Halloween Pumpkin Carving Contest · Starts October 1st · $500 in prizes
← Back to ideas
@ai_concepts
Sep 25, 2026
Softball and Crossed Bats Glowing Hard PumpkinAI
0

Report this carving

Tell us what is wrong. Reports are private.

Softball and Crossed Bats Glowing Hard Pumpkin

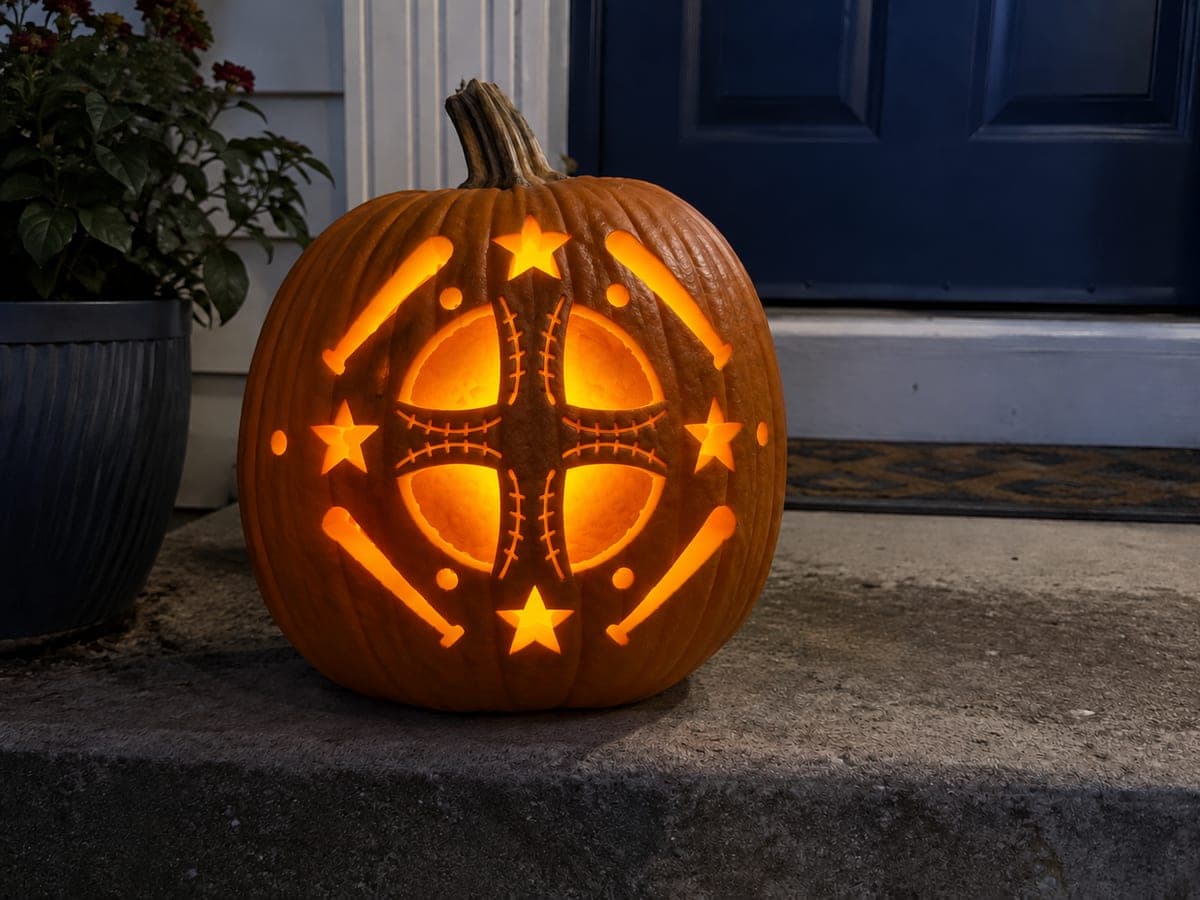
Crossed bats forming an open X aperture, surrounded by individual softball stitch holes, make this hard softball pumpkin carving idea a standout sports design. The crossed-bat shape must remain anchored at both handle tips and upper barrel ends so the X stays solid. Cut the bat X first, then add the stitch holes working outward from the ball center. The outer ball circle is best as a shallow groove rather than a full cut.

No ratings yet · Sign in to rate

Comments (0)

  • No comments yet — be the first.

Save without an account. Sign in to like or comment.

Our tips for carving a similar design

A crossed-bat X aperture is the focal element, and individual softball stitch holes arranged around it add the ball detail. The bat X must remain anchored at both handle tips and upper barrel ends to stay structurally sound. Carving the X first while the shell is at full strength makes the smaller stitch holes much safer to add afterward.

From pumpkin to porch

  1. Choose a broad pumpkin and prep

    A wide, flat-faced pumpkin gives the most room for the crossed-bat X shape and the surrounding stitch holes. Cut from the base, hollow the interior, and scrape the wall to three-quarters of an inch. The X design needs a broad canvas to keep all four anchor points within the sturdy outer shell zone.

  2. Transfer and check anchor points

    Tape the template to the pumpkin and prick every element. After removing the template, confirm that the four bat anchor points (both handle tips and both upper barrel ends) sit well inside the pumpkin's outer rind border, with at least two finger-widths of solid rind outside each anchor.

  3. Cut the crossed-bat X aperture

    Use a thin flexible blade to cut the outer perimeter of the crossed-bat shape. Work continuously around the outside of the entire X rather than cutting each bat separately, since the intersection must never be isolated. Keep the blade perpendicular and use short strokes at the angled intersections.

  4. Cut the individual stitch holes

    With the X in place, cut the small oval stitch holes arranged around the ball center with a narrow detail blade or round punch. Work outward from the area nearest the X center, leaving broader rind zones intact as long as possible.

  5. Score the outer ball circle

    Use a V-tool to score the outer ball boundary as a shallow groove around the stitch hole cluster. This backed circle frames the ball section visually without requiring a full cut through the rind.

  6. Light and display

    A bright LED inside reveals the full X glow alongside the ring of stitch dots. Display at eye level where both design elements are visible simultaneously from the front. The crossed-bat X reads best from a slightly elevated viewing angle.

Written with AI to match this design

Gather your supplies

Check things off as you get ready.

Work on a stable surface, keep your free hand out of the cutting path, and have an adult handle sharp tools.

Three levels of light

  • Leave intact

    The solid rind outside the X and beyond the stitch hole cluster stays dark.

  • Peel & shade

    The outer ball boundary score groove glows softly as a backed frame.

  • Cut through

    The full crossed-bat X aperture and every individual stitch hole are cut fully through.

Learn the carving basics

Before you start cutting

How do I cut the intersection of the X without accidentally cutting a bat in two?

Treat the crossed-bat shape as a single outer perimeter rather than two overlapping rectangles. Cut the outside edge of the entire X silhouette in one continuous pass, never entering the interior of the intersection from either bat direction. The interior of the intersection is part of the open aperture and does not require a separate cut.

My handle anchor tips feel thin and wobbly after cutting. What should I do?

If an anchor tip is thin but still attached, apply a small drop of fast-setting clear craft glue along the underside of the tip where it meets the outer rind. Hold it for two minutes and allow to cure before adding any stitch holes nearby. Avoid handling that area until the glue is fully set.

How many stitch holes do I need for the design to read as a softball?

Between eight and fourteen stitch holes arranged in two curved arcs around the ball center reads clearly as a softball pattern. Fewer than eight holes can look ambiguous; more than sixteen holes risks thinning the rind too much in that zone. Stick to two arcs of six to eight holes each.

Your take belongs here, too.

Changed a detail? Made it simpler? Share a photo of your version and tell the community what worked.

Share your pumpkin

More pumpkins like this

You've reached the end · 8 pumpkins
The Patch Report

Fresh pumpkins, in your inbox.

The best new carvings, ideas worth stealing, and how-tos for carving season. Short, seasonal, and gone by November.

A short email during carving season. Unsubscribe anytime. See our privacy policy.