Halloween Pumpkin Carving Contest · Starts October 1st · $500 in prizes
← Back to ideas
@ai_concepts
Sep 25, 2026
Intermediate Baseball Stitch Pumpkin Carving IdeaAI
0

Report this carving

Tell us what is wrong. Reports are private.

Intermediate Baseball Stitch Pumpkin Carving Idea

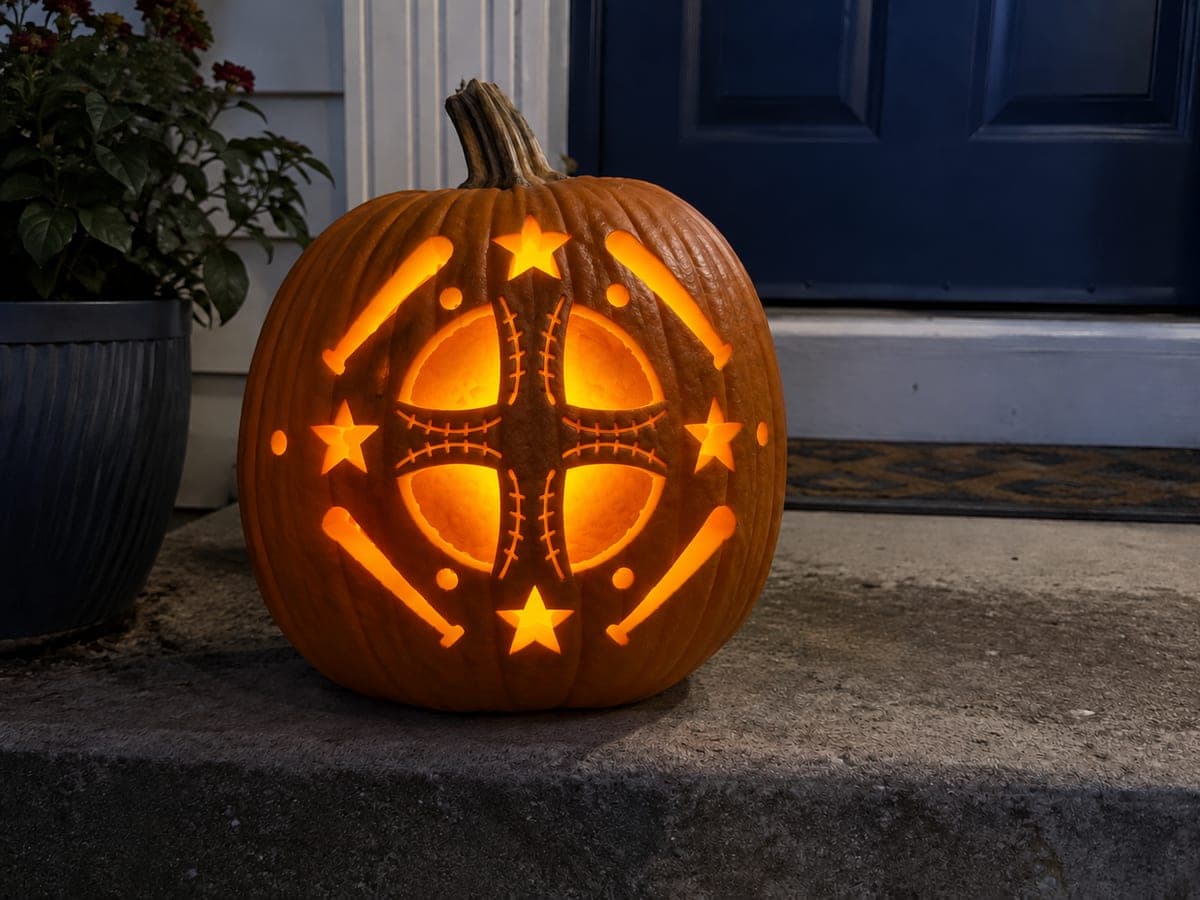
Curved stitch apertures and a bold baseball silhouette glow together in this intermediate baseball pumpkin carving idea. Transfer the stitching arcs carefully so both sides mirror each other, and leave a wide central rind strip between them. Cut the main ball aperture first for proportion, then add the curved stitch slots. A cool white LED inside makes the classic red-stitch pattern read clearly at night.

No ratings yet · Sign in to rate
Comments (0)

  • No comments yet — be the first.

Save without an account. Sign in to like or comment.

Our tips for carving a similar design

The baseball's recognizable curved red-stitch arcs become cut-through apertures separated from the main ball opening by a wide central rind band. Mirroring the arcs precisely is the main challenge, so careful stencil transfer before any cutting is essential. Cutting the main ball aperture first establishes the design's proportion before the smaller stitch slots are added.

From pumpkin to porch

  1. Hollow and thin

    Cut a bottom entry, scoop thoroughly, and scrape the interior wall to about three-quarter-inch thickness. The stitch arc slots are relatively small, so even thinning ensures the blade does not bind in those narrow passages.

  2. Transfer stitch arcs carefully

    Tape the stencil firmly so neither stitch arc can shift relative to the central rind band. Pin-transfer the ball circle, the central rind dividing band, and both stitch arc outlines in one session. Remove the stencil and check that both arcs are equal in width and symmetrically placed.

  3. Cut the main ball aperture

    Saw the outer circular ball shape with a medium blade, leaving the central rind band and stitch arc areas fully intact. Remove the ring piece outside the ball and confirm the surrounding shell is at least one inch wide before proceeding.

  4. Cut the stitch arc slots

    Work each curved arc from one end to the other in a smooth, flowing saw stroke. Keep the blade on the cut-through side of the pin dots at all times; veering toward the central band even slightly narrows the bridge that holds both arc sections apart.

  5. Refine and check symmetry

    Once both arcs are cut, view the design from a foot away in dim light. The two arcs should appear as a mirrored pair. If one is noticeably wider, carefully remove a thin sliver from its narrower side to balance the glow.

  6. Light and display

    Insert a cool white LED for a clean, bright glow that lets the classic stitch pattern read clearly. The central rind band between the two arcs creates the ball's characteristic look when lit from behind. Coat all cut edges with petroleum jelly.

Written with AI to match this design

Gather your supplies

Check things off as you get ready.

Work on a stable surface, keep your free hand out of the cutting path, and have an adult handle sharp tools.

Three levels of light

  • Leave intact

    Central rind dividing band and outer shell border stay fully dark.

  • Peel & shade

    None. This design relies entirely on cut-throughs.

  • Cut through

    The outer ball circle aperture and both curved stitch arc slots are cut completely through.

Learn the carving basics

Before you start cutting

How wide should the central rind band between the two stitch arcs be?

At least three-quarters of an inch, ideally one inch. This band is the structural element that keeps both arc sections connected to the shell. A thinner band can crack under the pressure of removing the arc cutout pieces.

My curved arc cuts keep drifting straight. How do I follow a curve with a saw?

Follow pin marks rather than trying to saw freehand. Keep the saw moving slowly and let the blade pivot naturally as you shift hand position. On tight curves, back the blade out slightly every inch or so and reenter at the next pin mark to correct any drift.

Should I use a warm or cool LED for a baseball design?

A cool white LED makes the stitch pattern read most crisply because red stitching is typically displayed in bright stadium lighting. A warm amber works too and feels more autumnal, but the cool white gives a sharper visual separation between the arc slots and the rind band.

Your take belongs here, too.

Changed a detail? Made it simpler? Share a photo of your version and tell the community what worked.

Share your pumpkin

More pumpkins like this

You've reached the end · 8 pumpkins
The Patch Report

Fresh pumpkins, in your inbox.

The best new carvings, ideas worth stealing, and how-tos for carving season. Short, seasonal, and gone by November.

A short email during carving season. Unsubscribe anytime. See our privacy policy.