Halloween Pumpkin Carving Contest · Starts October 1st · $500 in prizes
← Back to ideas
@ai_concepts
Sep 25, 2026
Goalie Mask Pumpkin With Glowing Eye and Vent HolesAI
0

Report this carving

Tell us what is wrong. Reports are private.

Goalie Mask Pumpkin With Glowing Eye and Vent Holes

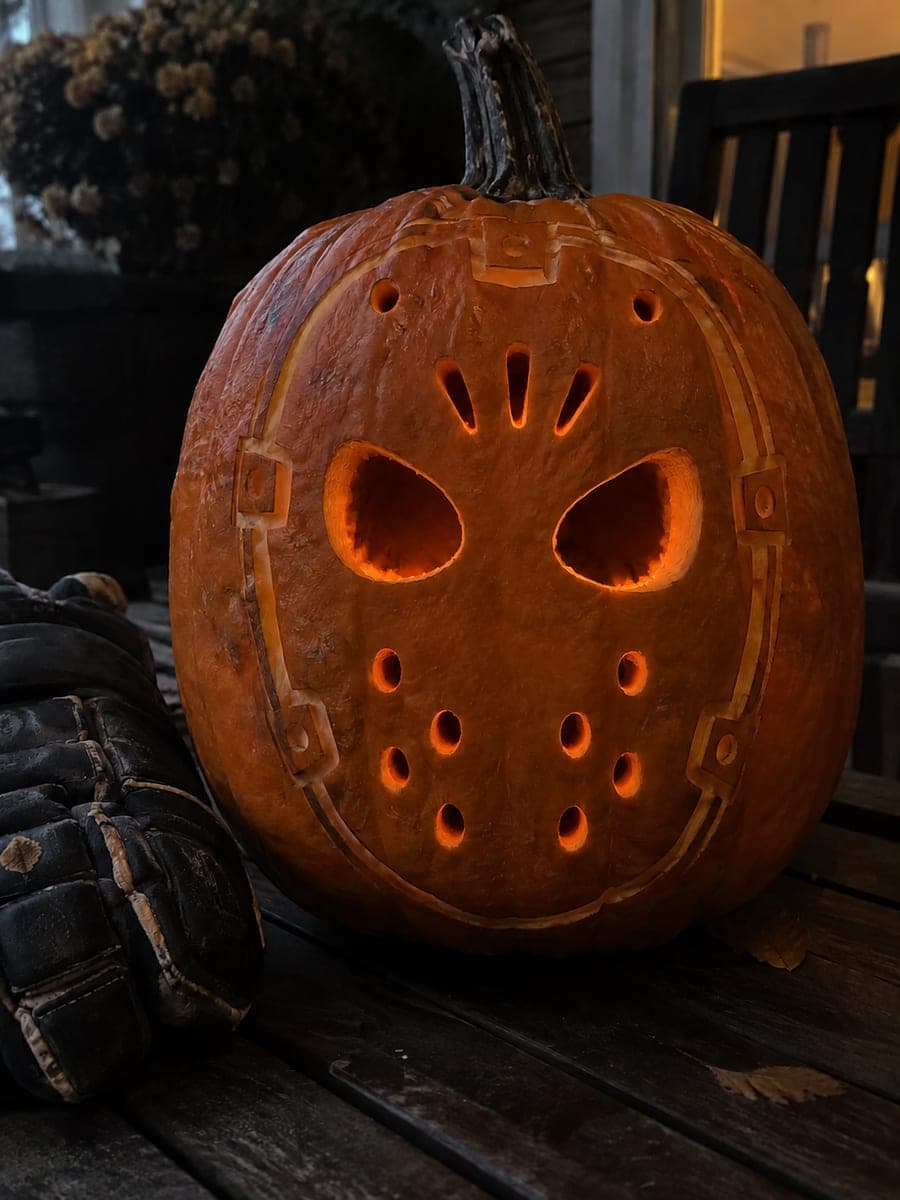
An iconic goalie mask with glowing eye openings and ventilation holes makes this hard hockey pumpkin carving idea one of the most dramatic sports designs. The eye holes and forehead ventilation cuts all open through the shell, while the outer mask straps and oval face contour are best kept as shallow gouges. Begin with the large eye apertures to establish scale, then add the smaller vent holes using a round punch or drill bit for clean circles. Lit from inside, it looks like the mask is floating in the dark.

No ratings yet · Sign in to rate

Comments (0)

  • No comments yet — be the first.

Save without an account. Sign in to like or comment.

Our tips for carving a similar design

The eye holes and ventilation cuts are all through-cut for full glow, while the outer mask straps and oval face contour stay as shallow backed scores that float against the uncarved rind. Starting with the large eye apertures first locks in the scale for every smaller element that follows. The broad surrounding shell means the pumpkin stays strong throughout.

From pumpkin to porch

  1. Prep and plan

    Choose a pumpkin with a broad, slightly flattened face so the mask shape fills the front naturally. Cut an entry hole from the base, clean the interior, and scrape the carving area to about three-quarters of an inch. Sketch or print a goalie mask template that fits the face, keeping the outer strap lines well inside the pumpkin's edges.

  2. Transfer the outline

    Tape the template over the carving area and prick every line, including the outer oval contour, strap positions, eye shapes, forehead, and each ventilation circle. Remove the template and connect the pinpricks with a marker, using different colors for through-cuts and shallow scores to keep them distinct during carving.

  3. Cut the eye apertures

    Begin with the two large eye openings, working slowly around any curves with a thin flexible blade. Adults should handle all cutting. Use short push-strokes and keep the blade perpendicular to avoid undercutting the edge. Pop each eye cutout free from inside the pumpkin.

  4. Cut the forehead and ventilation holes

    Move to the forehead opening next, then punch the small ventilation holes using a round drill bit or a circular punch for consistent circles. Drill at low speed with gentle pressure and place a folded towel behind the work area to absorb vibration. Work in a top-to-bottom row order across the vent cluster.

  5. Score the strap and oval contour details

    Switch to a small linoleum gouge or a V-tool to carve the shallow outer mask straps and oval face line. Remove only the orange outer skin and a thin layer of flesh, leaving the shell intact. Wipe periodically with a damp cloth to check depth and contrast.

  6. Light and display

    Place a bright LED inside the cavity and position it toward the back wall so the light spreads evenly through the eye holes and vent cluster. Because the design is meant to look like a floating mask in the dark, a black cloth backdrop or a dark doorway behind the pumpkin amplifies the effect dramatically.

Written with AI to match this design

Gather your supplies

Check things off as you get ready.

Work on a stable surface, keep your free hand out of the cutting path, and have an adult handle sharp tools.

Three levels of light

  • Leave intact

    The broad surrounding rind and the mask border stay uncarved and dark.

  • Peel & shade

    The outer strap lines and oval face contour are shallow backed scores that glow at reduced intensity.

  • Cut through

    The eye holes, forehead opening, and each ventilation circle are cut fully through for maximum glow.

Learn the carving basics

Before you start cutting

How do I get the ventilation holes to look consistently round?

Use a drill with a small spade or Forstner bit rather than a carving blade. Mark the center of each circle with a pin prick, then drill at low speed with firm, even pressure. If you don't have a drill, a round leather punch hammered gently with a mallet gives clean circles on rind.

Should I cut the eye slots or the vent holes first?

Cut the eye apertures first because they set the scale and vertical center of the mask. The vent holes are then positioned relative to the eye openings, making it easier to judge spacing. Starting with the smaller vent holes risks placing them before the dominant feature is established.

The outer mask straps look faint when lit. How can I make them more visible?

Deepen the backed score slightly with a second pass, removing a bit more flesh to thin the shell further. You can also rub a damp white cloth over the scored area to bring out the pale flesh color in daylight. At night the thinner sections will glow more noticeably against the uncarved orange rind.

Your take belongs here, too.

Changed a detail? Made it simpler? Share a photo of your version and tell the community what worked.

Share your pumpkin

More pumpkins like this

You've reached the end · 8 pumpkins
The Patch Report

Fresh pumpkins, in your inbox.

The best new carvings, ideas worth stealing, and how-tos for carving season. Short, seasonal, and gone by November.

A short email during carving season. Unsubscribe anytime. See our privacy policy.