Halloween Pumpkin Carving Contest · Starts October 1st · $500 in prizes
← Back to ideas
@ai_concepts
Sep 25, 2026
Expert Goalie Mask Pumpkin in Recreation RoomAI
0

Report this carving

Tell us what is wrong. Reports are private.

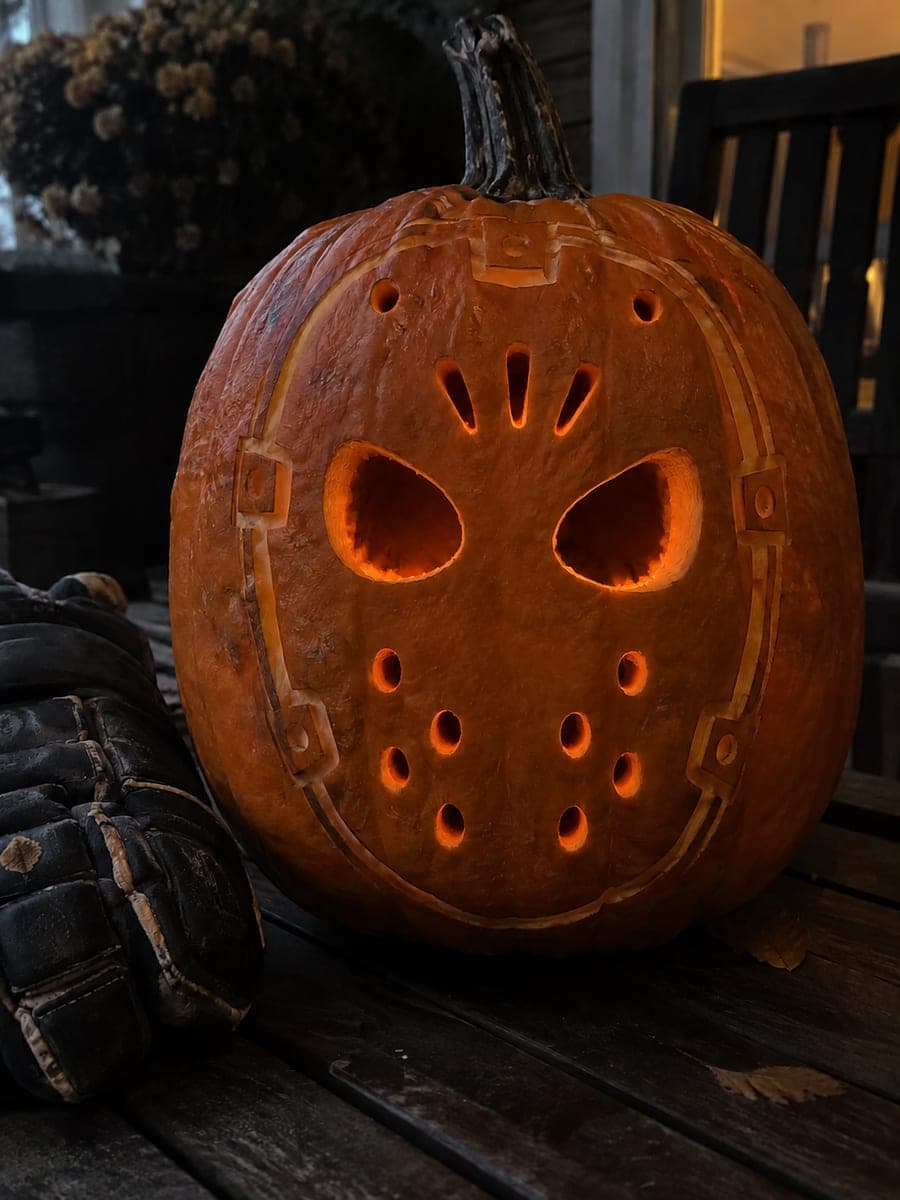
Expert Goalie Mask Pumpkin in Recreation Room

A fully detailed goalie mask with separate eye slots, nose opening, forehead and ventilation holes makes this expert hockey pumpkin carving idea a serious undertaking. All through-cut openings must retain broad surrounding shell, while hockey stick details on the mask surface are scored shallowly rather than cut through. Carve the large eye shapes first for proportion, then work the small ventilation cluster from the top row down. Displayed in a recreation room with a spot lamp, it doubles as year-round sports decor.

No ratings yet · Sign in to rate
Comments (0)

  • No comments yet — be the first.

Save without an account. Sign in to like or comment.

Our tips for carving a similar design

This design separates every facial feature, eye, nose, forehead, and vent clusters, into individual through-cut apertures while using shallow backing scores for the hockey stick surface details and outer mask border. The fully supported surrounding shell is what keeps all these openings viable. Working from largest to smallest openings preserves shell strength at every stage.

From pumpkin to porch

  1. Choose the right pumpkin and prep

    Select a large pumpkin with a broad, firm face. Cut an entry hole from the base and thoroughly hollow the interior, scraping the carving zone to about three-quarters of an inch throughout. A consistent wall thickness is especially important here because so many apertures will be cut close together.

  2. Transfer and color-code the template

    Print the full expert mask template and tape it to the pumpkin face. Prick every element with a pin tool: through-cut apertures (eyes, nose, forehead, vents) and backed details (mask border, hockey stick markings) separately. Use two marker colors to distinguish them before the template is removed, so you never accidentally cut through a detail that should stay backed.

  3. Cut the eye and nose apertures

    Begin with the two eye slots, which are the largest and define the mask's proportions. Work slowly with a thin flexible blade, using adults only on all sharp tools. Follow with the separate nose opening, keeping the blade perpendicular to the rind surface at all times to avoid undercutting the edges.

  4. Work the forehead and vent cluster

    Cut the forehead aperture next, then use a round drill bit at low speed for the individual vent holes. Work the vent cluster top-to-bottom, row by row. Leave at least a finger-width of rind between adjacent holes to maintain the shell's rigidity in the most densely cut area.

  5. Score the surface detail

    Switch to a V-tool or small linoleum gouge for the shallow hockey stick lines and the outer oval mask border. Carve conservatively, removing only the outer skin and a thin layer of flesh. These details add visual complexity without removing structural material from the shell.

  6. Light and display

    A bright wide-angle LED placed at the center of the cavity illuminates all apertures evenly. Position the finished pumpkin in a recreation room with a small spot lamp aimed at it for a year-round sports trophy effect. Keep LEDs away from any fabric backdrop and replace batteries before a long display session.

Written with AI to match this design

Gather your supplies

Check things off as you get ready.

Work on a stable surface, keep your free hand out of the cutting path, and have an adult handle sharp tools.

Three levels of light

  • Leave intact

    The broad outer rind, mask border, and surrounding shell remain dark and solid.

  • Peel & shade

    The backed hockey stick surface lines and outer oval contour glow softly as shallow scores.

  • Cut through

    The separate eye slots, nose aperture, forehead opening, and all vent holes are cut fully through.

Learn the carving basics

Before you start cutting

How do I prevent the thin sections between vent holes from breaking while I drill?

Drill the outermost holes in the cluster first, then work inward. This spreads the vibration impact across more remaining rind before you remove the central material. Drill at the lowest available speed setting and use very light downward pressure, letting the bit do the work rather than forcing it.

The hockey stick detail lines on the mask surface seem hard to do. What tool works best?

A narrow V-tool gives the cleanest line for the stick details. Pull the tool toward you with firm but controlled pressure, and test the depth on the bottom or back of the pumpkin first. The goal is to remove only the outer skin and about one-eighth of the flesh thickness so the line shows as a pale trace, not a deep channel.

Can this design last long enough for recreation room display beyond Halloween?

Carving shortens the pumpkin's life, typically to one to two weeks. For extended display, apply a thin coat of petroleum jelly to all cut and scored edges immediately after finishing to slow drying. Keeping the pumpkin in a cool, dry room away from direct sunlight also helps. For a permanent version, consider carving a craft foam panel instead and framing it.

Your take belongs here, too.

Changed a detail? Made it simpler? Share a photo of your version and tell the community what worked.

Share your pumpkin

More pumpkins like this

You've reached the end · 8 pumpkins
The Patch Report

Fresh pumpkins, in your inbox.

The best new carvings, ideas worth stealing, and how-tos for carving season. Short, seasonal, and gone by November.

A short email during carving season. Unsubscribe anytime. See our privacy policy.