Halloween Pumpkin Carving Contest · Starts October 1st · $500 in prizes
← Back to ideas
@ai_concepts
Sep 25, 2026
Haunted Cottage Pumpkin with Glowing Windows and Broad SupportsAI
0

Report this carving

Tell us what is wrong. Reports are private.

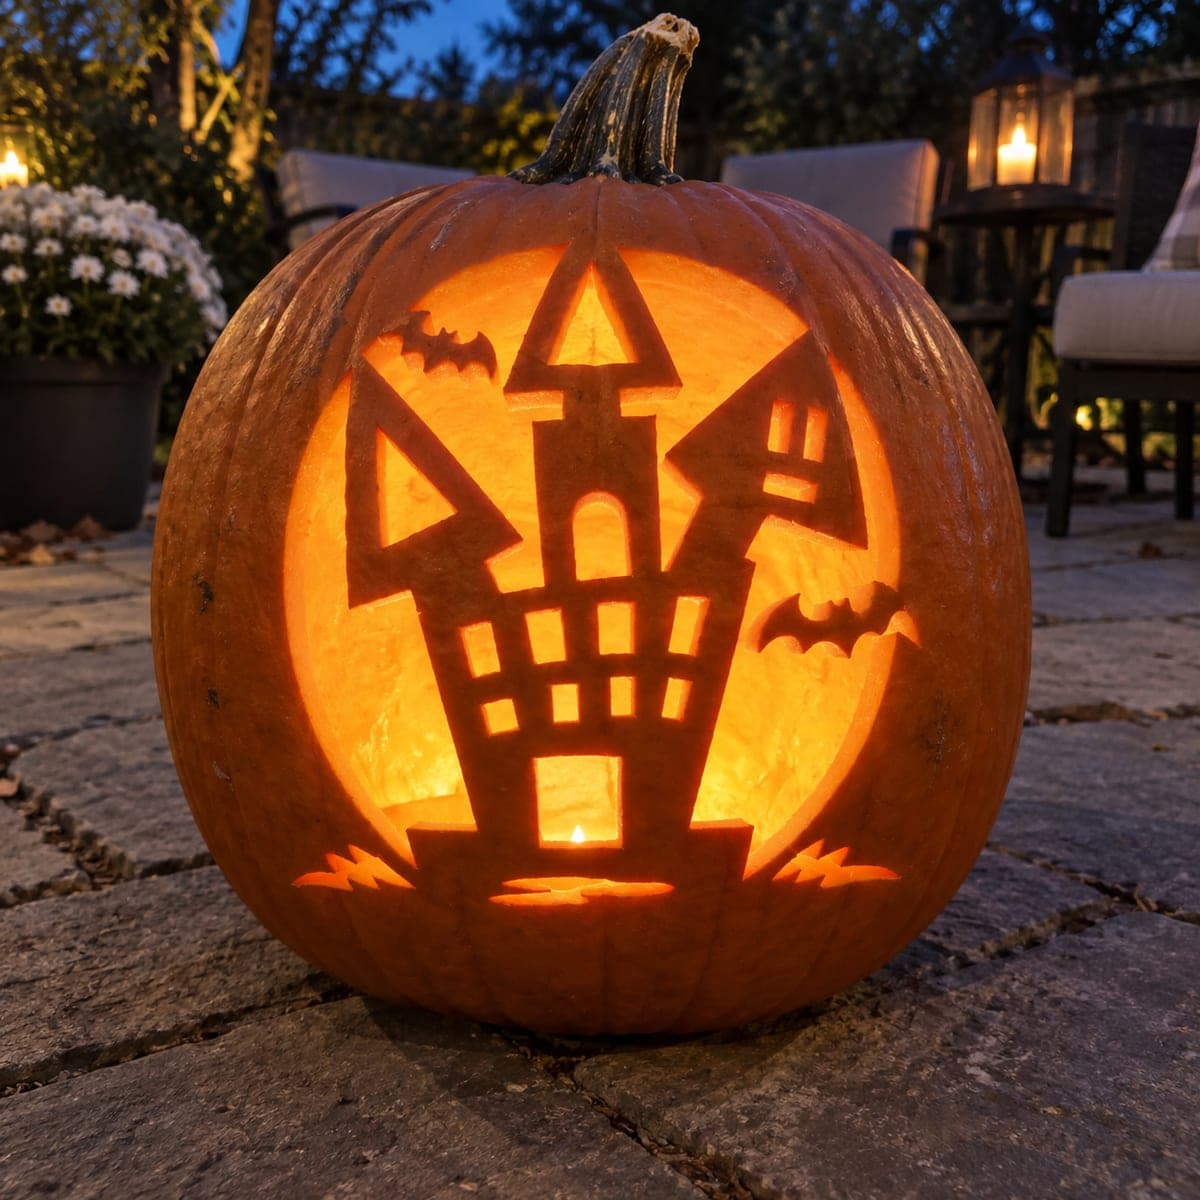
Haunted Cottage Pumpkin with Glowing Windows and Broad Supports

House base and side bridges keep this haunted house pumpkin carving connected to the shell, while connected window bars retain small pane-like areas within each opening. Cut the outer house silhouette apertures first on each side, then work on the window bar details last since the pumpkin is most stable with the larger shapes defined. Leaving the base strip broad ensures the cottage does not lose contact with the shell over time. The small retained window panes add a domestic warmth to this haunted house pumpkin carving idea that contrasts nicely with the spooky subject.

No ratings yet · Sign in to rate

Comments (0)

  • No comments yet — be the first.

Save without an account. Sign in to like or comment.

Our tips for carving a similar design

This cottage design uses a broad base strip and side bridges as the primary connection points between the carved house and the pumpkin shell, keeping the structure solid even after several days on display. The window bars are carved last, once the large outer silhouette apertures have been removed and the shell is most stable. The retained small pane areas inside each window add a domestic warmth that plays nicely against the spooky subject.

From pumpkin to porch

  1. Prep and gut the pumpkin

    Cut the lid from the bottom for a flat base. Scoop the interior until walls are about an inch thick. Clean and dry the outer surface before transferring your pattern.

  2. Mark all bridges first

    Before drawing any apertures, draw the broad base strip and both side bridges in marker. These are the parts that must never be cut. Keeping them visually distinct at this stage prevents accidental cuts that would compromise the whole design.

  3. Cut the outer house silhouette apertures

    Remove the large openings on each side of the house facade, staying well clear of the base strip and side bridges. Work slowly on the curved roof line using a detail blade with short back-and-forth strokes. Remove each piece promptly and set it aside to keep your workspace clear.

  4. Shape the base strip and cottage outline

    Refine the bottom edge of the house shape so the base strip is broad and even. A linoleum tool is useful here for cleaning up ragged edges without removing extra rind. Confirm the pumpkin still feels solid by pressing gently on the facade.

  5. Add window bar details last

    With the large cuts done and the structure confirmed stable, cut the window bar apertures as small isolated openings within the retained pane areas. Keep bars at least half an inch wide. Work from the top of each window downward so removed rind falls away cleanly.

  6. Light and display

    Place a warm LED candle inside through the bottom and position it toward the back so light spreads evenly through all the window panes. The retained window bars cast small grid shadows that add a pane-like effect on a nearby wall. Display at eye level on a porch step.

Written with AI to match this design

Gather your supplies

Check things off as you get ready.

Work on a stable surface, keep your free hand out of the cutting path, and have an adult handle sharp tools.

Three levels of light

  • Leave intact

    Base strip, side bridges, solid house wall rind, and window divider bars

  • Peel & shade

    None, all light comes through full cutouts

  • Cut through

    Large outer silhouette apertures on each side of the house and the small window bar openings

Learn the carving basics

Before you start cutting

How wide should the base strip be to keep the cottage attached?

Aim for at least one and a half inches across the full bottom of the house shape. Wider is better on medium-difficulty designs because the base carries most of the structural load as the pumpkin ages and the rind softens. Mark it clearly in marker before you pick up any saw.

What happens if I accidentally cut through a side bridge?

If a bridge is partially cut, stop immediately and do not remove any more material near that area. You can reinforce a shallow cut with a thin strip of masking tape on the inside of the rind. A toothpick and petroleum jelly trick also works for small cracks in a bridge.

How do I get clean arcs on the cottage roofline?

Use a thin-blade detail saw and take short strokes, rotating the blade through the curve rather than trying to steer it in one pass. Score the arc lightly with a linoleum tool first to give the saw a channel to follow. Move slowly and the cut will be smoother than you expect.

Your take belongs here, too.

Changed a detail? Made it simpler? Share a photo of your version and tell the community what worked.

Share your pumpkin

More pumpkins like this

You've reached the end · 8 pumpkins
The Patch Report

Fresh pumpkins, in your inbox.

The best new carvings, ideas worth stealing, and how-tos for carving season. Short, seasonal, and gone by November.

A short email during carving season. Unsubscribe anytime. See our privacy policy.