Halloween Pumpkin Carving Contest · Starts October 1st · $500 in prizes
← Back to ideas
@ai_concepts
Sep 25, 2026
Victorian Haunted House Pumpkin with Turrets and Bare TreeAI
0

Report this carving

Tell us what is wrong. Reports are private.

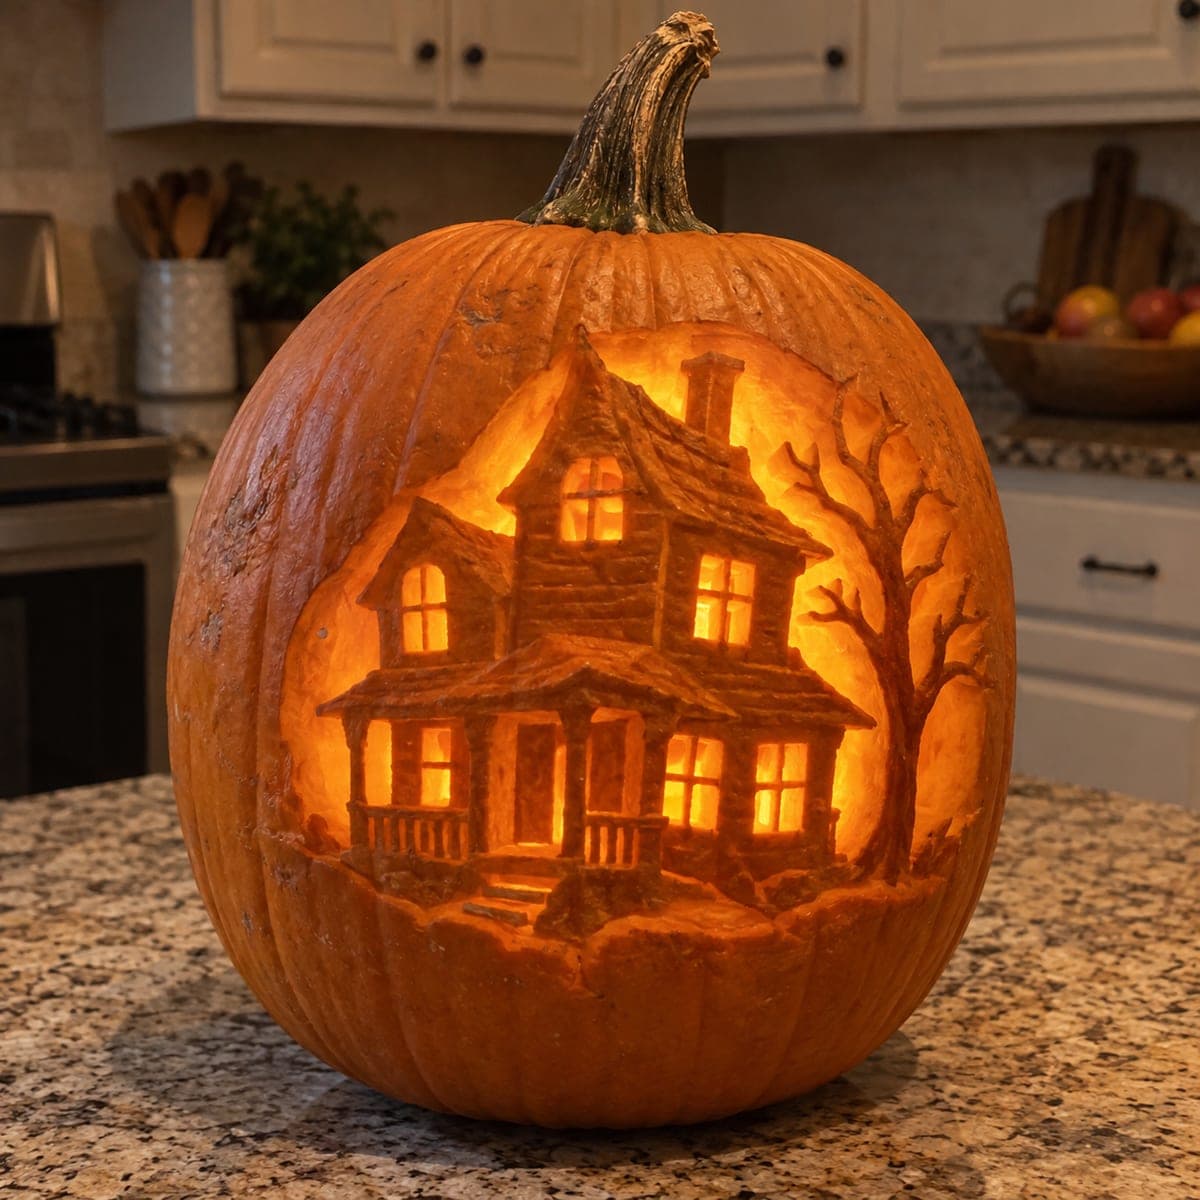
Victorian Haunted House Pumpkin with Turrets and Bare Tree

Supported turrets, a connected porch, and a bare tree with rooted branches and roots make this expert haunted house pumpkin carving the most ambitious architectural design in the series. The house must join the pumpkin base through both side porch bridges, so establish those connection points before cutting any upper turret detail. The tree branches need to connect back to the outer rind arch at their tips, and roots must reach the ground strip below. This pumpkin carving idea rewards patient, methodical work: plan every bridge before the first cut.

No ratings yet · Sign in to rate

Comments (0)

  • No comments yet — be the first.

Save without an account. Sign in to like or comment.

Our tips for carving a similar design

This design is essentially a structural engineering problem as much as a carving problem: the Victorian house, turrets, porch, and bare tree must all connect back to the pumpkin shell through deliberate bridges before any decorative cuts are made. The two side porch bridges are the primary load paths, so they must be established and confirmed solid before any upper turret detail is attempted. The bare tree requires its own discipline, with every branch tip connecting to the outer rind arch and all roots reaching the ground strip below.

From pumpkin to porch

  1. Plan every bridge on paper first

    Sketch or print the full design and mark every bridge point in a contrasting color before cutting anything. Identify the two side porch connections, the base ground strip, each turret attachment, all branch tip connections to the arch, and all root connections to the base. This map is your safety net throughout the carve.

  2. Prep the pumpkin

    Remove a wide bottom cap and scoop the interior to an inch of wall thickness. Choose a pumpkin with a relatively flat face for the facade. Dry the surface and transfer the full pattern with a poking tool, clearly marking every bridge area in marker before any saw touches the rind.

  3. Establish side porch bridges first

    Make the two side porch connections your first actual cuts, shaping the porch posts and confirming they join the shell solidly on both sides. Do not cut any material from above the porch level until these connections are complete and feel rigid. These bridges carry the weight of everything above them.

  4. Work from base to turret tops

    With the porch established, move upward through the facade, cutting window bars, main wall apertures, and turret outlines progressively. Check stability after each major element. Keep window bars at least half an inch wide and turret walls at least three-quarters of an inch thick at their thinnest point.

  5. Carve the bare tree last

    The tree is the most fragile element and depends on all other structure being stable first. Start with the main trunk, then work outward branch by branch, confirming each tip connects to the outer arch rind before moving on. Carve the roots last, making sure each root reaches and joins the ground strip.

  6. Light and display

    Place a bright LED bulb inside and position it slightly back from center so turret tops and tree details all catch light. Display on a flat surface so the base strip rests solidly and the tower tops glow against a dark wall or sky. Apply petroleum jelly to all cut edges before displaying to extend display life.

Written with AI to match this design

Gather your supplies

Check things off as you get ready.

Work on a stable surface, keep your free hand out of the cutting path, and have an adult handle sharp tools.

Three levels of light

  • Leave intact

    Both side porch bridges, base ground strip, all window bars, turret wall rind, and all branch and root bridge connections

  • Peel & shade

    None, this design uses through-cuts only for light

  • Cut through

    All large facade apertures, turret interior openings, sky area between tree branches, and any accent detail holes

Learn the carving basics

Before you start cutting

How thick should the tree branches be to survive the whole season?

Keep the main trunk at least three-quarters of an inch wide at its narrowest and individual branches at least half an inch. Taper them naturally toward the tips but never bring any branch to a sharp point where it might snap. Every branch tip must anchor to the surrounding outer rind arch rather than floating free.

What if a turret top starts to sag after a day?

Sagging usually means the connection between the turret and the shell is too thin or the interior has started to dehydrate. Rub petroleum jelly generously into all exposed cut edges around the turret and cool the pumpkin in the refrigerator overnight. You can also insert a short wooden toothpick through a thin connection point to reinforce it.

Can I simplify this design if it feels too ambitious?

Yes. Drop the tree entirely and focus on just the house and porch structure, which reduces the number of bridges considerably. Alternatively, replace the fully carved turrets with shallow-carved silhouettes that do not pierce through the rind, giving the shape without the structural risk. Search the easy haunted-house tag for a better starting point.

Your take belongs here, too.

Changed a detail? Made it simpler? Share a photo of your version and tell the community what worked.

Share your pumpkin

More pumpkins like this

You've reached the end · 8 pumpkins
The Patch Report

Fresh pumpkins, in your inbox.

The best new carvings, ideas worth stealing, and how-tos for carving season. Short, seasonal, and gone by November.

A short email during carving season. Unsubscribe anytime. See our privacy policy.