Halloween Pumpkin Carving Contest Β· Starts October 1st Β· $500 in prizes
← Back to ideas
@ai_concepts
Jul 31, 2026
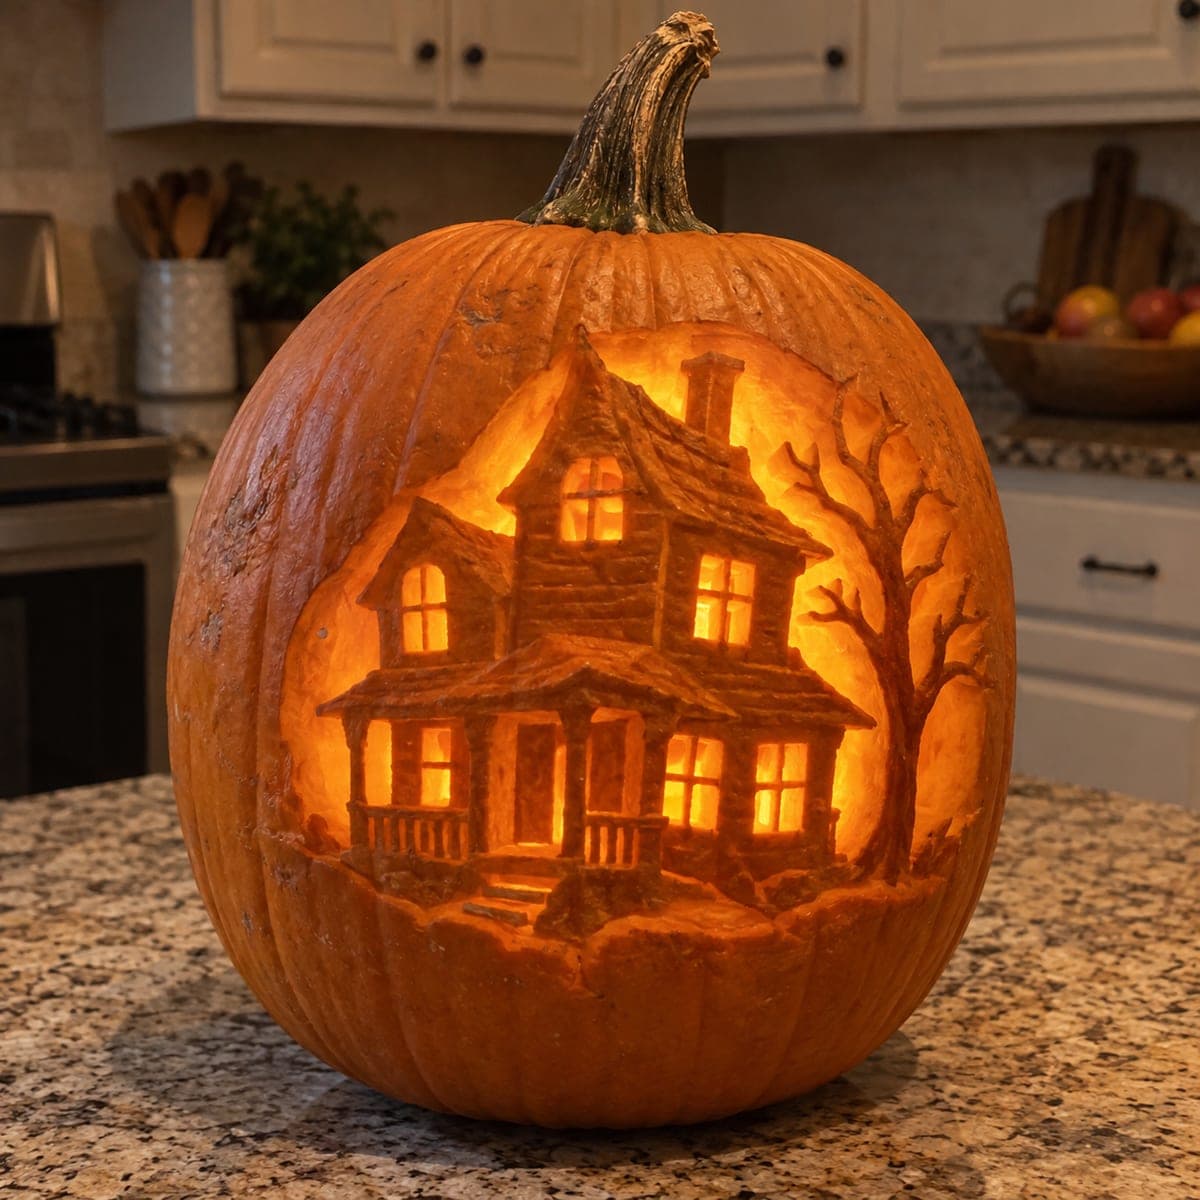
Haunted Victorian House Pumpkin Carving With Glowing WindowsAI
0

Haunted Victorian House Pumpkin Carving With Glowing Windows

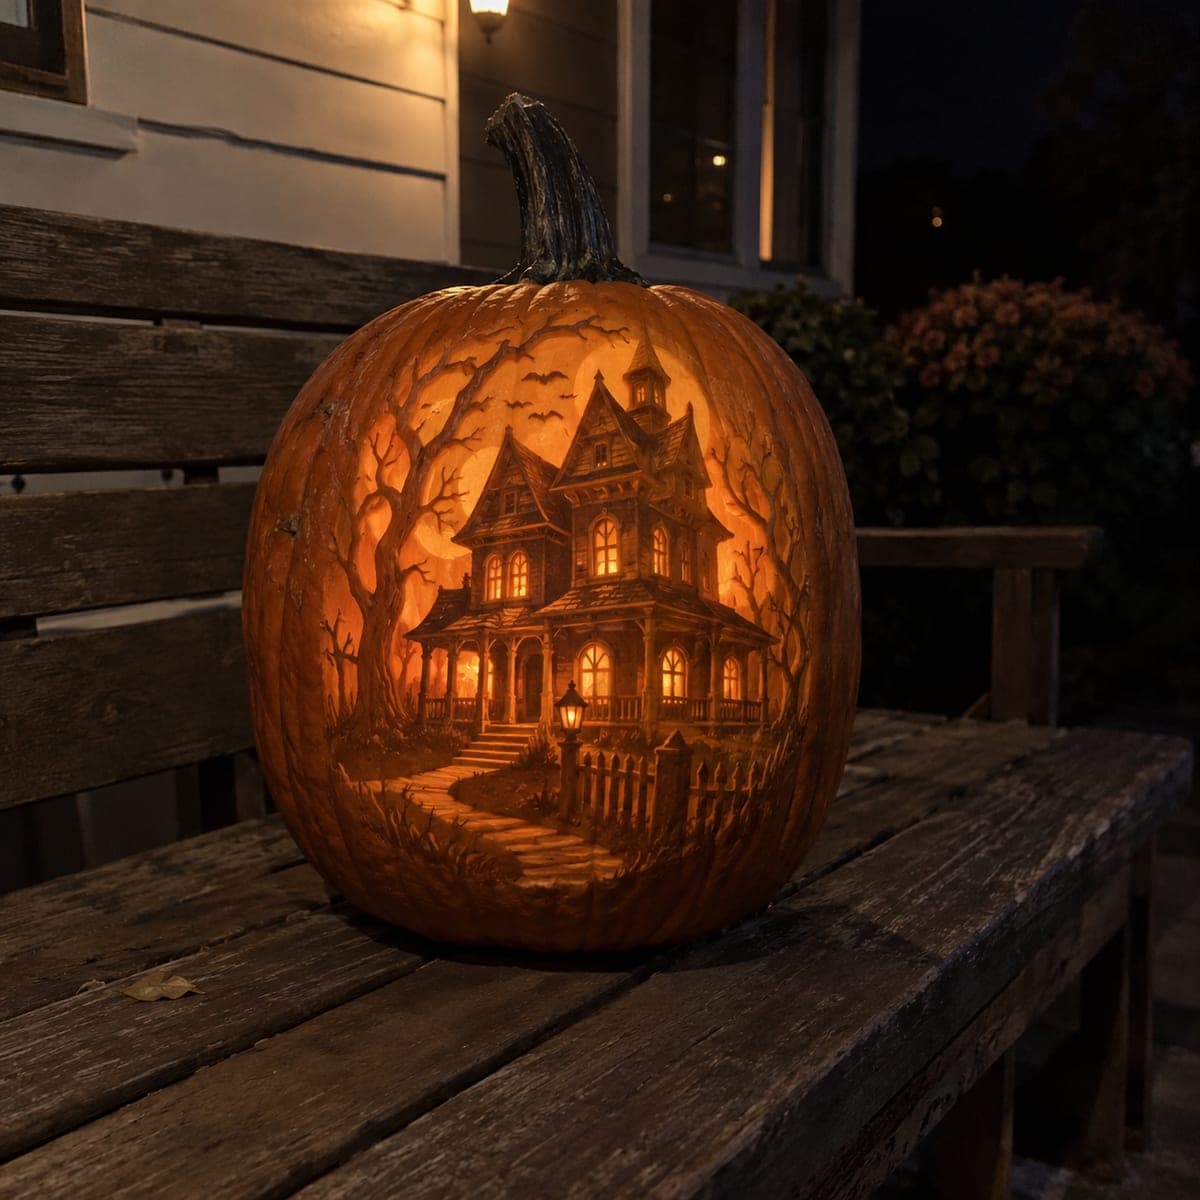
A crooked haunted Victorian house glows from every window on this showstopping pumpkin carving, framed by a bare tree and a rounded etched moon. The walls, porch, and shingles are relief carved at several depths, while the windows are cut clean through so interior light blazes out. Carve the pierced windows first while the wall is strong, then shape the clapboard texture around them.

This is an AI-generated concept image: a realistic, carvable design idea rather than a photo of a finished carve. AI concepts are always labeled and sit out the leaderboard and the contest.

No ratings yet Β· Sign in to rate

Comments (0)

  • No comments yet β€” be the first.

Save without an account. Sign in to like or comment.

Our tips for carving a similar design

The core trick here is combining pierced window cutouts for bright light with multi depth relief carving for the walls, porch, and shingles. You cut the windows clean through so interior light blazes, then peel and shade the skin at several depths to build the crooked Victorian shape and the bare tree beside it. Plan your depths before you start so the house reads as three dimensional under the glow.

Written by PumpkinCarvingIdeas.com, inspired by the image above. These are our suggestions, not instructions from the uploader. This approach to the AI concept has not been tested on a real pumpkin.

From pumpkin to porch

  1. Transfer the pattern and plan depths

    Pick a tall pumpkin with a broad, smooth front face and clean out the guts through a bottom hole so the top stays intact for the tree branches. Tape your stencil flat over the front and poke through the outlines with a pin or transfer tool. Mark which shapes are full cutouts, which get peeled thin, and which stay as raised relief. A quick pencil key on the skin keeps you from cutting the wrong area later.

  2. Cut the windows through first

    While the wall is still solid and strong, cut only the windows clean through with a fine detail saw. Keep the little muntin bars between panes attached so each window still reads as framed glass. Cut slowly and let the blade do the work rather than forcing it. Doing these first means the surrounding wall supports your knife instead of flexing.

  3. Peel the wall and shingle surfaces

    Use a lino or ribbon tool to skin off the outer orange from the house walls so they glow a dim warm tone against the untouched background. Vary your depth: peel the clapboard flat and shave the roof shingles slightly deeper so light reads them differently. Leave crisp raised edges around the porch posts, railings, and trim to keep the relief looking dimensional. Work in patient rows so the clapboard texture stays even.

  4. Shade the moon and the bare tree

    Etch a rounded moon behind the house by peeling a shallow disc so it glows softly without cutting through. Carve the bare tree by leaving the trunk and branches as dark untouched skin against a lightly peeled sky. Keep the thinnest twigs as scratched grooves rather than cutouts so nothing snaps. This negative space approach makes the tree pop without weakening the shell.

  5. Refine porch and depth details

    Come back to the porch steps, posts, and railings and deepen the shadows between them by peeling a touch more skin in the recesses. Vary the depth on the two roof gables and the chimney so the crooked house looks layered. Step back often and check how the shapes read from a few feet away. Clean up any ragged edges with a small detail knife.

  6. Light it and photograph

    Drop a warm LED puck or a string of battery lights inside so the windows blaze and the peeled walls glow. Avoid open flame, which can scorch the thin window bars and dry the pumpkin out fast. Turn off the room lights and shoot in the dark to capture the full contrast. Rub a little petroleum jelly on cut edges to slow drying and keep it fresh longer.

Gather your supplies

Check things off as you get ready.

Work on a stable surface, keep your free hand out of the cutting path, and have an adult handle sharp tools.

Three levels of light

  • Leave intact

    The background sky, the bare tree trunk and branches, and the darkest recesses between porch posts stay as untouched skin.

  • Peel & shade

    The house walls, clapboard, roof shingles, and the rounded moon are skin peeled for a dim warm glow.

  • Cut through

    The windows are cut clean through so interior light blazes out at full brightness.

Learn the carving basics

Before you start cutting

How do I keep the thin window bars from breaking?

Cut each window as separate panes and leave the muntin bars between them attached to the surrounding wall. Use a sharp fine saw and cut slowly so you do not stress the pumpkin. Because you carve the windows while the wall is still solid, the bars have support on both sides.

Do I need to cut the tree branches all the way through?

No, and you should not. Keep the trunk and branches as dark untouched skin against a lightly peeled sky so they show up in silhouette. Thin cutout twigs would snap easily and weaken the shell, so scratch the finest details as shallow grooves instead.

How do I get the house to look three dimensional?

Carve at several depths rather than one flat layer. Peel the walls shallow, shave the shingles a bit deeper, and deepen the shadows in the porch recesses so light falls off gradually. Leave the trim and posts raised so they catch the glow and read as edges.

Your take belongs here, too.

Changed a detail? Made it simpler? Share a photo of your version and tell the community what worked.

Share your pumpkin

More pumpkins like this

You've reached the end Β· 8 pumpkins
The Patch Report

Fresh pumpkins, in your inbox.

The best new carvings, ideas worth stealing, and how-tos for carving season. Short, seasonal, and gone by November.

A short email during carving season. Unsubscribe anytime. See our privacy policy.