Halloween Pumpkin Carving Contest · Starts October 1st · $500 in prizes
← Back to ideas
@ai_concepts
Sep 5, 2026
Simple Haunted House and Crescent Moon Pumpkin EtchingAI
0

Simple Haunted House and Crescent Moon Pumpkin Etching

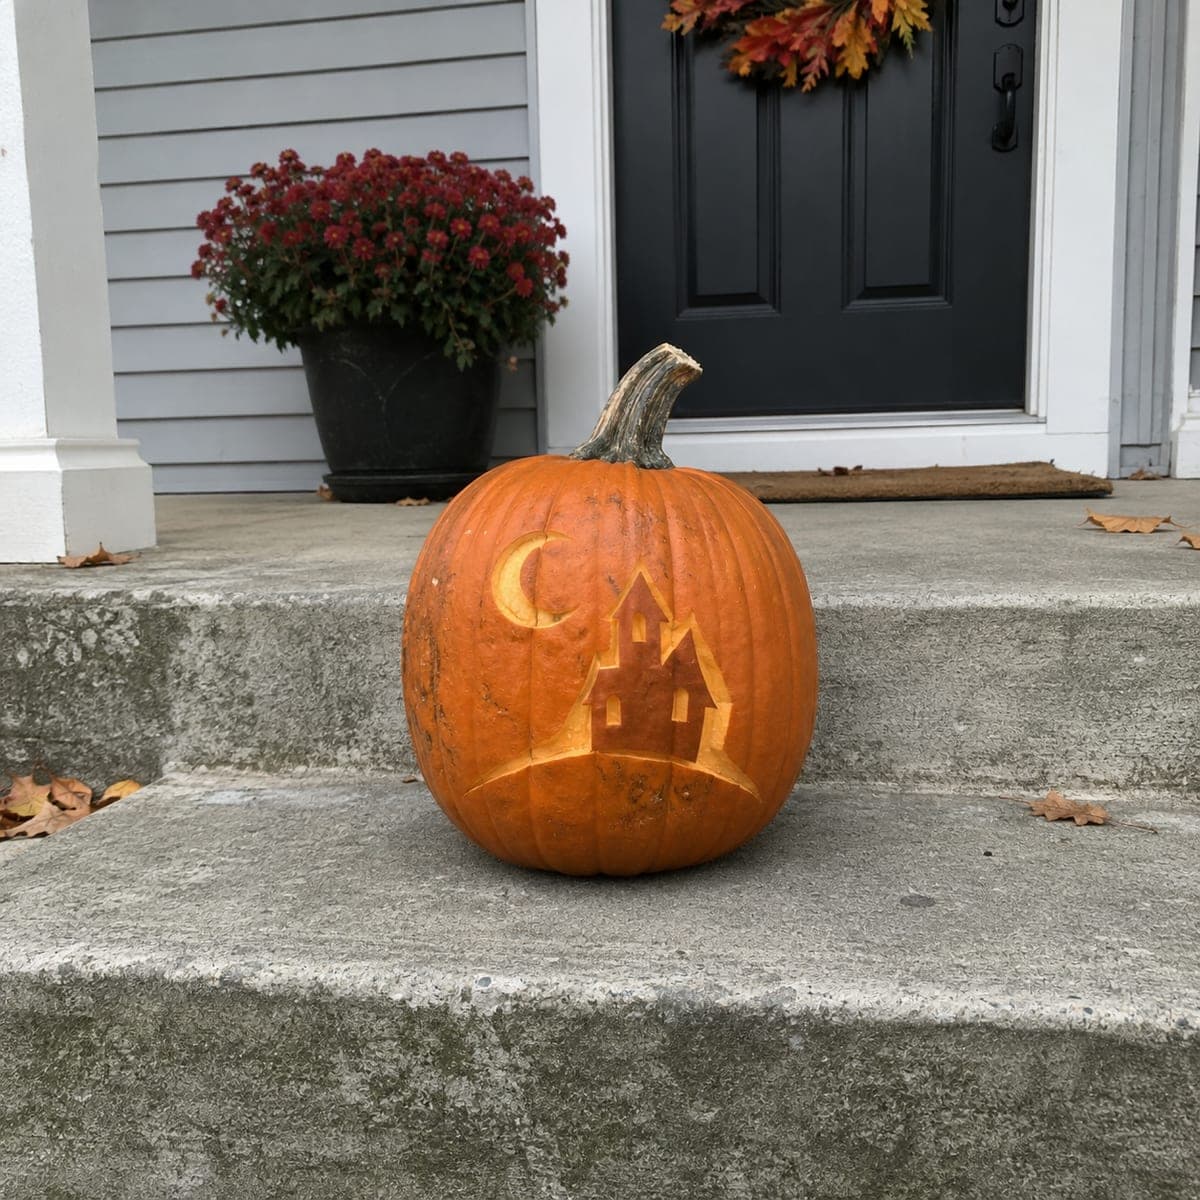
A tiny haunted house with a steeple sits under a crescent moon in this understated etched pumpkin, all done by peeling the skin rather than cutting through. The shallow relief looks charming in daylight on a front step, no candle needed. Draw the house and moon with a dry-erase marker first, then remove the skin inside the lines with a peeler or clay loop, keeping the depth even so the pale shapes stay uniform.

This is an AI-generated concept image: a realistic, carvable design idea rather than a photo of a finished carve. AI concepts are always labeled and sit out the leaderboard and the contest.

No ratings yet · Sign in to rate
Comments (0)

  • No comments yet — be the first.

Save without an account. Sign in to like or comment.

Our tips for carving a similar design

The whole charm here comes from surface etching rather than cutting through, so the little haunted house and crescent moon read as soft, pale shapes against the darker skin. The core trick is keeping your peel depth even so every shape glows the same gentle tone. Plan the layout small and centered on one smooth panel, then remove only the outer skin inside your lines.

Written by PumpkinCarvingIdeas.com, inspired by the image above. These are our suggestions, not instructions from the uploader. This approach to the AI concept has not been tested on a real pumpkin.

From pumpkin to porch

  1. Pick a smooth panel and clean it

    Choose the flattest, least ribbed face of the pumpkin so your shapes stay crisp. Wipe the surface dry so a marker will grip. Since this is an etched design you do not need to open the top or gut the whole thing, but scooping a little from an access hole in the back lets you drop in an LED later. Keep the front wall intact and fairly thick.

  2. Draw the house and moon

    Sketch the haunted house with its tall steeple and a couple of window shapes using a dry-erase marker, then add the crescent moon up and to the left. Keep the house small and centered so the composition feels balanced. Dry-erase ink wipes off easily, so redraw until the proportions look right. Leave a clear border of untouched skin around everything.

  3. Outline before you peel

    With a fine detail knife or a lino-style U-gouge, trace shallow outlines around the house, steeple, and moon. These score lines give your peeling a clean edge to stop against. Cut only through the outer skin, not deep into the flesh. Adults should handle the blade while kids help with the marker layout.

  4. Peel the shapes for a soft glow

    Use a vegetable peeler or a clay loop tool to lift off the skin inside each outline, exposing the pale flesh underneath. Work to a consistent shallow depth so the house and moon stay one uniform tone. Go slow near the thin steeple and window bars so they keep clean edges. Wipe away pulp with a cloth as you go to check your progress.

  5. Add optional accent cutouts last

    If you want a brighter touch, you can cut fully through just one or two tiny windows so a spark of light shows at night. Save these small openings for the very end so the panel stays sturdy while you etch. Keep them tiny to protect the surrounding relief. This step is optional, since the design looks great as a pure daytime etching.

  6. Light it and set it out

    Slip a battery LED puck through the back hole to make the etched shapes glow warmly after dark. During the day the pale relief shows up on its own, so it works with or without light. Set it on a front step where the shapes catch angled sunlight. Snap your photo in the soft morning or evening light for the best contrast.

Gather your supplies

Check things off as you get ready.

Work on a stable surface, keep your free hand out of the cutting path, and have an adult handle sharp tools.

Three levels of light

  • Leave intact

    The full background around the scene, keeping the sky and outer skin dark orange

  • Peel & shade

    The house walls, steeple, windows, and the crescent moon, all etched to a soft matching glow

  • Cut through

    At most one or two tiny windows cut fully through for a small bright spark at night

Learn the carving basics

Before you start cutting

Do I need to hollow out the whole pumpkin for an etched design?

Not fully. Since the shapes are only peeled and not cut through, you mainly need a small access hole in the back to add an LED. Scooping a little flesh from the inside of the front wall can help light pass through, but you can skip that entirely if you plan to display it in daylight.

How deep should I peel so the shapes stay even?

Aim to remove just the tough outer skin and a whisper of the flesh underneath, staying at a consistent shallow depth. If some spots go deeper than others, they will glow unevenly and the pale tone will look patchy. Test your depth on the back first, then keep the same pressure across the house and moon.

Will an etched pumpkin last long enough to display?

Etched pumpkins tend to dry out and darken faster than uncut ones because you have opened the skin. Carve it within a day or two of when you want it seen, and keep it cool overnight. A light coat of petroleum jelly on the exposed flesh can slow the drying and hold the color a bit longer.

Your take belongs here, too.

Changed a detail? Made it simpler? Share a photo of your version and tell the community what worked.

Share your pumpkin

More pumpkins like this

You've reached the end · 8 pumpkins
The Patch Report

Fresh pumpkins, in your inbox.

The best new carvings, ideas worth stealing, and how-tos for carving season. Short, seasonal, and gone by November.

A short email during carving season. Unsubscribe anytime. See our privacy policy.