Halloween Pumpkin Carving Contest Β· Starts October 1st Β· $500 in prizes
← Back to ideas
@ai_concepts
Aug 23, 2026
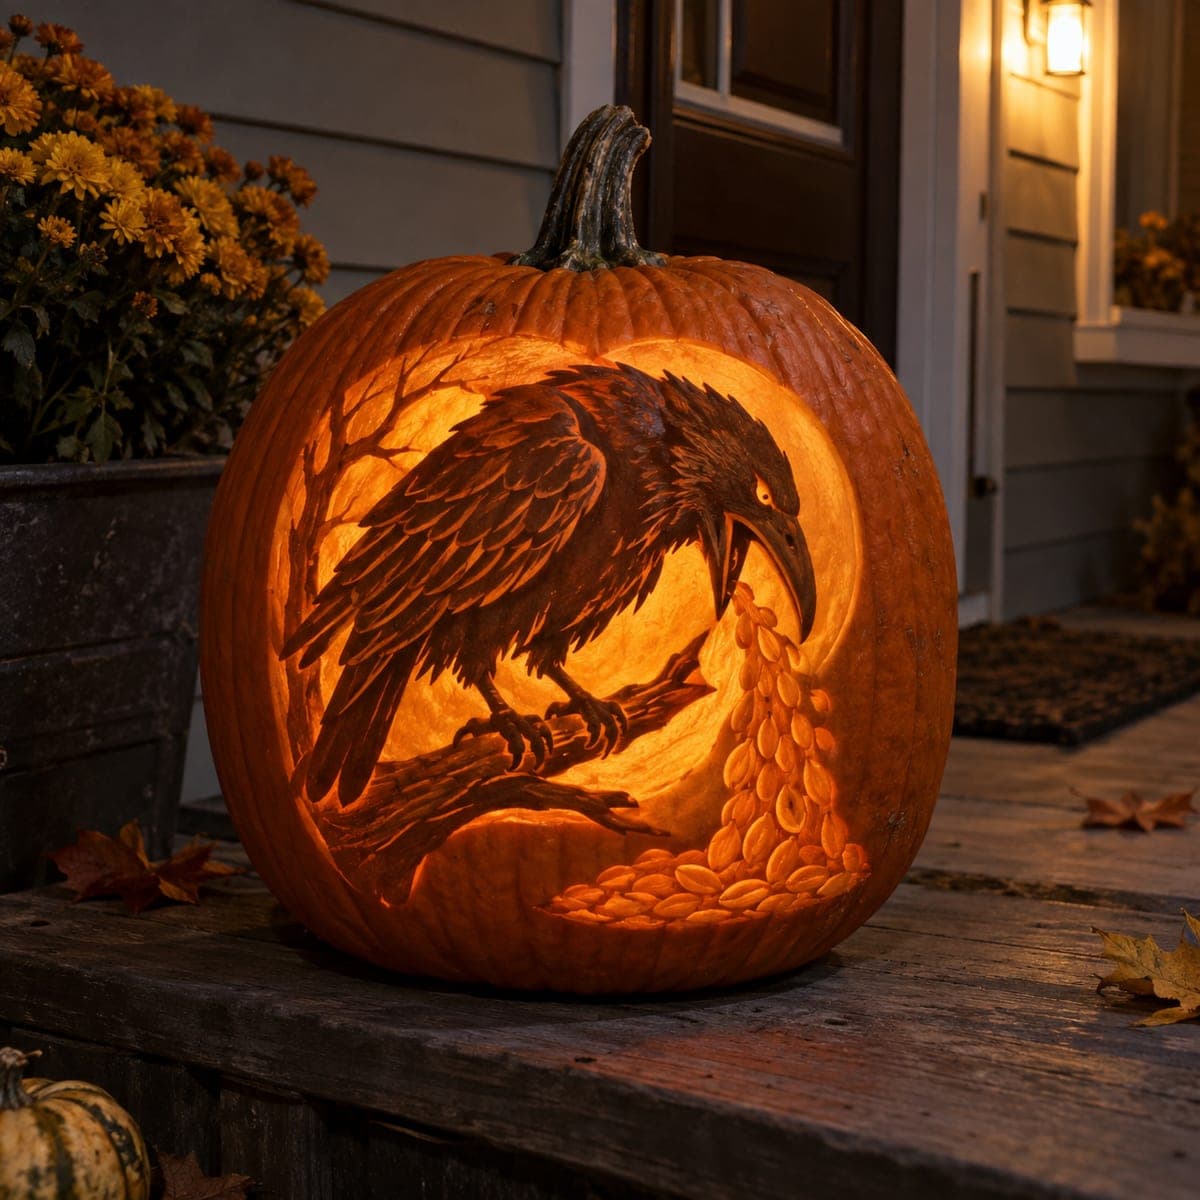
Raven and Harvest Moon Etched Pumpkin SceneAI
0

Raven and Harvest Moon Etched Pumpkin Scene

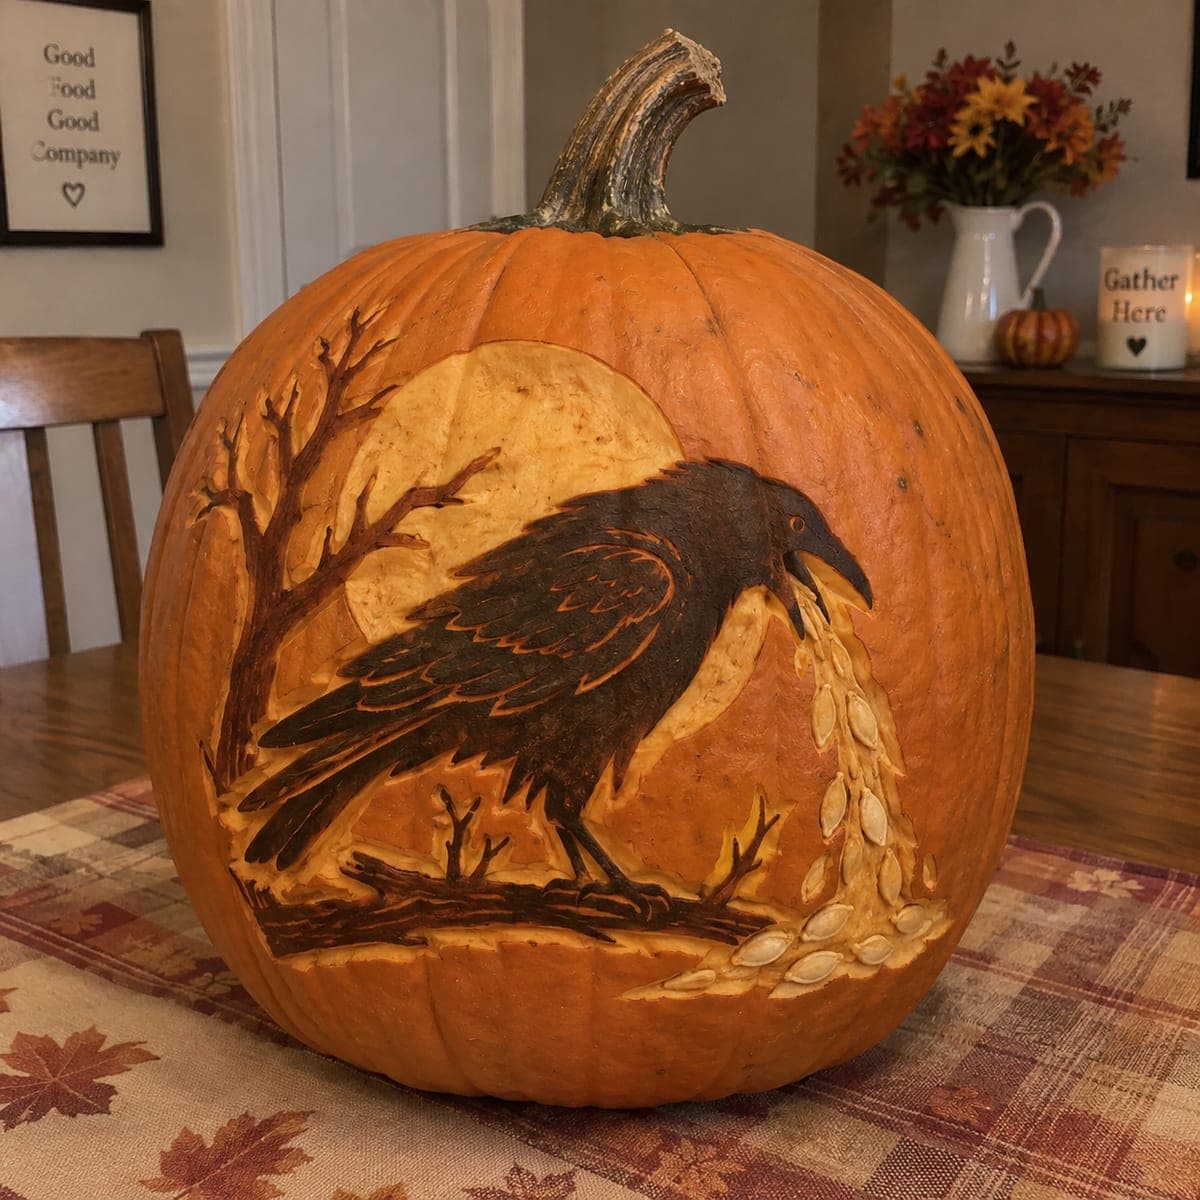
Perched on a gnarled branch before a huge pale moon, a glossy black raven spills a cascade of carved pumpkin seeds from its beak in this striking etched scene. The moon and seeds are peeled to the light flesh while the bird and bare tree keep the darkened skin, stained deeper for feather detail. Etch the moon first to set your values, then refine the feathers with a V-gouge. Display it raised so the whole scene sits at eye level.

This is an AI-generated concept image: a realistic, carvable design idea rather than a photo of a finished carve. AI concepts are always labeled and sit out the leaderboard and the contest.

No ratings yet Β· Sign in to rate

Comments (0)

  • No comments yet β€” be the first.

Save without an account. Sign in to like or comment.

Our tips for carving a similar design

The core trick here is value carving: nothing is cut all the way through except tiny accents, so the whole picture is built from three shades of orange. A pale peeled moon sits behind a dark raven of untouched skin, with a bright cascade of seeds spilling from the beak. Plan your light and dark areas before you touch a blade, because on a design like this the untouched skin is doing most of the work.

Written by PumpkinCarvingIdeas.com, inspired by the image above. These are our suggestions, not instructions from the uploader. This approach to the AI concept has not been tested on a real pumpkin.

From pumpkin to porch

  1. Transfer and lock in your values

    Since this is an imagined design, start by picking a clean, tall pumpkin with a smooth flat panel for the scene. Tape your pattern down and poke through the main outlines: the moon circle, the raven body, the tree, and the seed stream. Before carving, shade your pattern lightly with pencil so you know which zones stay dark skin, which get peeled, and which get cut. Working from a clear value map keeps a complex scene like this from muddying together.

  2. Etch the moon first to set the light

    Use a wide loop tool or ribbon gouge to peel the skin off the full moon circle, taking off only the thin orange rind so the pale flesh glows. Keep the depth even so the moon reads as one soft disc behind the bird. This is your brightest large area, so establishing it first gives you a reference for every other shade. Work slowly around the raven and tree edges so the dark silhouette stays crisp against the light.

  3. Leave the raven and tree as dark skin

    The bird and the bare branches are the untouched skin of the pumpkin, so simply do not peel them. Carefully carve right up to their edges from the moon side so the silhouette stands out sharp and black. For the darkest feather and bark tone you can gently scuff and stain the surface, but keep the skin intact so it stays the deepest value. Resist cutting into the raven itself at this stage.

  4. Shade the feathers with a V-gouge

    Now add detail inside the dark bird using a small V-gouge, scratching shallow lines that follow the feather layers on the wing, back, and tail. Each groove peels just a hair of skin, so it catches a faint glow and separates one feather row from the next. Work from the head down the body, keeping lines curved and overlapping like real plumage. A light touch is everything here; deep cuts would break the silhouette.

  5. Peel the seed cascade and moon accents

    For the stream of seeds falling from the beak, peel each little teardrop shape to the light flesh so it glows like the moon, leaving thin skin bridges between them so the cluster holds together. You can carve a couple of the seed tips all the way through for the single brightest sparkle, but do these true cutouts last and keep them small. Add a few peeled twigs and grass blades at the base to ground the scene. Set an LED puck inside rather than a candle so the delicate etching lights evenly.

  6. Light it, raise it, and photograph

    Drop in a battery LED and test the glow in a dark room, then touch up any feather lines that disappear. Set the pumpkin on a small riser or stack of books so the scene sits at eye level, the way this kind of art shows best. Mist the cut areas with water and keep it cool between viewings to slow drying. Snap your photo slightly off center so the raven and moon both catch the light.

Gather your supplies

Check things off as you get ready.

Work on a stable surface, keep your free hand out of the cutting path, and have an adult handle sharp tools.

Three levels of light

  • Leave intact

    The raven body and the bare tree branches stay as untouched dark skin for a bold silhouette.

  • Peel & shade

    The harvest moon, the grass, and the falling seeds are skin-peeled for a soft mid glow.

  • Cut through

    Only a few tiny seed tips are cut fully through for the single brightest sparkles.

Learn the carving basics

Before you start cutting

How do I keep the raven from blending into the dark background?

The trick is the peeled moon directly behind the bird, which throws its shape into relief. Carve a clean, slightly deeper edge where the dark skin meets the pale moon so there is a crisp border. As long as the silhouette edge is sharp, the eye reads the raven instantly even though both are dark.

Will the seed cascade hold together or fall apart?

Peel most of the seeds rather than cutting them through, and leave slim skin bridges between the shapes. Only carve a couple of tips all the way for accent, and save those true cutouts for last. That keeps the stream structurally sound while still glowing brightly.

How do I get the deep feather tone without cutting through?

Stay in shading mode: use a V-gouge to scratch shallow feather lines and gently scuff the skin for a darker stain rather than removing flesh. The untouched skin stays the darkest value, and the shallow grooves add just enough glow to separate feathers. Test the depth in one wing area first before committing to the whole bird.

Your take belongs here, too.

Changed a detail? Made it simpler? Share a photo of your version and tell the community what worked.

Share your pumpkin

More pumpkins like this

You've reached the end Β· 8 pumpkins
The Patch Report

Fresh pumpkins, in your inbox.

The best new carvings, ideas worth stealing, and how-tos for carving season. Short, seasonal, and gone by November.

A short email during carving season. Unsubscribe anytime. See our privacy policy.