Halloween Pumpkin Carving Contest · Starts October 1st · $500 in prizes
← Back to ideas
@ai_concepts
Jul 31, 2026
Haunted Tree Spirit Painted Pumpkin With RavenAI
0

Haunted Tree Spirit Painted Pumpkin With Raven

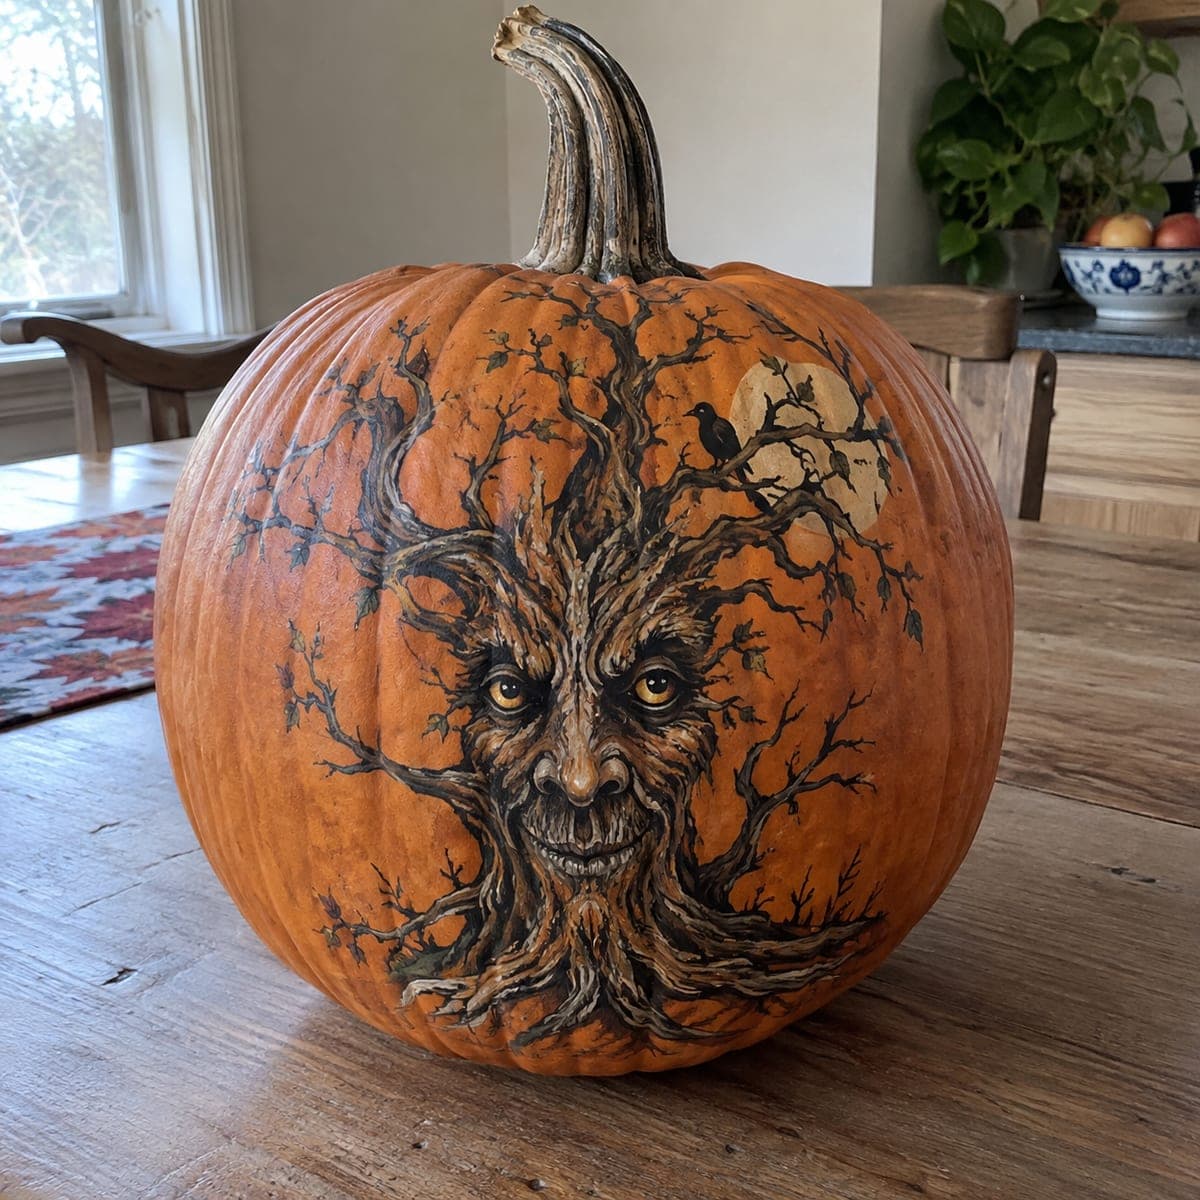
A gnarled tree spirit stares out from this pumpkin, its bark face framed by twisting branches, a perched raven, and a hazy full moon. The design is painted in fine layered brushwork, building from a midtone bark base up to pale highlights on the brow and knuckled roots. Seal the finished art with matte spray sealer so the detail survives damp porch nights, and give it strong side lighting after dark.

This is an AI-generated concept image: a realistic, carvable design idea rather than a photo of a finished carve. AI concepts are always labeled and sit out the leaderboard and the contest.

No ratings yet · Sign in to rate
Comments (0)

  • No comments yet — be the first.

Save without an account. Sign in to like or comment.

Our tips for carving a similar design

The core trick here is treating the whole pumpkin as a canvas and using its natural orange as the glowing background sky. You build a bark face from a midtone base coat, then layer darker branches and pale highlights so the twisting wood, the perched raven, and the hazy moon all read as one scene. Because this is a paint design, almost nothing gets cut, which keeps the pumpkin strong and lets you focus on fine detail.

Written by PumpkinCarvingIdeas.com, inspired by the image above. These are our suggestions, not instructions from the uploader. This approach to the AI concept has not been tested on a real pumpkin.

From pumpkin to porch

  1. Pick and prep the pumpkin

    Choose a large pumpkin with a smooth, evenly rounded front and few deep ribs, since flat space makes a painted face easier. Wipe the skin down with a damp cloth and let it dry fully so paint grabs the surface. Set it on a towel ring so it will not roll while you work. Sketch the face, branches, raven, and moon lightly in pencil or washable marker first.

  2. Block in the moon and base tones

    Paint the pale full moon on the upper right with an off white or cream acrylic, softening the edge so it looks hazy. Lay a midtone brown base over the whole face and root area to establish the bark. Keep these first layers thin and let each coat dry before adding the next. Do not chase detail yet, just get your big shapes placed.

  3. Build the branches and face structure

    With a fine round brush and darker brown, paint the twisting branches spreading up into the sky and down into the knuckled roots. Carve the face out with shadow, deepening the eye sockets, the sides of the nose, and the mouth. Use short, flowing strokes that follow the direction of real wood grain. Add the raven as a solid dark silhouette perched across the moon.

  4. Add highlights and the eyes

    Switch to a pale tan or bone color and drybrush highlights onto the brow, cheekbones, nose ridge, and the tops of the roots to make them pop forward. Paint the eyes last so they stay crisp, using a warm amber with a tiny white catchlight in each. Keep the amber bright against the dark sockets for that watchful stare. Step back often to check the face still reads from a few feet away.

  5. Seal and protect

    Once everything is bone dry, take the pumpkin outside or to a ventilated space and mist it with a matte spray sealer. Two light coats beat one heavy coat and prevent drips. This skin lets the detail survive damp porch nights without going glossy. Let it cure before handling.

  6. Light it and photograph

    Because this design is painted rather than cut, use a battery LED spotlight placed low and to one side rather than a light inside. Strong side lighting rakes across the raised bark strokes and throws shadow into the eye sockets, which sells the spirit after dark. Never use a candle near sealer or paint. Snap your photo in that side light against a dark background.

Gather your supplies

Check things off as you get ready.

Work on a stable surface, keep your free hand out of the cutting path, and have an adult handle sharp tools.

Three levels of light

  • Leave intact

    Most of the orange skin stays untouched as the glowing dusk sky and the warm space between the branches.

  • Peel & shade

    If you want a soft glow, lightly skin-peel just the moon disc so it reads a shade brighter than the painted sky around it.

  • Cut through

    Reserve any real cutting for the two eyes only, opened last as small amber apertures if you add an internal LED, keeping every branch attached.

Learn the carving basics

Before you start cutting

Is this really a no-carve project?

Mostly yes. The whole tree spirit is painted, which is why it holds so much fine detail without weakening the shell. If you want a little glow you can peel the moon or cut only the eyes, but the design works fully as paint alone.

How do I keep the bark face from looking flat?

Work in three value layers: a midtone base, darker branch and shadow lines, then pale drybrushed highlights on the brow, nose, and roots. That range of light to dark is what gives the wood its carved, three dimensional look. Let each layer dry so colors do not muddy together.

Will the paint survive being outdoors?

Acrylic alone will scuff and spot in damp weather, so seal it with two light coats of matte spray sealer once dry. Keep the pumpkin off wet ground and bring it in during heavy rain. A real pumpkin still softens over a week or two, so paint it close to the day you want to display it.

Your take belongs here, too.

Changed a detail? Made it simpler? Share a photo of your version and tell the community what worked.

Share your pumpkin

More pumpkins like this

You've reached the end · 8 pumpkins
The Patch Report

Fresh pumpkins, in your inbox.

The best new carvings, ideas worth stealing, and how-tos for carving season. Short, seasonal, and gone by November.

A short email during carving season. Unsubscribe anytime. See our privacy policy.