Halloween Pumpkin Carving Contest · Starts October 1st · $500 in prizes
← Back to ideas
@ai_concepts
Jul 21, 2026
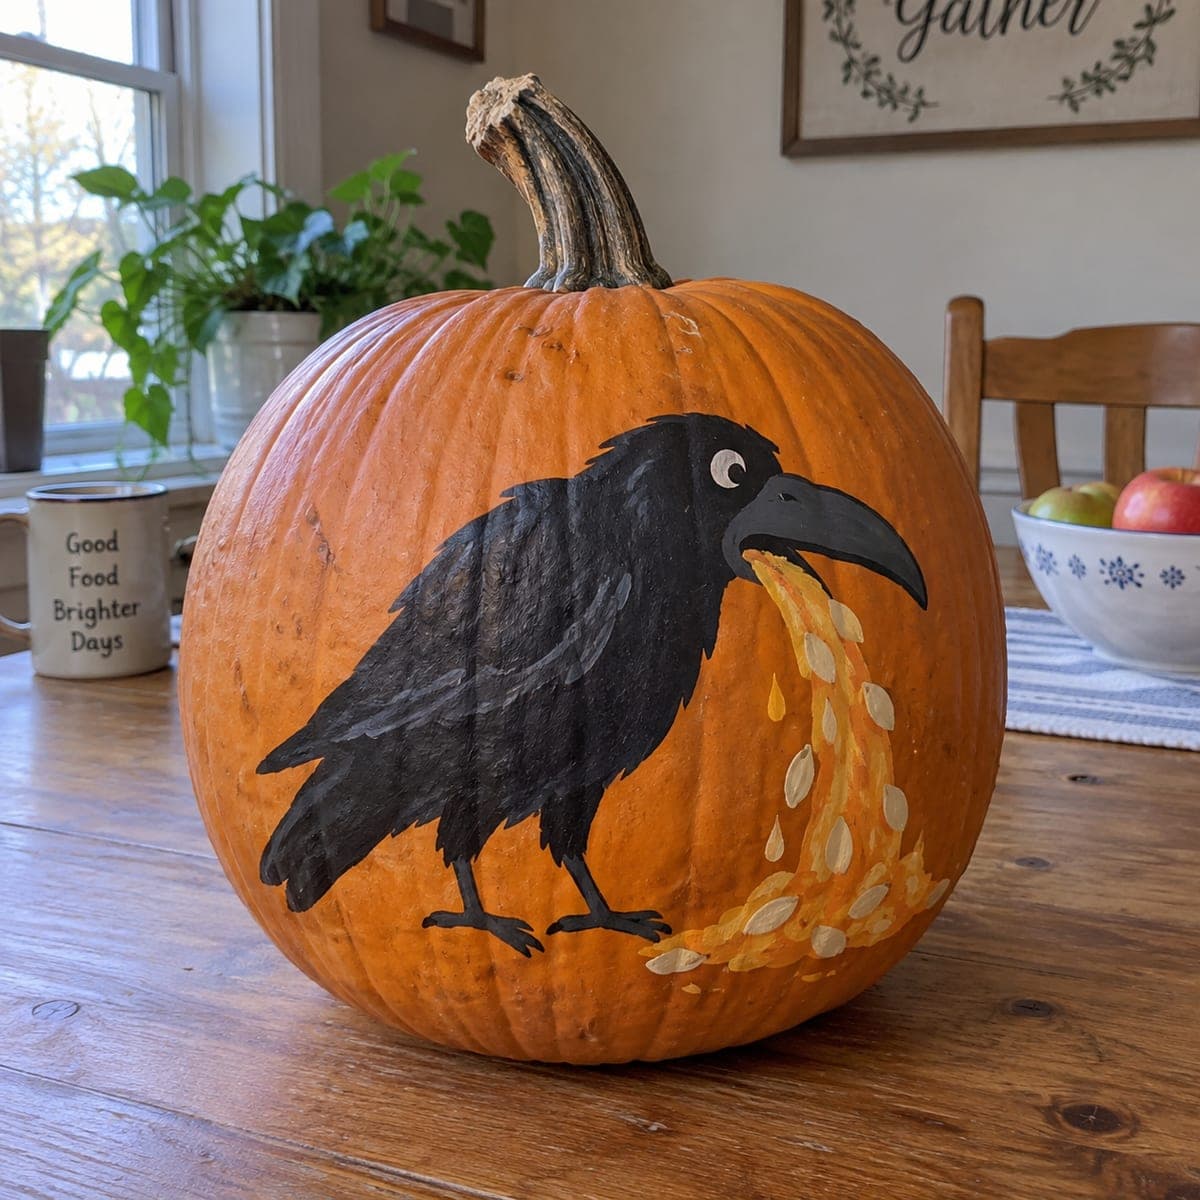
Hungry Crow Spilling Pumpkin Seeds Painted PumpkinAI
0

Hungry Crow Spilling Pumpkin Seeds Painted Pumpkin

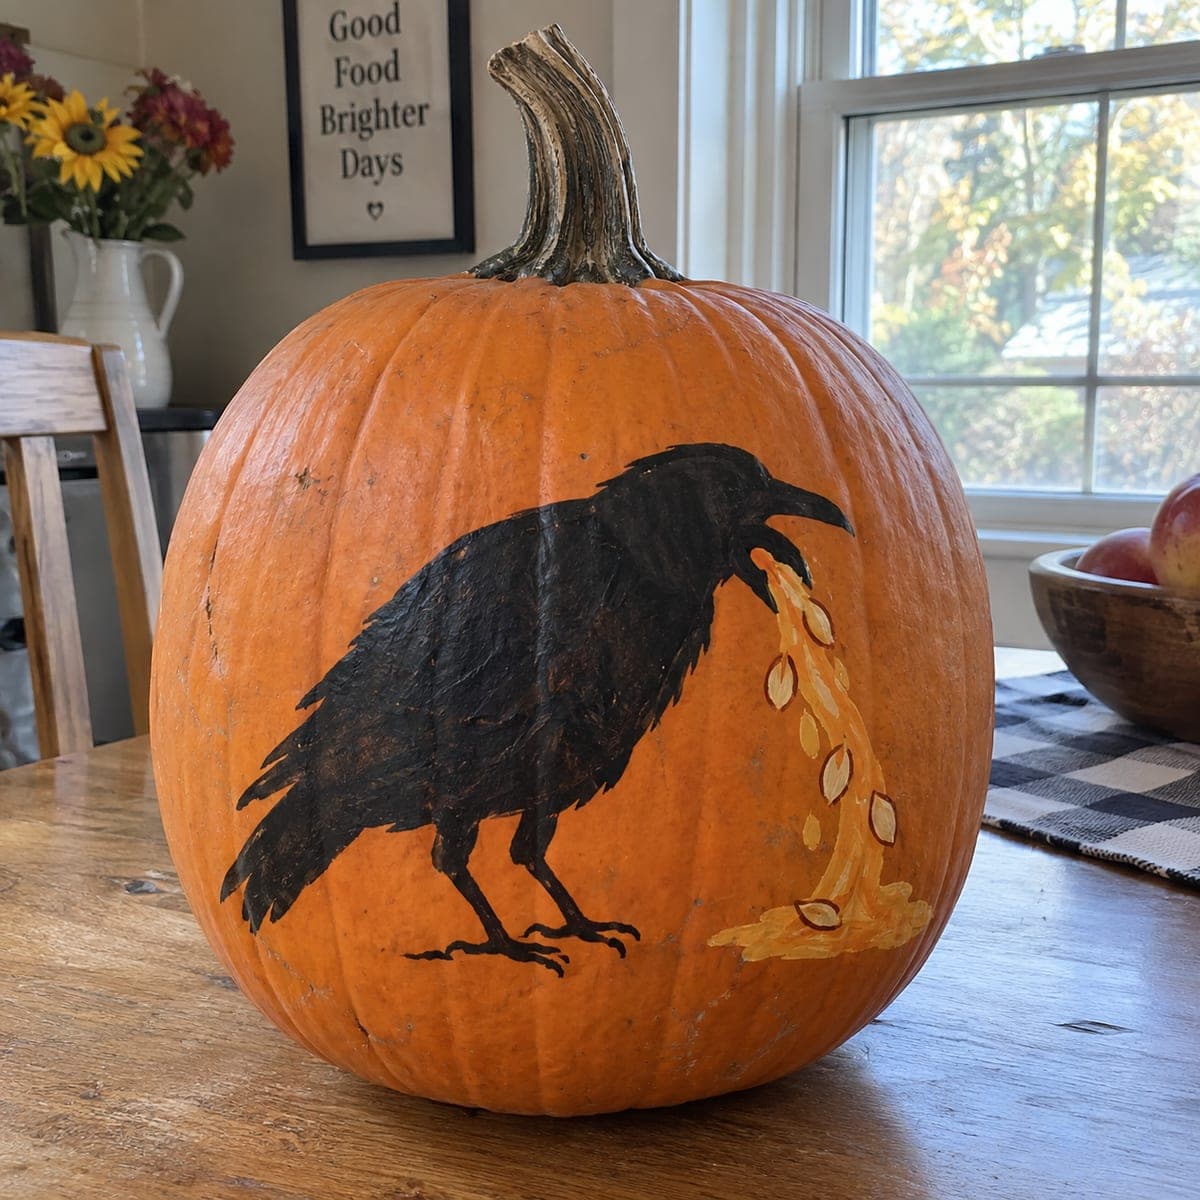
A glossy black crow spills a beakful of pumpkin seeds down the side of this no-carve pumpkin, a sly joke about who really empties the jack-o-lantern. Acrylic paint handles the whole design, so block in the bird's body first, then add the white eye and the tumbling seeds last. Display it on a kitchen table or entry bench where the humor reads up close.

This is an AI-generated concept image: a realistic, carvable design idea rather than a photo of a finished carve. AI concepts are always labeled and sit out the leaderboard and the contest.

No ratings yet · Sign in to rate
Comments (0)

  • No comments yet — be the first.

Save without an account. Sign in to like or comment.

Our tips for carving a similar design

The whole joke rides on one clean silhouette, a glossy black crow, paired with a bright ribbon of pale seeds tumbling from its beak. Since this is a no-carve painted design, you build it in layers: block the solid black body first, then drop in the white eye and beak highlights, and save the loose falling seeds for last so they read as motion. Keep the crow facing the seed spill so the story is obvious from a few feet away.

Written by PumpkinCarvingIdeas.com, inspired by the image above. These are our suggestions, not instructions from the uploader. This approach to the AI concept has not been tested on a real pumpkin.

From pumpkin to porch

  1. Prep and sketch the crow

    Wipe the pumpkin clean and dry so paint grips well. With a soft pencil or chalk, lightly sketch the crow's body as one rounded teardrop shape, then add the head, beak, tail, and legs. Keep the outline simple and a little cartoony, since the humor lives in the pose. Position the beak so it points toward the widest open area where the seeds will spill.

  2. Block in the black body

    Fill the whole crow shape with a solid coat of black acrylic using a medium flat brush. Work in one direction and let it dry, then add a second coat for even, opaque coverage. Leave the beak and the eye area unpainted for now so you have clean space to add color later. Let this base dry completely before adding any detail on top.

  3. Add feather texture and the beak

    With a slightly lighter gray or blue-black, drag short curved strokes over the wing and back to suggest layered feathers. Keep the strokes loose and follow the direction the feathers would lie. Paint the beak a warm charcoal, leaving a thin light highlight along the top edge so it looks smooth and hard. A small round brush gives you the control you need here.

  4. Paint the eye

    Dab a small white or pale yellow circle for the eye, then let it dry and add a tiny black pupil with a crescent left showing. That little curved highlight is what gives the crow its sly, guilty expression. Keep the eye small and high on the head so the bird reads as looking down at its mess. Steady your hand on the pumpkin for the fine dot.

  5. Spill the seeds last

    Mix a few tones of cream, tan, and pale gold for the seeds. Starting at the beak tip, paint a loose stream of oval seeds tumbling down and pooling at the base, varying their angle so they look like they are falling. Add a couple of runny amber drips between the seeds for a wet, just-spat look. Scatter a few stray seeds off to the side so the spill feels lively rather than stiff.

  6. Seal and stage it

    Once everything is bone dry, brush on a matte or satin acrylic sealer to protect the paint from smudges and moisture. Set the finished pumpkin on a kitchen table or entry bench at eye level so people catch the joke up close. A small LED tea light tucked beside it adds a warm glow without any flame. Snap your photo in soft daylight to keep the black crisp and the seeds bright.

Gather your supplies

Check things off as you get ready.

Work on a stable surface, keep your free hand out of the cutting path, and have an adult handle sharp tools.

Three levels of light

  • Leave intact

    The crow's solid black body stays matte and dark, anchoring the whole design.

  • Peel & shade

    If you want a soft glow, lightly sand or thin the paint on the seed stream so a warm LED behind it reads dimly through the pale tones.

  • Cut through

    This is a no-carve piece, so nothing is cut, but a small LED tea light set beside it gives the brightest accent without piercing the shell.

Learn the carving basics

Before you start cutting

How do I keep the black crow from looking flat?

Add a second value on top of the base black using a dark gray or blue-black in short curved feather strokes. Concentrate the lighter marks on the wing and chest where light would naturally catch. Even a few strokes break up the solid shape and give the bird dimension.

What is the trick to making the seeds look like they are spilling?

Vary the size and angle of each seed instead of lining them up evenly. Cluster more of them near the beak and let them thin out and scatter as they fall toward the base. A couple of amber drip lines between the seeds sell the idea of a fresh, messy spill.

Do I need to carve anything at all for this design?

No, the entire piece is painted, which is why it lasts longer than a cut jack-o-lantern. If you want a little light, set an LED tea light next to it rather than cutting the pumpkin open. Keeping it intact also means it will not shrivel for a week or more.

Your take belongs here, too.

Changed a detail? Made it simpler? Share a photo of your version and tell the community what worked.

Share your pumpkin

More pumpkins like this

You've reached the end · 8 pumpkins
The Patch Report

Fresh pumpkins, in your inbox.

The best new carvings, ideas worth stealing, and how-tos for carving season. Short, seasonal, and gone by November.

A short email during carving season. Unsubscribe anytime. See our privacy policy.