Halloween Pumpkin Carving Contest · Starts October 1st · $500 in prizes
← Back to ideas
@ai_concepts
Aug 13, 2026
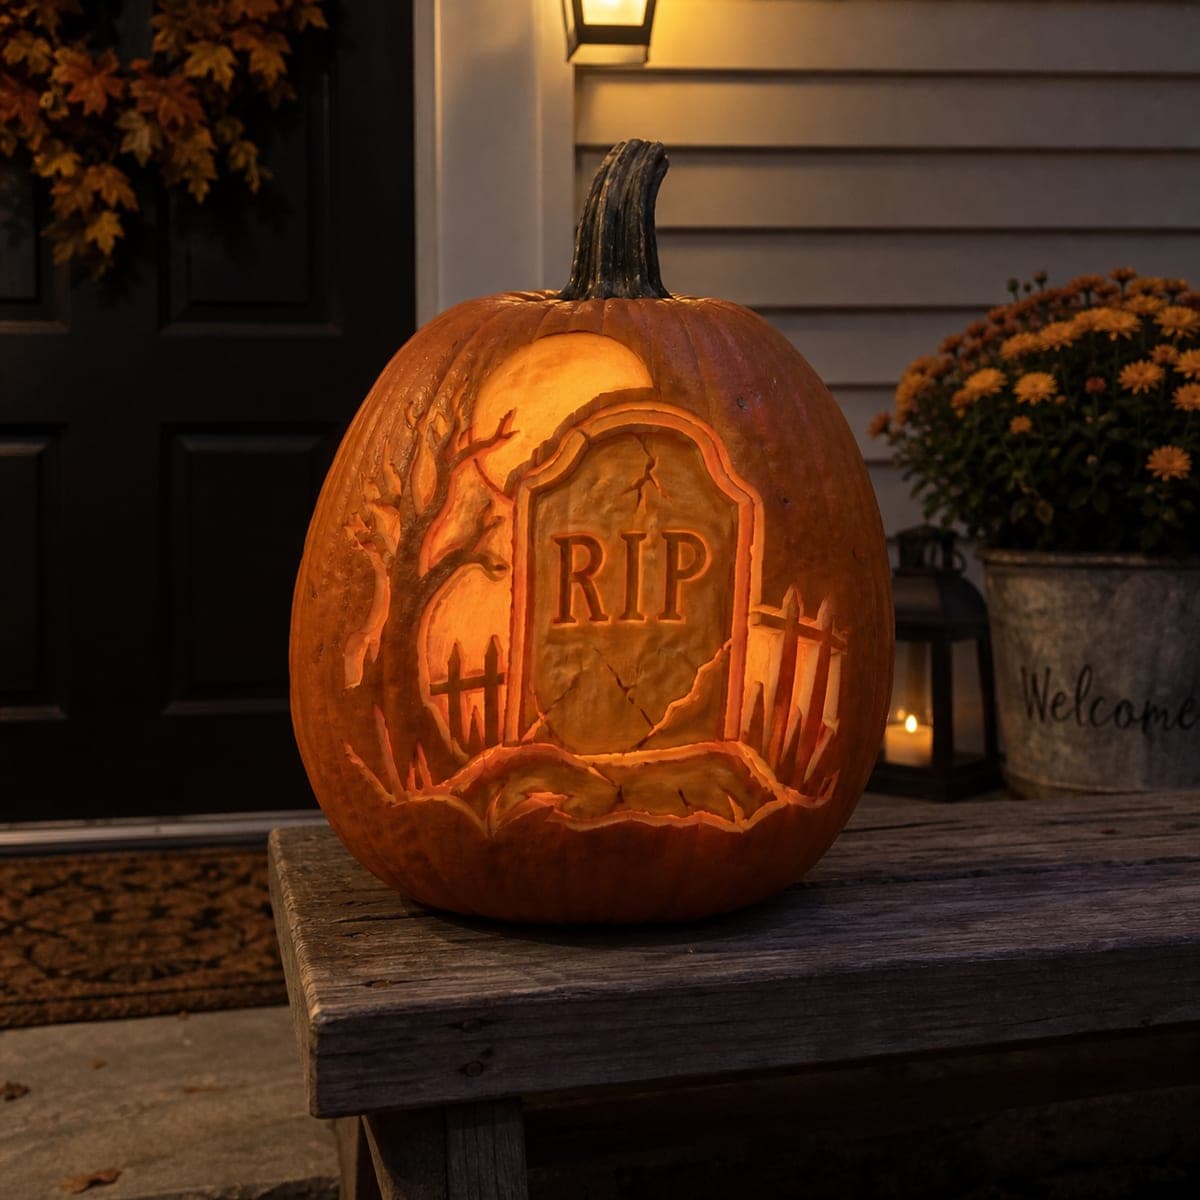
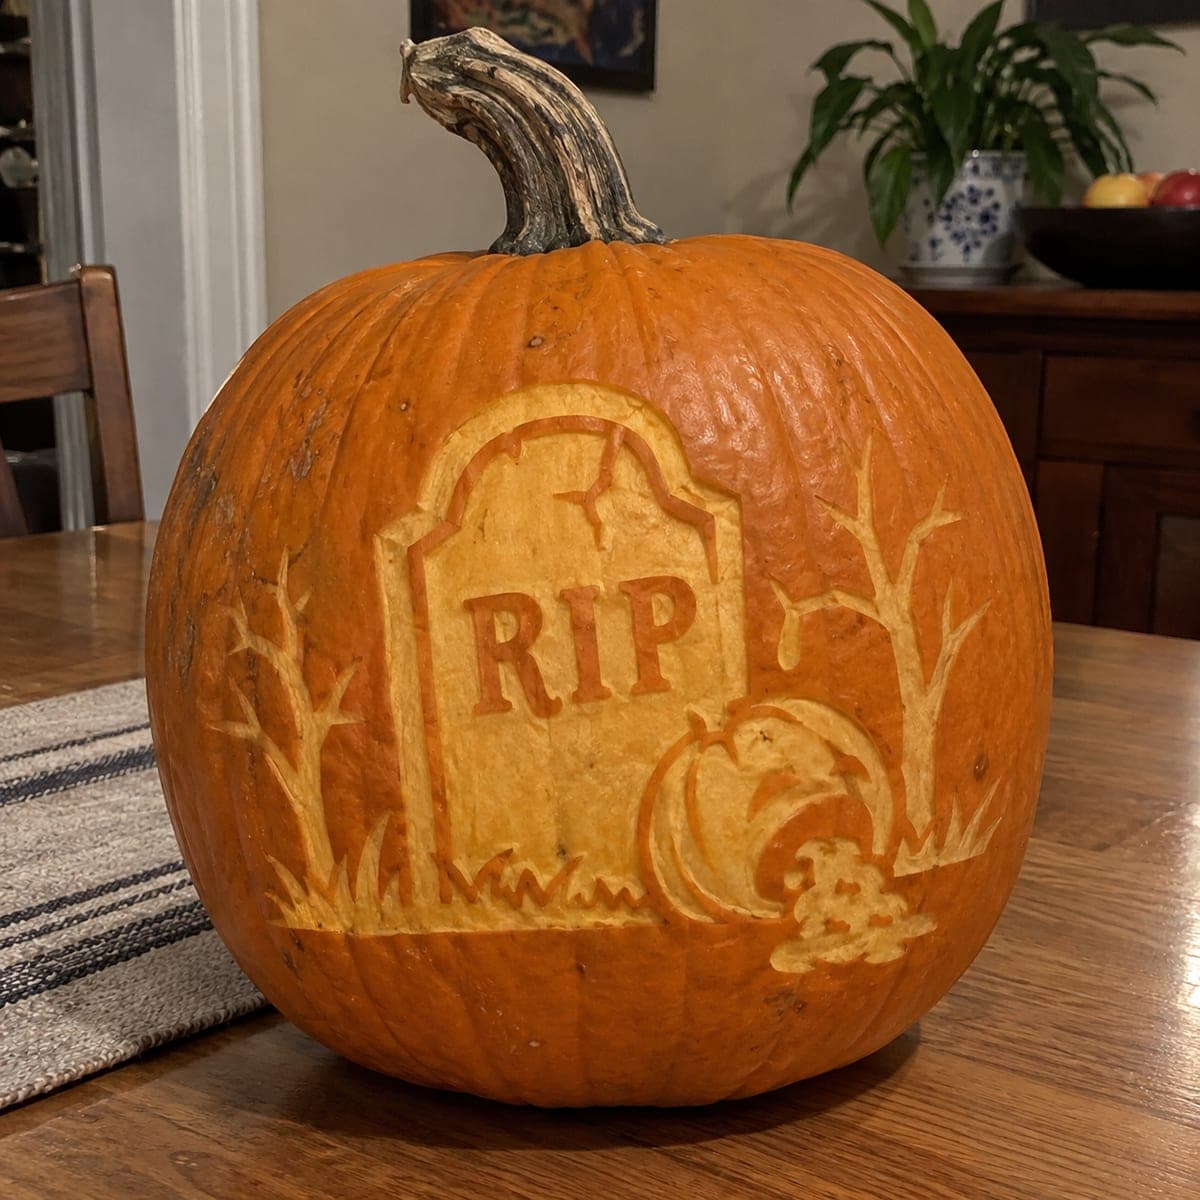
RIP Gravestone Scene Carved Pumpkin with Bare TreesAI
0

RIP Gravestone Scene Carved Pumpkin with Bare Trees

A cracked tombstone reading RIP anchors a spooky graveyard scene complete with bare twisted trees, overgrown grass, and a small pumpkin at its base, all carved in shallow relief across the pumpkin surface. The legible letters and well-defined shapes make this pumpkin carving idea easier to execute than it looks, since every element uses a consistent depth of skin removal rather than full cutouts. Start by outlining all the major shapes with a detail knife, then use a U-gouge or Dremel to scoop the background skin away. Warm indoor lighting beneath the pumpkin emphasizes the texture and brings the graveyard atmosphere to life.

This is an AI-generated concept image: a realistic, carvable design idea rather than a photo of a finished carve. AI concepts are always labeled and sit out the leaderboard and the contest.
No ratings yet · Sign in to rate

Comments (0)

  • No comments yet — be the first.

Save without an account. Sign in to like or comment.

Our tips for carving a similar design

The core trick here is shading, meaning you scoop away only the top skin of the pumpkin instead of cutting all the way through. Every element, the RIP stone, the bare trees, the grass, and the little pumpkin, sits at one consistent shallow depth so the whole scene glows a soft orange when lit. Plan it as a layered scene with the tombstone as your anchor, then add trees and ground details around it.

Written by PumpkinCarvingIdeas.com, inspired by the image above. These are our suggestions, not instructions from the uploader. This approach to the AI concept has not been tested on a real pumpkin.

From pumpkin to porch

  1. Pick a smooth-faced pumpkin and prep it

    Choose a pumpkin with one large, fairly flat, blemish-free area for the scene. Since this design lives in the skin rather than a hollow, you can carve a small access lid in the back or bottom rather than a big front opening. Scrape the inside wall behind the design down to about one inch so light passes through the peeled areas. A thinner wall glows more evenly.

  2. Transfer the full scene

    Print or draw the tombstone, two bare trees, grass line, and small pumpkin at the size you want. Tape the pattern on and poke dots along every outline with a pin or transfer tool. Space the dots close together on the RIP letters and the thin tree branches so the shapes stay readable. Peel the paper and connect the dots lightly with a pencil if you want a clearer guide.

  3. Score all the outlines first

    With a small detail knife, trace shallow cuts along every outline you dotted. Cut only a few millimeters deep here, just enough to define edges. Do the tombstone border, the crack, the letters, the tree trunks and branches, the grass blades, and the little pumpkin. Getting all outlines in before you scoop keeps your shapes crisp.

  4. Scoop the background to a uniform depth

    Switch to a U-gouge or a Dremel with a sanding bit and remove the skin between your outlines, staying at one steady depth. The goal is exposed flesh that glows dim orange, not a hole. Work slowly around the thin branches and the serifs of the R, I, and P so you do not undercut them. Keep the removed areas even so the light reads consistently.

  5. Refine texture and contrast

    Go back and deepen just the cracked line on the stone and the shadowed sides of the trees for a little extra depth. Leave the raised faces of the letters and the tombstone slightly higher so they stand out against the scooped background. Smooth any rough patches with the sanding bit. Brush away crumbs and check the design under a light.

  6. Light it and photograph

    Drop in a battery LED or a small string of warm LEDs, never a candle, since the thin walls and shallow relief can scorch. Set the pumpkin so the light sits low and behind the design to push the glow outward. Shoot in a dim room to let the orange scene pop against the dark skin. Rotate the light until the trees and grass show best.

Gather your supplies

Check things off as you get ready.

Work on a stable surface, keep your free hand out of the cutting path, and have an adult handle sharp tools.

Three levels of light

  • Leave intact

    The surrounding pumpkin skin, the sky, and the ground stay untouched and dark to frame the scene.

  • Peel & shade

    The tombstone face, RIP letters, bare trees, grass blades, and the small pumpkin are skin-peeled to glow dim orange.

  • Cut through

    Nothing is cut fully through on this design; if you want one bright accent, you could pierce only the deepest crack line.

Learn the carving basics

Before you start cutting

This is an AI concept, so how do I keep the thin branches from breaking?

Because you are shading and not cutting through, the branches stay part of the solid wall and are naturally sturdy. Just keep your gouge shallow around them so you do not accidentally punch through. If a branch feels fragile, leave a touch more skin on it rather than scooping to the edge.

How do I keep the RIP letters readable?

Score the letter outlines cleanly first, then scoop the background around them so the letters sit slightly raised. Keep the space inside and between letters at the same depth as the rest of the background. A little extra care on the serifs keeps the R, I, and P sharp.

Why not just cut all the way through for a brighter pumpkin?

Cutting through would lose the soft, textured graveyard mood that makes this scene work. The shallow relief gives you a gentle orange glow and lets details like tree bark and grass show up. Save full cutouts for a different, higher-contrast design.

Your take belongs here, too.

Changed a detail? Made it simpler? Share a photo of your version and tell the community what worked.

Share your pumpkin

More pumpkins like this

You've reached the end · 8 pumpkins
The Patch Report

Fresh pumpkins, in your inbox.

The best new carvings, ideas worth stealing, and how-tos for carving season. Short, seasonal, and gone by November.

A short email during carving season. Unsubscribe anytime. See our privacy policy.