Halloween Pumpkin Carving Contest · Starts October 1st · $500 in prizes
← Back to ideas
@ai_concepts
Sep 14, 2026
I Love Connecticut Heart Lettering PumpkinAI
0

I Love Connecticut Heart Lettering Pumpkin

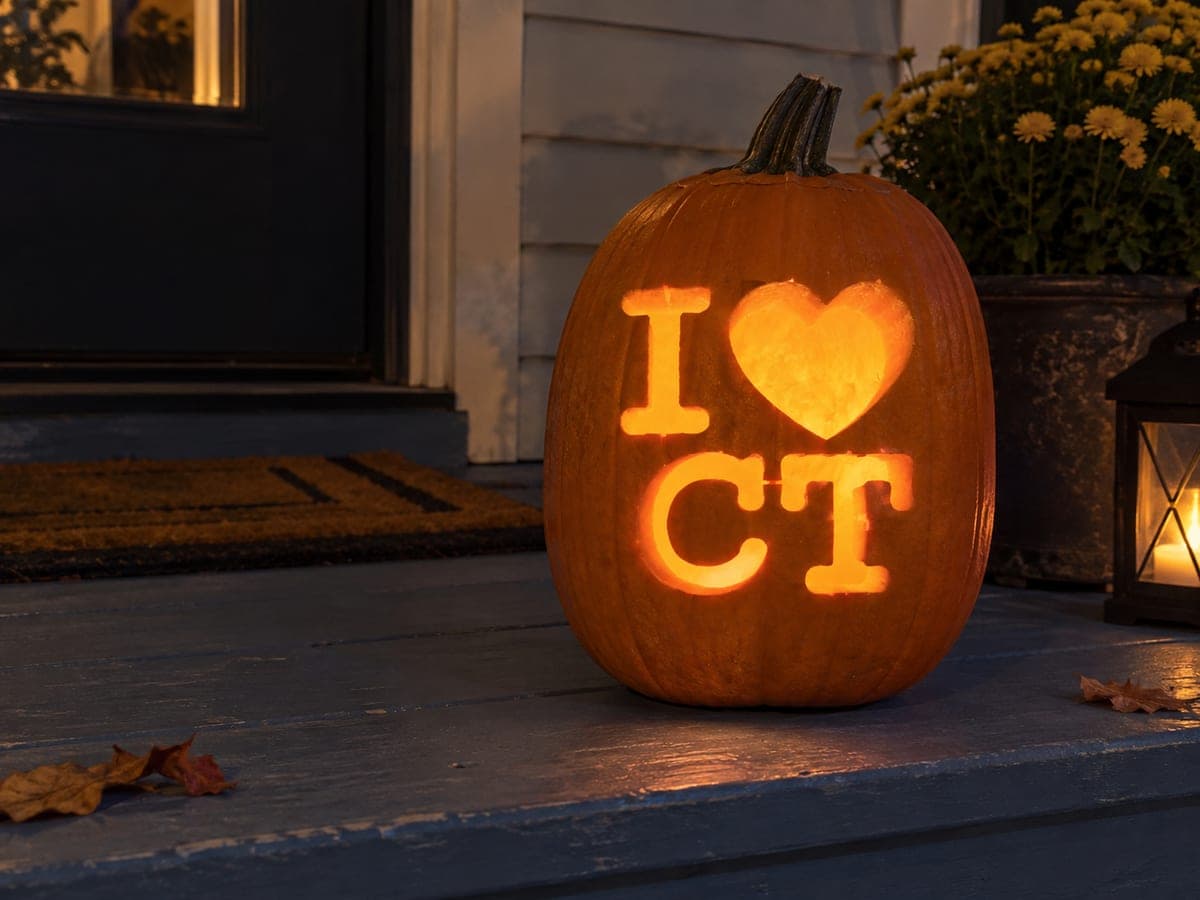
The two-row I-heart-CT layout is cut through this tall pumpkin glowing on a dark front porch, the chunky slab-serif letters and rounded heart giving the carving a warm, welcoming character. CT's T is a cross-shaped cutout with four open quadrants, which means the center crossbar is a thin strip of pumpkin holding the top section in place -- carve the T last so it is surrounded by completed cuts that stabilize it. A lantern beside the pumpkin echoes the warm glow and suggests placing this jack-o-lantern near existing porch lighting for maximum visual impact.

This is an AI-generated concept image: a realistic, carvable design idea rather than a photo of a finished carve. AI concepts are always labeled and sit out the leaderboard and the contest.


No ratings yet · Sign in to rate

Comments (0)

  • No comments yet — be the first.

Save without an account. Sign in to like or comment.

Our tips for carving a similar design

The core trick here is treating chunky slab-serif letters and a rounded heart as full cutouts arranged in two clean rows. Since this is a concept image, you would recreate it by transferring a printed stencil, then carving the simpler shapes first and saving the cross-shaped T for last so its thin center crossbar is supported by finished cuts around it. Keep even spacing between characters so the message stays easy to read once it lights up.

Written by PumpkinCarvingIdeas.com, inspired by the image above. These are our suggestions, not instructions from the uploader. This approach to the AI concept has not been tested on a real pumpkin.

From pumpkin to porch

  1. Pick a tall pumpkin and plan the layout

    Choose a tall, fairly flat-faced pumpkin so both rows fit without wrapping around the curve. Sketch or print your I-heart-CT stencil sized to fill the front cleanly, with the heart top row and the letters below. Center everything and mark the outline lightly before you commit. A tall shape gives the chunky letters room to breathe.

  2. Open a lid and clean out the shell

    Have an adult cut a lid from the bottom or the back rather than the top, so the stem stays intact for looks. Scoop out the seeds and pulp, then scrape the inside wall behind your design down to about one inch thick. A thinner wall makes the letters much easier to cut and lets more light through. Save some scraped pulp in case you need to patch a slip.

  3. Transfer the stencil to the skin

    Tape the stencil flat against the pumpkin and poke closely spaced dots along every letter edge with a poker tool or pushpin. Pay special attention to the inner corners of the C, the serifs on the letters, and the four quadrants of the T so the crossbar shows up clearly. Peel the paper and connect the dots with a marker if it helps you see the shapes. Double check spacing before cutting.

  4. Carve the heart and simple letters first

    Start with the heart and the I, C, and the rest of the strokes, using a small serrated carving saw and gentle sawing pressure. Cut each piece fully through and push the waste out from the inside to keep edges clean. Working these easier shapes first builds confidence and leaves solid pumpkin around the tricky T. Take breaks so your hand stays steady.

  5. Carve the cross-shaped T last

    Now cut the T, which reads as four open quadrants around a thin center crossbar. Carve the four openings carefully and leave the narrow strip of skin that holds the top section in place, since that bridge is doing structural work. Go slow near the crossbar and support the surrounding shell with your free hand. If a bridge feels fragile, leave it slightly wider rather than risk a break.

  6. Light it and stage the shot

    Drop in one or two battery LED lights, never a candle, and aim for a warm color to match a cozy porch. Set the pumpkin near existing porch lighting or a lantern so the glow reads well in photos. Wipe the face dry, let it sit at dusk, and take your picture while ambient light still shows the whole scene.

Gather your supplies

Check things off as you get ready.

Work on a stable surface, keep your free hand out of the cutting path, and have an adult handle sharp tools.

Three levels of light

  • Leave intact

    The pumpkin's untouched orange skin surrounding the letters stays dark and frames the message.

  • Peel & shade

    You could skin-shave a thin border around each letter for a soft halo, letting a dim orange glow bloom at the edges.

  • Cut through

    The I, heart, C, and T are cut all the way through for the brightest light and the clearest read.

Learn the carving basics

Before you start cutting

How do I keep the T's crossbar from breaking?

The center crossbar is a thin strip of skin that supports the top of the T, so treat it as a bridge you must not cut through. Carve the four quadrants slowly and leave that strip slightly wider if it feels fragile. Carving the T last means the finished cuts around it help stabilize the shell.

How do I keep the letters evenly spaced and readable?

Use a printed stencil rather than freehand so the slab-serif shapes and spacing stay consistent. Center the heart on the top row and line up the C and T below it before you poke any dots. Step back and check the layout from a few feet away, since that is roughly how viewers will read it on the porch.

Can I swap in my own state abbreviation?

Absolutely, the same two-row I-heart-layout works for any two-letter state code. Just keep the letters chunky and the strokes wide so they hold up and glow brightly. Watch for any letter with an enclosed or thin section and plan a supporting bridge the way you would for the T.

Your take belongs here, too.

Changed a detail? Made it simpler? Share a photo of your version and tell the community what worked.

Share your pumpkin

More pumpkins like this

You've reached the end · 8 pumpkins
The Patch Report

Fresh pumpkins, in your inbox.

The best new carvings, ideas worth stealing, and how-tos for carving season. Short, seasonal, and gone by November.

A short email during carving season. Unsubscribe anytime. See our privacy policy.