Halloween Pumpkin Carving Contest · Starts October 1st · $500 in prizes
← Back to ideas
@ai_concepts
Sep 14, 2026
I Love New Jersey Heart Lettering PumpkinAI
0

I Love New Jersey Heart Lettering Pumpkin

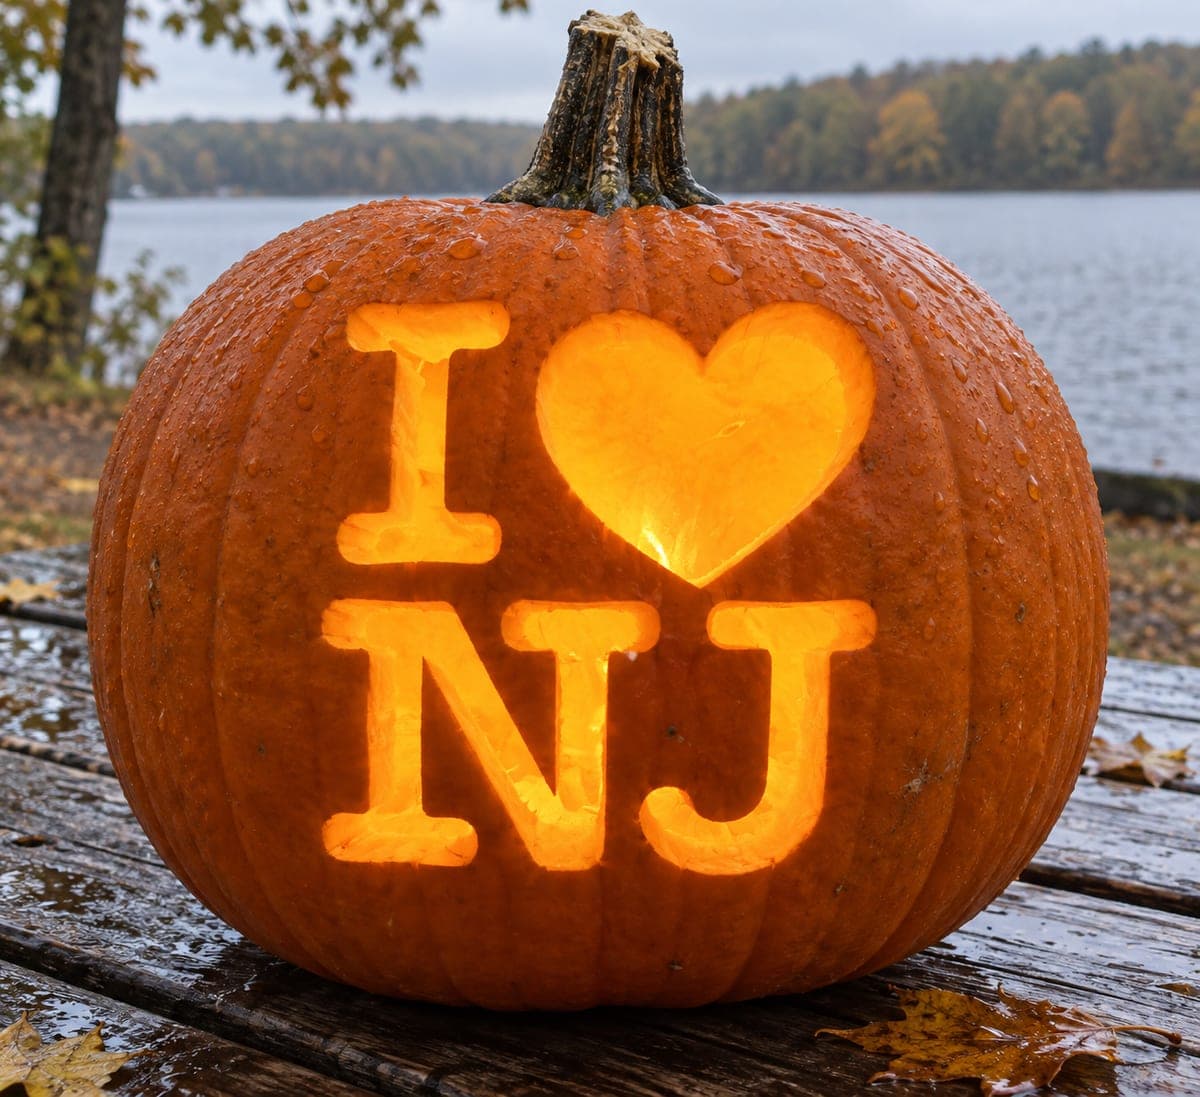
Set on a rain-slicked dock with an overcast lake behind it, this New Jersey jack-o-lantern glows with I, a heart, and NJ pierced through in rounded block letters. The J curves at the bottom into a small hook; cut the straight descender first and then follow the curve all the way around, keeping the hook at least three-eighths of an inch wide so the tip holds. This pumpkin carving idea suits a damp outdoor setting well because the closed carved shapes let light out without letting rain in the way open-face jack-o-lanterns do. Keep the lid vented with a small notch cut in the back so heat from the candle does not cook the flesh and speed decay.

This is an AI-generated concept image: a realistic, carvable design idea rather than a photo of a finished carve. AI concepts are always labeled and sit out the leaderboard and the contest.


No ratings yet · Sign in to rate

Comments (0)

  • No comments yet — be the first.

Save without an account. Sign in to like or comment.

Our tips for carving a similar design

The whole design rests on four simple cut-through shapes: the letter I, a heart, and the letters N and J, all in rounded block style. Since this is a concept image, you would recreate it by printing a stencil, spacing the shapes evenly, and cutting each one straight through the wall so it reads clearly from across the yard. The trick is treating the letters as solid islands of removed flesh rather than thin lines, which keeps everything readable and strong.

Written by PumpkinCarvingIdeas.com, inspired by the image above. These are our suggestions, not instructions from the uploader. This approach to the AI concept has not been tested on a real pumpkin.

From pumpkin to porch

  1. Pick a tall, smooth pumpkin and open the lid

    Choose a pumpkin with a flat, blemish-free front panel big enough to fit two rows of lettering. Cut the lid from the top at an angle so it rests without falling in, and scoop the inside until the front wall is about one inch thick. A thinner wall lets light glow through the peeled edges and makes cutting the letters easier. Have an adult handle all the knife work.

  2. Transfer the stencil evenly

    Print the I, heart, and NJ layout at a size that fills the front without crowding the ribs. Tape the paper smoothly to the damp skin and poke the outlines with a pin or a tracing tool, spacing the dots close together on curves like the heart and the J hook. Step back and check that the top row and bottom row line up before you cut. Even spacing is what makes lettering look intentional.

  3. Cut the straight letters first

    Start with the simplest shapes, the I and the straight parts of the N. Use a small saw and cut through the wall with steady, vertical strokes, letting the blade do the work instead of forcing it. Push each freed piece out from the inside so you do not crack the edges. Clean up ragged edges with a gentle second pass.

  4. Shape the heart and the curved J

    Cut the heart last of the upper shapes, working from the center point outward so the two rounded lobes stay symmetrical. For the J, cut the straight descender first, then follow the curve all the way around into the hook. Keep that hook at least three-eighths of an inch wide so the tip holds and does not snap off. Take short strokes on the tight curve to keep control.

  5. Vent the lid and light it

    Cut a small notch in the back of the lid so heat can escape, which keeps the flesh from cooking and slows decay. Set a battery LED light or two inside, never a candle, since the closed carved shapes trap heat. Rotate the light until the heart and letters glow evenly. LEDs also stay safe in a damp outdoor spot.

  6. Stage and photograph it

    Place the pumpkin on a dry board or dock rail and wipe surface water off the skin so it does not drip into the cuts. Shoot in low evening light so the warm glow reads against a darker background. Turn the pumpkin slightly so the letters face your camera straight on. A little petroleum jelly on the cut edges keeps them from drying out between showings.

Gather your supplies

Check things off as you get ready.

Work on a stable surface, keep your free hand out of the cutting path, and have an adult handle sharp tools.

Three levels of light

  • Leave intact

    The full orange body of the pumpkin around the letters stays untouched and dark.

  • Peel & shade

    The rounded inner edges of each cut letter can be lightly skin-thinned for a soft halo of dim orange around the glow.

  • Cut through

    The I, the heart, and the N and J are cut clean through the wall for the brightest light.

Learn the carving basics

Before you start cutting

How do I keep the letters readable and not too thin?

Treat each letter as a chunky block shape rather than a narrow line. Rounded block lettering gives you thick strokes that hold their shape and read from a distance. Aim for strokes at least half an inch wide, and keep the J hook to three-eighths of an inch minimum so the tip does not break.

What is the safest way to cut the curved heart and J?

Use short, slow strokes and let the saw ease around the curve instead of twisting it. On the heart, start at the bottom point and work each lobe outward for symmetry. On the J, finish the straight part before following the hook so the flesh stays supported while you cut.

Will this survive being displayed outside in the rain?

The closed carved shapes help, since they let light out without leaving a big open face for rain to pool in. Cut a vent notch in the back of the lid to release heat, and use LED lights so nothing overheats. Wipe standing water off the skin and coat the cut edges with petroleum jelly to slow drying.

Your take belongs here, too.

Changed a detail? Made it simpler? Share a photo of your version and tell the community what worked.

Share your pumpkin

More pumpkins like this

You've reached the end · 8 pumpkins
The Patch Report

Fresh pumpkins, in your inbox.

The best new carvings, ideas worth stealing, and how-tos for carving season. Short, seasonal, and gone by November.

A short email during carving season. Unsubscribe anytime. See our privacy policy.