Halloween Pumpkin Carving Contest · Starts October 1st · $500 in prizes
← Back to ideas
@ai_concepts
Sep 14, 2026
Little Round-Eyed Bat PumpkinAI
0

Little Round-Eyed Bat Pumpkin

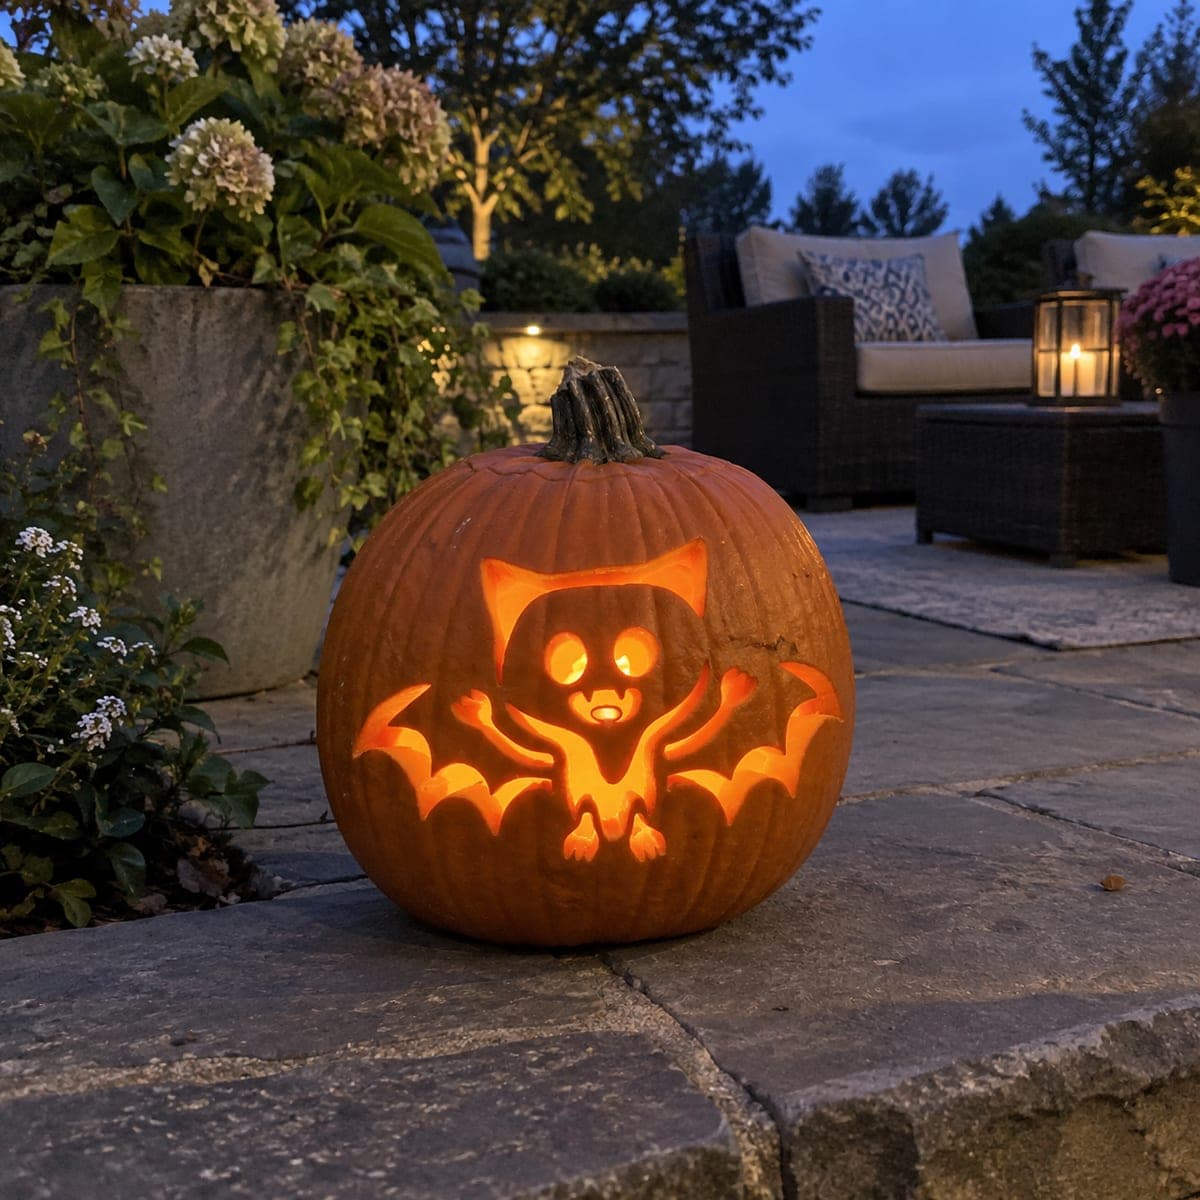
A round-faced cartoon bat with oversized glowing eyes, small pointed ears, stubby clawed feet, and spread wings faces forward with an open-mouthed surprised expression in this cute bat pumpkin carving cutout design. The eye whites, wing interiors, mouth, and body center are all pierced through, leaving dark rind for the pupils and facial details. Cut the circular eye openings before the wing sections so the face stays structurally supported while you remove the larger surrounding glow areas. Placing this jack-o-lantern at ground level lets the candlelight wash upward through the wing panels, adding a subtle gradient to the glowing amber.

This is an AI-generated concept image: a realistic, carvable design idea rather than a photo of a finished carve. AI concepts are always labeled and sit out the leaderboard and the contest.
No ratings yet · Sign in to rate

Comments (0)

  • No comments yet — be the first.

Save without an account. Sign in to like or comment.

Our tips for carving a similar design

The core trick here is a bright silhouette held together by thin strips of dark rind. You pierce the eye whites, mouth, wing panels, and body center all the way through, but leave slivers of skin in place for the pupils, ears, and clawed feet so the face reads clearly. Cut the small round eyes first while the surface is still solid, then open the big wing panels last.

Written by PumpkinCarvingIdeas.com, inspired by the image above. These are our suggestions, not instructions from the uploader. This approach to the AI concept has not been tested on a real pumpkin.

From pumpkin to porch

  1. Pick a round pumpkin and clean it out

    Choose a smooth, round pumpkin so the bat's chubby shape has room to sit centered on the front. Cut a lid from the bottom or the back rather than the top, which keeps the stem intact and makes the pumpkin easier to set over a light later. Scoop out the seeds and pulp, then thin the front carving wall to about one inch with a scraper. A thinner wall makes the cuts cleaner and lets more light through the wings.

  2. Transfer the bat design

    Print the stencil sized to fill the front face, then tape it flat and poke transfer dots along every line with a pin or awl. Pay special attention to the two big round eyes, the small pointed ears, the open mouth, and the scalloped edges of both wings. Mark which areas stay dark, the pupils and the little feet, so you do not cut them by mistake. Peel the paper and connect the dots lightly with a pencil if the pattern is faint.

  3. Cut the round eyes first

    Start with the two circular eye openings while the surface around them is still fully supported. Use a small carving saw and go slowly, rotating the pumpkin so your blade stays comfortable. Leave the pupil dots as untouched rind by cutting the ring of white around each one, or simply cut the whole circle and let the round shape glow. Cutting these small features first prevents the face from flexing once the larger wing panels are gone.

  4. Open the mouth and body center

    Cut the small open mouth and the central body glow next, keeping the little fangs as narrow attached bridges of rind if your design includes them. Keep these openings modest so the bat still looks plump and cute rather than hollowed out. Support the wall with your free hand as you finish each cut. Push the cut pieces gently inward and out to avoid tearing the edges.

  5. Remove the wing panels last

    Save the two large scalloped wing sections for the end since they take away the most material. Work one scallop at a time along the bottom edge of each wing, leaving the thin ribs between panels intact so the wings hold their shape. Keep the pointed ears and stubby clawed feet as solid dark rind for contrast. Take your time here, as these are the biggest openings and the surrounding surface is now more delicate.

  6. Light it low and take your photo

    Set a battery LED light or a short string of LEDs inside, never a candle, since the wide openings and thin walls need a cool, steady source. Place the pumpkin at ground level so the light washes upward through the wing panels and creates that soft amber gradient. Trim any rough edges with a paring knife and blot the inside dry. Shoot your photo at dusk when the surrounding light is dim and the glow reads warm.

Gather your supplies

Check things off as you get ready.

Work on a stable surface, keep your free hand out of the cutting path, and have an adult handle sharp tools.

Three levels of light

  • Leave intact

    The pupils, pointed ears, and stubby clawed feet stay as untouched dark rind for the bat's facial detail.

  • Peel & shade

    Skin-peel the wing ribs and a thin outline around the body if you want a dim orange halo framing the silhouette.

  • Cut through

    Cut fully through the round eyes, open mouth, body center, and scalloped wing panels for the brightest glow.

Learn the carving basics

Before you start cutting

How do I keep the fangs and wing ribs from breaking?

Leave them as narrow bridges of attached rind rather than freestanding tips. Keep each fang at least a quarter inch wide at the base and cut around it slowly. The wing ribs between scallops should stay solid so the wings do not sag once the panels are open.

Why cut the eyes before the wings?

The eyes are small openings surrounded by solid surface, so cutting them first keeps the face rigid while you work. The wing panels remove a lot of material, which makes the front wall flex and harder to control. Doing the big cuts last means the delicate face is already finished and stable.

Since this is a concept image, will a real pumpkin glow the same way?

This picture is an AI concept, so no real pumpkin was carved, but the design is fully doable. Thin the wall to about an inch and use a bright LED at ground level to get that upward wash through the wings. Real rind will hold the fangs and ribs fine as long as you keep those details wide and attached.

Your take belongs here, too.

Changed a detail? Made it simpler? Share a photo of your version and tell the community what worked.

Share your pumpkin

More pumpkins like this

You've reached the end · 8 pumpkins
The Patch Report

Fresh pumpkins, in your inbox.

The best new carvings, ideas worth stealing, and how-tos for carving season. Short, seasonal, and gone by November.

A short email during carving season. Unsubscribe anytime. See our privacy policy.