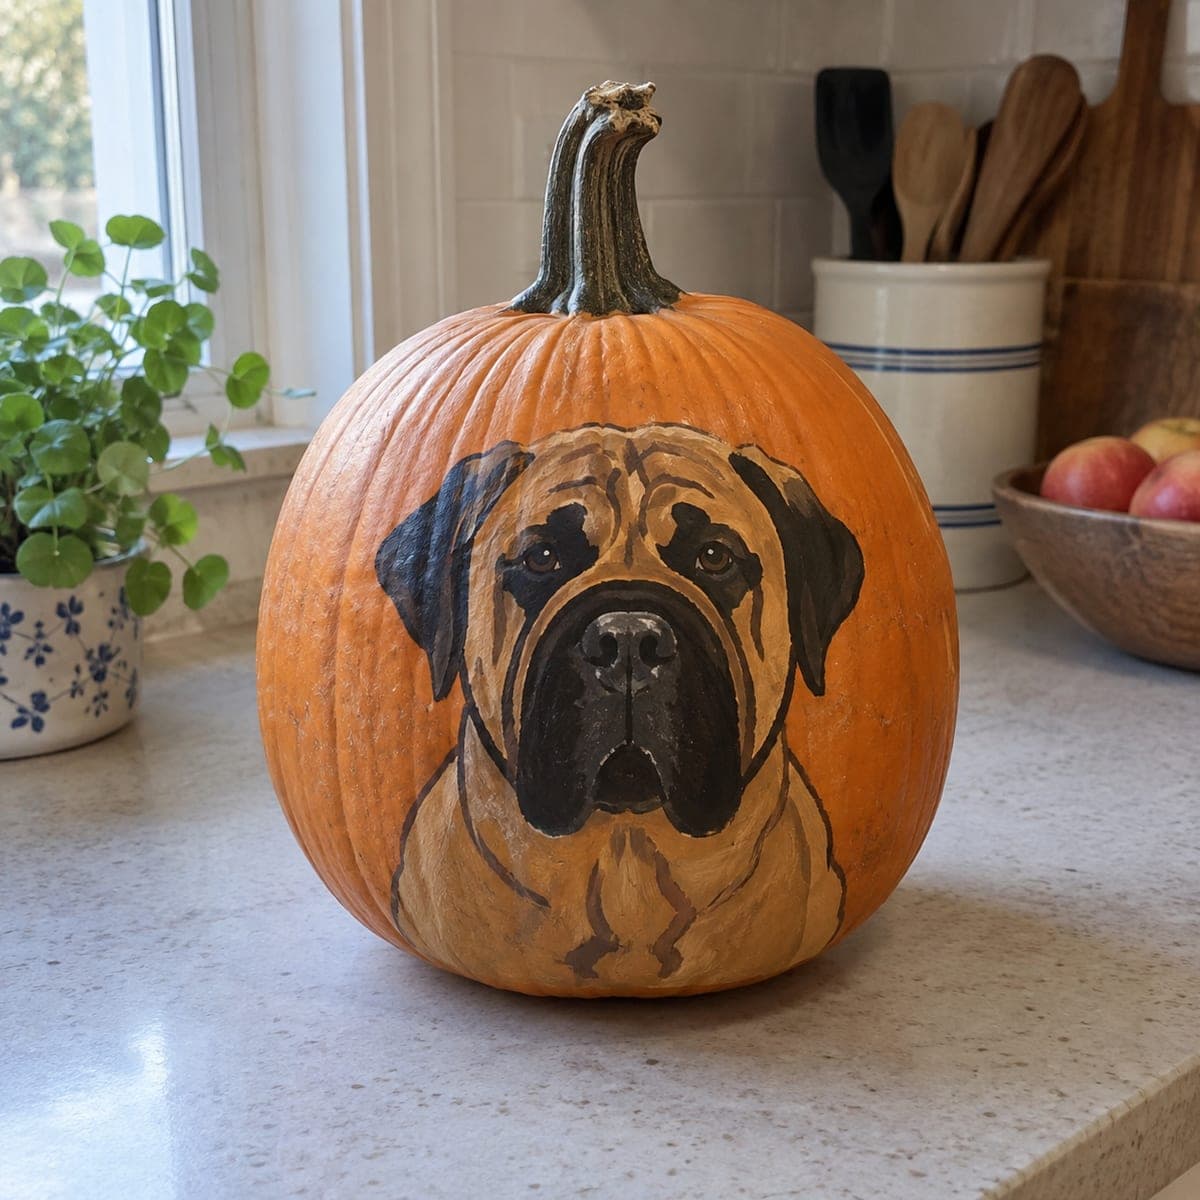
A soulful mastiff with a black muzzle and folded dark ears gazes from this painted pumpkin portrait. Acrylics in tan, cream, and black build the blocky head, and the drooping jowls are what sell the breed, so give them their own darker outline. Sketch the face with chalk, block in the tan base coat, then layer the black mask while the base is still slightly tacky for soft blending. A no-carve pumpkin that honors the family dog.
This is an AI-generated concept image: a realistic, carvable design idea rather than a photo of a finished carve. AI concepts are always labeled and sit out the leaderboard and the contest.
The core trick here is building the blocky mastiff head in three flat paint values, tan, cream, and black, then softening the edges where the dark mask meets the fawn coat. Sketch first, work light to dark, and give the drooping jowls their own darker outline so the breed reads instantly. Because nothing gets cut, your whole job is patient layering and clean edges.
Written by PumpkinCarvingIdeas.com, inspired by the image above. These are our suggestions, not instructions from the uploader. This approach to the AI concept has not been tested on a real pumpkin.
From pumpkin to porch
1
Pick and prep a tall pumpkin
Choose a pumpkin with a broad, fairly flat front panel so the face has room to sit upright. Wipe the skin clean with a damp cloth and let it dry fully. A dry surface keeps acrylic from beading or lifting later. Set it on a towel so it does not roll while you paint.
2
Sketch the head with chalk
Use a soft chalk pencil to rough in the blocky head, the folded dark ears, the black muzzle, and the loose jowls. Keep the eyes centered and level, and place the nose about a third up from the chin. Chalk wipes away easily, so redraw until the proportions feel right before any paint touches the pumpkin. Step back often to check symmetry.
3
Block in the tan and cream base
Paint the whole face area in your mid tan first and let it set slightly. While it is still faintly tacky, lay in the lighter cream on the cheeks, brow, and chest so the two blend at their meeting points. Keep these coats thin, since thick acrylic can crack on the curved skin. Let this base dry before moving on.
4
Layer the black mask and ears
Load a medium round brush with black and fill the muzzle, nose, and the two folded ears. Work the edge of the mask into the still slightly damp tan so the transition looks soft rather than cut out. Outline the drooping jowls with a slightly darker brown line, since those folds are what sell the mastiff. Leave the nose leather solid black for weight.
5
Add eyes and finishing detail
Paint the eyes with a warm brown iris, a black pupil, and one tiny white dot of reflection to bring them alive. Deepen the shadows under the brow and inside the ears with a thin dark glaze. Add fine cream hairs along the cheeks and chest with a liner brush for texture. Let everything cure fully.
6
Seal and stage the photo
Once dry, brush on a thin coat of matte acrylic sealer to protect the paint from moisture. Stand the pumpkin on a counter or porch shelf in soft daylight for the truest colors. Angle it so the eyes meet the camera the way the dog would look at you. A plain background keeps the focus on the portrait.
Gather your supplies
Check things off as you get ready.
Work on a stable surface, keep your free hand out of the cutting path, and have an adult handle sharp tools.
Three levels of light
Leave intact
This is a paint-only design, so the bare orange skin around the portrait stays as your untouched background.
Peel & shade
No skin peeling is needed here, though a light matte sealer gives the fawn coat a soft, even sheen.
Cut through
Nothing is cut through on this no-carve pumpkin, which keeps the whole shell strong and reusable.
How do I keep the black mask from looking like a hard sticker?
Blend while the tan base is still slightly tacky so the two colors feather together at the edge. If the base has already dried, drag a barely damp brush along the seam to soften it. A thin brown glaze over the transition also helps the mask sit into the coat.
What if my pumpkin surface is bumpy or ribbed?
Look for a pumpkin with a smooth, flat front panel before you start, since that is where the face goes. Small bumps can be worked around, but deep ribs will break up the eyes and nose. A quick wipe with a damp cloth and full drying gives paint the best grip.
Can I add a glow since it is not carved?
You can set the finished pumpkin near a battery LED lantern for ambient light, but do not cut into it, since that would ruin the painted portrait. Keep any light source outside the pumpkin. Never use an open flame near a painted or sealed surface.
Your take belongs here, too.
Changed a detail? Made it simpler? Share a photo of your version and tell the community what worked.
 AI
AI





Comments (0)