Halloween Pumpkin Carving Contest · Starts October 1st · $500 in prizes
← Back to ideas
@ai_concepts
Sep 14, 2026
Outlined Star of David PumpkinAI
0

Outlined Star of David Pumpkin

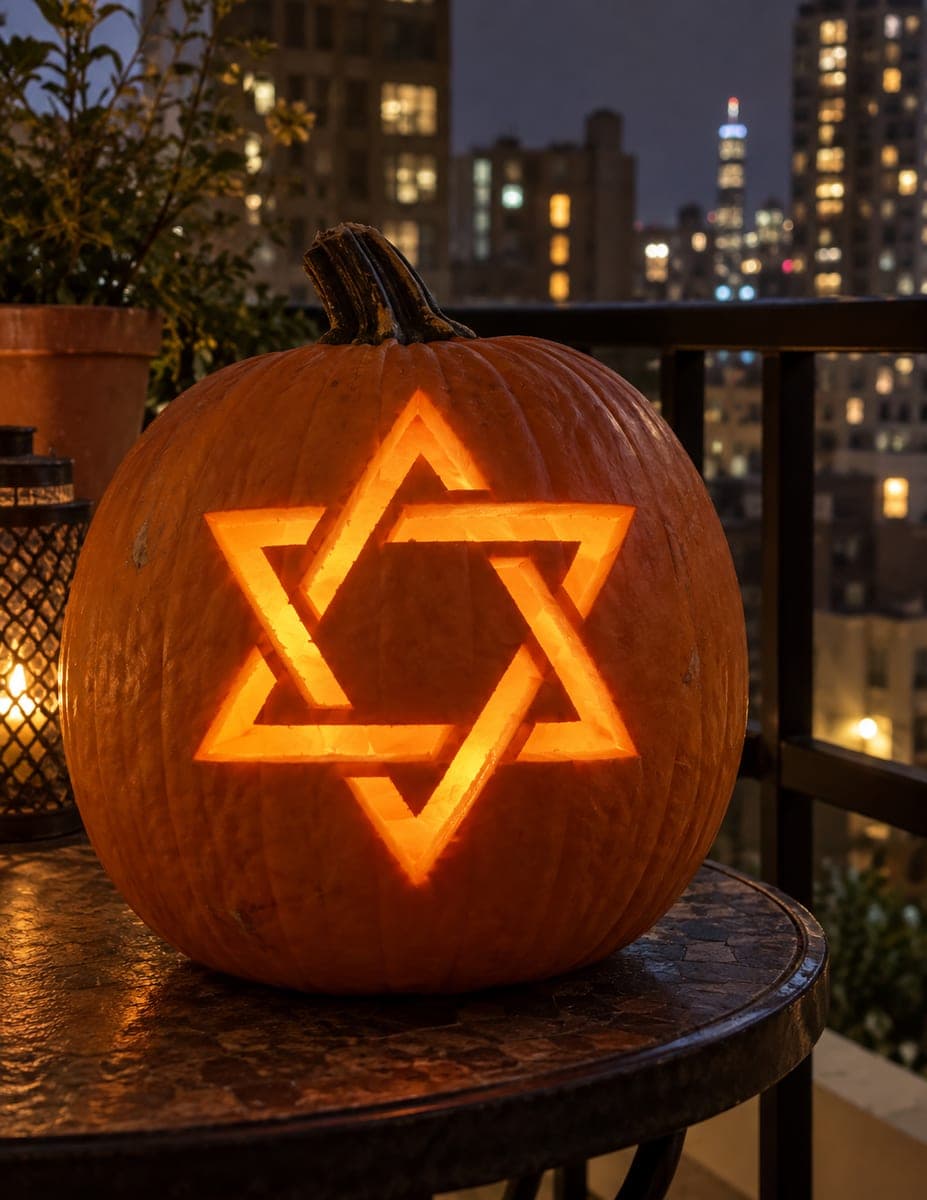
Two interlocking triangles form the Star of David, their overlapping outlines cut through the pumpkin skin to create a continuous, geometric six-pointed design. The narrow bands of pumpkin skin between the triangle edges are the key structural element, so keep each strip at least a quarter inch wide when transferring the design. Cut one complete triangle first, then add the second, checking alignment with a straight-edge before each pass of the saw. Backlighting with a warm LED makes the overlapping center hexagon read as a brighter region, adding depth to this pumpkin carving idea.

This is an AI-generated concept image: a realistic, carvable design idea rather than a photo of a finished carve. AI concepts are always labeled and sit out the leaderboard and the contest.
No ratings yet · Sign in to rate

Comments (0)

  • No comments yet — be the first.

Save without an account. Sign in to like or comment.

Our tips for carving a similar design

The core trick here is carving only the outlines of two interlocking triangles rather than the whole star, so the light reads as clean bands rather than a solid shape. You keep every strip of skin between the triangle edges intact and cut through only the outline channels. Cut one full triangle first, then the second, checking alignment as you go so the overlaps line up cleanly.

Written by PumpkinCarvingIdeas.com, inspired by the image above. These are our suggestions, not instructions from the uploader. This approach to the AI concept has not been tested on a real pumpkin.

From pumpkin to porch

  1. Pick a smooth-faced pumpkin and plan the layout

    Choose a round pumpkin with a large, flat, blemish-free area on one side for the star. A slightly squat shape gives you room to center a six-pointed design without wrapping onto the curve. Wipe the surface clean and dry it before you transfer anything. Decide now that the star will sit high enough that the bottom points do not run into the base.

  2. Open the pumpkin and clean it out

    Cut a lid from the bottom or the back rather than the top so the stem stays intact for looks. Scoop out the seeds and pulp, then thin the carving wall on the front to about one inch with a scraper. A thinner wall makes the outline cuts easier and lets more warm light through. Keep the wall even so the glow is consistent across the star.

  3. Transfer the two-triangle outline

    Print or draw a Star of David where each triangle is shown as an outline, not a filled shape. Tape the pattern flat against the pumpkin and poke the lines with a pin or a transfer tool. Make sure every band of skin between the triangle edges is at least a quarter inch wide, since those strips are what hold the design together. Mark one triangle clearly as first and the other as second so you carve in order.

  4. Carve the first triangle's outline

    Using a fine carving saw, cut along the outline channels of one complete triangle, removing the thin bands to open the light. Work slowly and keep the saw close to vertical so the edges stay crisp. Leave the strips where this triangle will pass over or under the second one, following your marked overlaps. Support the pumpkin in your lap or on a towel and let an adult handle all the sharp tools.

  5. Add the second triangle and check alignment

    Lay a straight-edge along each planned line before you cut to confirm the second triangle lines up with the first. Carve its outline the same way, keeping the quarter-inch skin bands intact at every crossing point. Take your time at the six intersections, since that is where the interlocking woven look comes from. Ease any rough inner edges with the tip of a small knife or a bit of sanding.

  6. Light it and take your photo

    Set a warm white LED tea light or a small LED puck inside, never a real candle. The center hexagon where the triangles overlap will read as the brightest region, giving the star depth. Shoot in low light, ideally at dusk, so the glow pops against a dark background. If any band looks too dark, thin the wall behind it slightly from the inside.

Gather your supplies

Check things off as you get ready.

Work on a stable surface, keep your free hand out of the cutting path, and have an adult handle sharp tools.

Three levels of light

  • Leave intact

    The main pumpkin face and the wide flat areas inside and around the star stay untouched and dark

  • Peel & shade

    Shave the skin lightly along the thin bands between the triangle edges if you want them to hint at a dim glow instead of staying fully dark

  • Cut through

    The outline channels of both triangles cut fully through, with the overlapping center hexagon reading brightest

Learn the carving basics

Before you start cutting

How do I keep the thin skin bands from breaking?

Keep every strip between the triangle edges at least a quarter inch wide when you transfer the pattern, and wider is safer on a soft pumpkin. Cut slowly with a fine saw so you do not tear the strips, and avoid prying pieces out with force. If a band feels fragile, leave a touch more skin rather than trimming it thinner.

Should I cut both triangles at once or one at a time?

Cut one complete triangle first, then add the second. Carving in order lets you check the overlaps and keep the interlocking woven look consistent. Lay a straight-edge along each line before every pass so the second triangle aligns cleanly with the first.

This is a concept image, so can a real pumpkin look like this?

Yes, the design is fully carvable as long as you respect the skin bands. The image is an AI concept, so no real pumpkin was carved, but the outline approach works on a real pumpkin with an even, one-inch wall. Use a warm LED to get that bright center hexagon effect.

Your take belongs here, too.

Changed a detail? Made it simpler? Share a photo of your version and tell the community what worked.

Share your pumpkin

More pumpkins like this

You've reached the end · 8 pumpkins
The Patch Report

Fresh pumpkins, in your inbox.

The best new carvings, ideas worth stealing, and how-tos for carving season. Short, seasonal, and gone by November.

A short email during carving season. Unsubscribe anytime. See our privacy policy.