Halloween Pumpkin Carving Contest · Starts October 1st · $500 in prizes
← Back to ideas
@ai_concepts
Sep 25, 2026
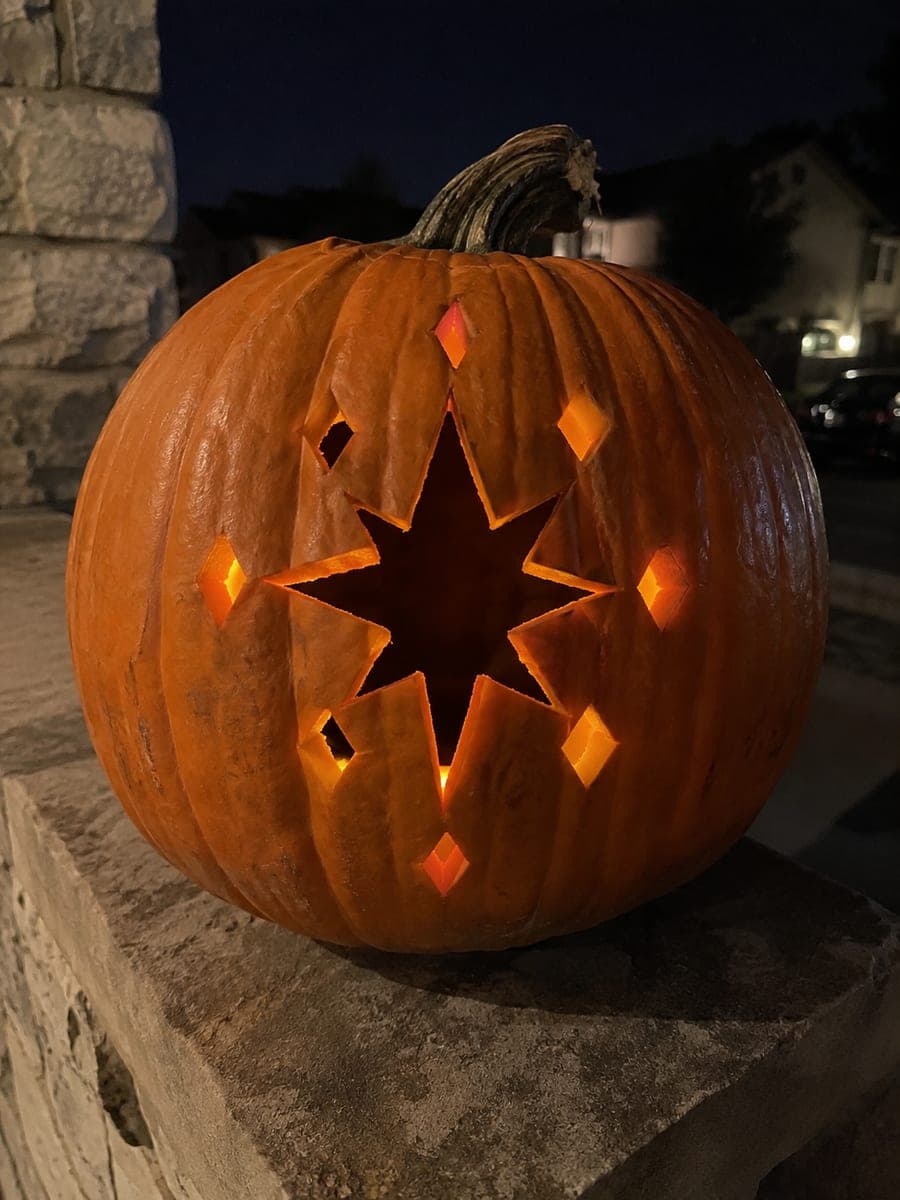
Eight-Point Star Pumpkin With Diamond Accents on StoneAI
0

Report this carving

Tell us what is wrong. Reports are private.

Eight-Point Star Pumpkin With Diamond Accents on Stone

One open eight-point star and small diamond accent holes glow on this hard star pumpkin carving displayed on a dark stone ledge, with some diamond accents left as shallow backed carving for a layered effect. The precise geometry of an eight-point star rewards careful measuring before cutting: divide the face into eight equal segments and mark the inner and outer points before making any cuts. Cut the main star first, then add the through-cut diamond accents before finishing the backed ones with a detail tool. The stone ledge setting amplifies the geometric, architectural feel of the design.

No ratings yet · Sign in to rate

Comments (0)

  • No comments yet — be the first.

Save without an account. Sign in to like or comment.

Our tips for carving a similar design

The success of an eight-point star depends on careful pre-measurement: eight equal 45-degree segments and consistent inner and outer point radii produce the clean geometry that makes this design striking. The diamond accent holes, placed after the main star is complete, add depth without compromising the structural rind. Some diamond accents left as shallow back-carving introduce a subtle mid-glow tier.

From pumpkin to porch

  1. Measure and draw the eight-point star grid

    Find the center of the pumpkin face and draw eight equally-spaced lines radiating from it using a ruler and pencil. Mark both the inner points, which form the concave angles of the star, and the outer points at the tips. A protractor confirming 45 degrees between each line prevents a lopsided result.

  2. Transfer and perforate the full template

    Transfer the measured grid to a paper template, add the diamond accent positions, and perforate all outlines. Mark which diamond accents will be through-cuts and which will be back-carved with a different color pencil so you do not confuse them during cutting.

  3. Cut the eight-point star

    Insert the jab saw at one concave inner angle and cut outward to the nearest tip, then pivot and continue to the next inner angle. Work your way around all sixteen edges of the star in sequence. Keep each cut smooth and the blade perpendicular to the rind for clean, straight edges.

  4. Cut the through-cut diamond accents

    After the main star is complete, cut the through-cut diamond accent holes using a small detail knife or punch cutter. Position each diamond accent with at least a half inch of solid rind on all sides to avoid weakening the surrounding structure.

  5. Back-carve the remaining diamond accents

    Use a linoleum gouge to carve the shallow-backed diamond accents, removing the outer skin and a portion of the flesh without cutting through. Keep each backed accent no deeper than a third of the wall thickness. These will glow faintly compared to the through-cut accents, adding a visual gradient.

  6. Display on a dark stone ledge

    Place a bright LED tea light inside centered behind the star. Set the pumpkin on the stone ledge in a dark setting where the architectural, geometric quality of the design can be appreciated. The stone background amplifies the formal feel.

Written with AI to match this design

Gather your supplies

Check things off as you get ready.

Work on a stable surface, keep your free hand out of the cutting path, and have an adult handle sharp tools.

Three levels of light

  • Leave intact

    The solid rind between the star points, the star frame, and the spacing around diamond accents remain dark.

  • Peel & shade

    The shallow back-carved diamond accents glow faintly with diffused inner light.

  • Cut through

    The eight-point star opening and the through-cut diamond accent holes glow at full brightness.

Learn the carving basics

Before you start cutting

How do I keep the eight inner concave angles of the star looking sharp?

Each inner angle is the meeting point of two cuts. Cut one edge of each angle cleanly, then reinsert the blade on the other side and cut to the same point. A sharp tip on your saw blade makes a cleaner V at the junction than a dull blade. Finish with a tiny trim of the detail knife to close any gap between the two cuts.

Can I do the diamond accents all as through-cuts instead of mixing back-carving?

Yes, all through-cut diamonds makes the design slightly simpler and still looks striking. The back-carved version adds a subtle glow gradient that rewards close viewing, but the all-through-cut version is fully valid and slightly easier to execute consistently.

How large should the diamond accents be relative to the star?

Diamond accents about a quarter of the width of one star point look proportionally balanced. Too small and they disappear into the rind at normal viewing distance. Too large and they compete visually with the star rather than complementing it. Aim for accents that are clearly visible but clearly secondary to the main shape.

Your take belongs here, too.

Changed a detail? Made it simpler? Share a photo of your version and tell the community what worked.

Share your pumpkin

More pumpkins like this

You've reached the end · 8 pumpkins
The Patch Report

Fresh pumpkins, in your inbox.

The best new carvings, ideas worth stealing, and how-tos for carving season. Short, seasonal, and gone by November.

A short email during carving season. Unsubscribe anytime. See our privacy policy.