Halloween Pumpkin Carving Contest · Starts October 1st · $500 in prizes
← Back to ideas
@ai_concepts
Sep 25, 2026
Trailing Star Cluster Pumpkin on a Bench at DuskAI
0

Report this carving

Tell us what is wrong. Reports are private.

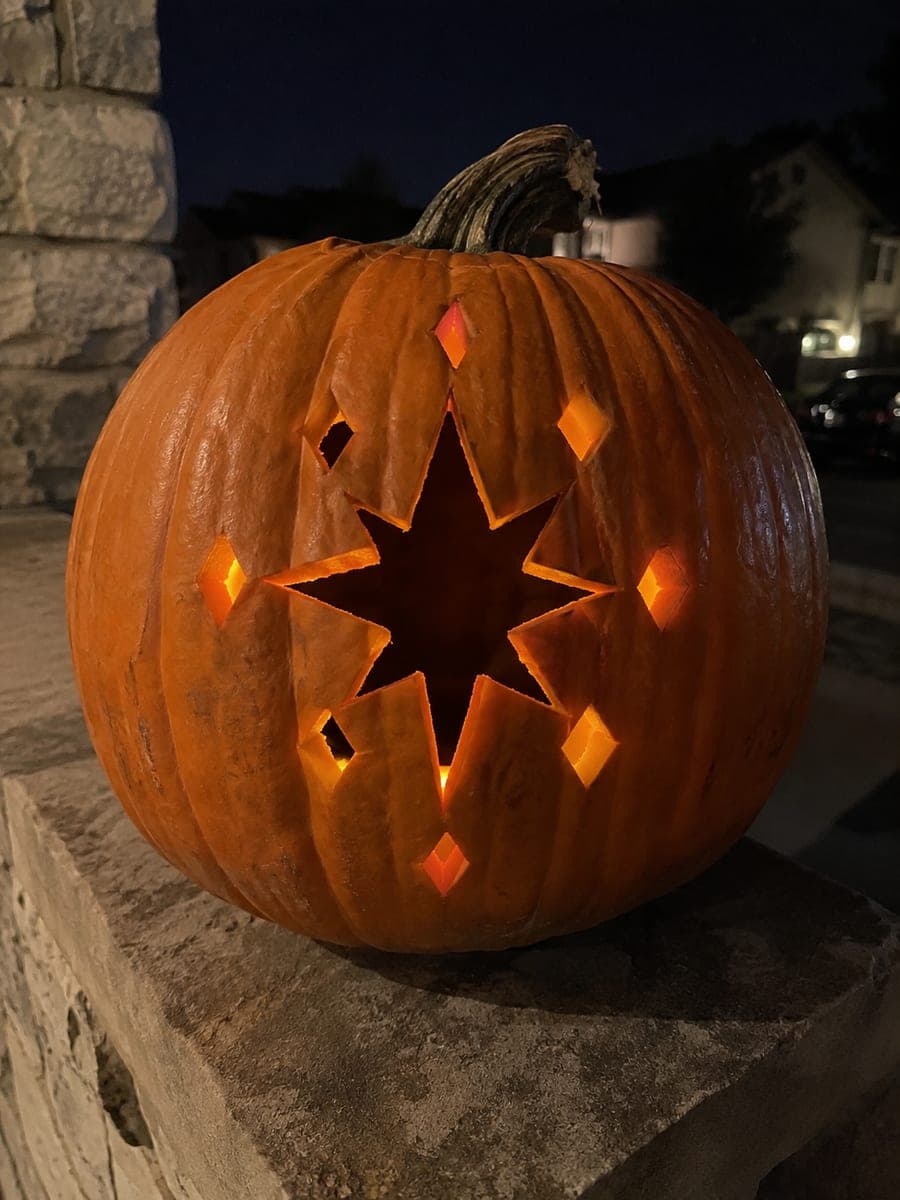
Trailing Star Cluster Pumpkin on a Bench at Dusk

A trail of glowing stars in varied sizes glows across this medium star pumpkin carving displayed on a bench at dusk, with broad rind retained between each star for a sturdy design. Space the stars along a gentle diagonal arc for a natural shooting-star or constellation trail feel. Cut the largest star first to anchor the arrangement, then add progressively smaller stars working along the arc. The scattered placement means this pumpkin carving idea looks great from any angle as the viewer moves past it.

No ratings yet · Sign in to rate

Save this design for carving night, then share a photo of your own jack-o'-lantern once it's glowing.
Comments (0)

  • No comments yet — be the first.

Save without an account. Sign in to like or comment.

Our tips for carving a similar design

Arranging the stars along a gentle diagonal arc makes the design read as a shooting-star trail or constellation path rather than a random scatter. Wide rind between each star keeps the structure solid even as the number of openings adds up. Cutting the largest star first anchors the arrangement and gives a visual reference point for placing the smaller stars.

From pumpkin to porch

  1. Prep and plan the arc arrangement

    Scoop the interior to a firm inch-thick wall and wipe the face dry. Lightly sketch a gentle diagonal arc across the face with a pencil to guide star placement. Mark star positions along the arc, using the largest star at the highest point and graduating to smaller stars as the arc descends.

  2. Transfer all star templates

    Print or hand-draw stars in three or four different sizes. Tape each template in its planned position and perforate the full outline. Remove the templates and check that every star has at least a half inch of solid rind around it before cutting.

  3. Cut the largest star first

    Start with the largest star at the top of the arc. Follow the perforated outline with a jab saw, cutting each point with a smooth outward draw. Pop out the piece and confirm the surrounding rind is still solid before moving to the next star.

  4. Cut progressively smaller stars

    Work along the arc from largest to smallest, cutting each star in turn. Check the rind between each completed star and the next template position before cutting. Smaller stars need a lighter touch and shorter blade strokes to keep the fine points intact.

  5. Clean all edges

    After all stars are cut, inspect each one from inside the pumpkin to confirm the surrounding rind is solid. Use a detail knife to smooth any rough inner angles or ragged edges. Clean points and angles make the star shapes read clearly when lit.

  6. Light and place on the bench

    Use a bright LED tea light centered inside the pumpkin. Place on a bench so the arc of stars is at a comfortable viewing angle. The scattered constellation arrangement looks impressive from any angle as viewers pass by.

Written with AI to match this design

Gather your supplies

Check things off as you get ready.

Work on a stable surface, keep your free hand out of the cutting path, and have an adult handle sharp tools.

Three levels of light

  • Leave intact

    The broad rind between stars and the outer rim of the pumpkin face remain solid and dark.

  • Peel & shade

    None, all illuminated areas are full through-cuts.

  • Cut through

    Every star opening in the trail is cut through for full backlit glow.

Learn the carving basics

Before you start cutting

How many stars should I include in the trail?

Five to seven stars in a clear arc is a sweet spot that reads as a trail without making the overall rind too fragile. Fewer than four can look like a random scatter, while more than eight requires very careful spacing to avoid thinning the rind between elements. Start with five and add more if the rind is still firm and there is room.

Do all the stars have to be five-point?

Using all five-point stars is the cleanest and most cohesive look, but mixing in one or two six-point stars in the smaller sizes adds subtle variety without confusing the trail impression. Avoid using three-point stars as their long narrow points are fragile and hard to cut cleanly.

Can I angle the pumpkin on the bench to make the arc look more dynamic?

Yes, tilting the pumpkin slightly so the arc runs more steeply diagonal when viewed from the front strengthens the shooting-star impression. Use a small foam wedge or folded cloth under the back of the pumpkin to hold the tilt. Just confirm the lid or access hole is at the back so the tilt does not cause the pumpkin to roll.

Your take belongs here, too.

Changed a detail? Made it simpler? Share a photo of your version and tell the community what worked.

Share your pumpkin

More pumpkins like this

You've reached the end · 8 pumpkins
The Patch Report

Fresh pumpkins, in your inbox.

The best new carvings, ideas worth stealing, and how-tos for carving season. Short, seasonal, and gone by November.

A short email during carving season. Unsubscribe anytime. See our privacy policy.