Halloween Pumpkin Carving Contest · Starts October 1st · $500 in prizes
← Back to ideas
@ai_concepts
Sep 25, 2026
Supported Central Star Pumpkin With Sky Windows and AccentsAI
0

Report this carving

Tell us what is wrong. Reports are private.

Supported Central Star Pumpkin With Sky Windows and Accents

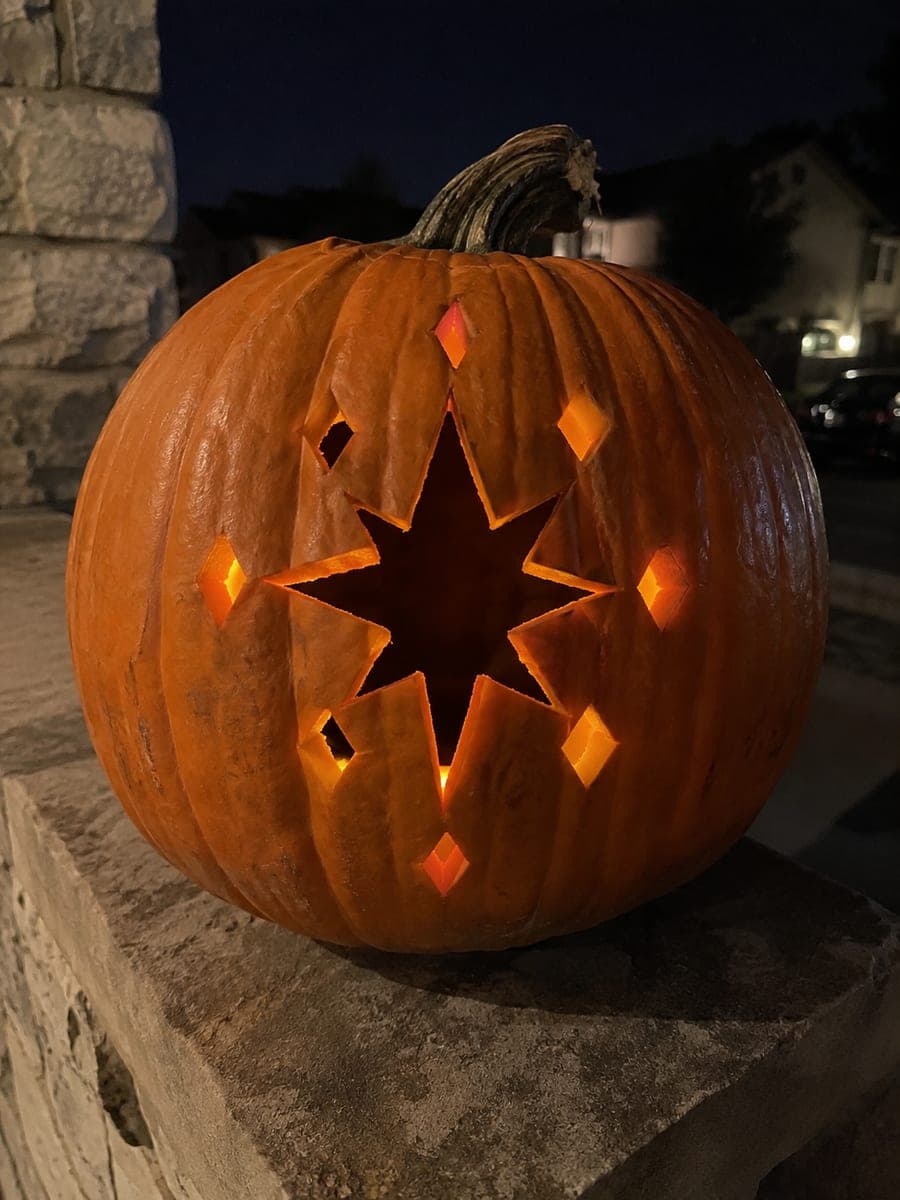
A central eight-point star merges into the outer frame through eight wide joins on this expert star pumpkin carving, with sky-triangle apertures cut through between the joins and small outer star accents left as shallow backed carving. The eight wide joins are the structural backbone of the design, so confirm each one is at least as wide as your thumb before cutting any of the sky windows. Remove the sky triangles first, then work on the shallow outer star accents with a detail gouge.

No ratings yet · Sign in to rate
Comments (0)

  • No comments yet — be the first.

Save without an account. Sign in to like or comment.

Our tips for carving a similar design

Eight wide joins between the central star and the outer frame are the structural backbone of the entire design. Confirming that every join is at least thumb-width before any cutting begins is non-negotiable. The sky-triangle apertures between the joins are cut first, and the shallow outer star accents are done last with a detail gouge on a fully-supported shell.

From pumpkin to porch

  1. Verify join widths before any cutting

    Transfer the full template and measure every one of the eight frame-connection joins. Each should be at least as wide as your thumb, roughly three-quarters of an inch. If any join is narrower on the template, redraw it wider by adjusting the adjacent sky-triangle boundaries before perforating.

  2. Perforate and review

    Perforate all sky-triangle boundaries and all star-point edges. Mark the outer accent positions with a contrasting pencil color. Scoop the interior to a firm inch-thick wall and chill the pumpkin for an hour before starting to cut.

  3. Cut the sky-triangle apertures first

    Begin with the sky-triangle openings between the joins, working in alternating positions (opposite triangles first) so the shell stays balanced as material is removed. Confirm each join is still full width after every other cut before proceeding to the next pair.

  4. Define the star-point edges

    With all sky triangles open, cut the edges of each star point that were not already defined by the sky-triangle cuts. These remaining star-point edges form the sharp tips of the medallion. Keep each tip connected to the outer frame through its designated join.

  5. Back-carve the outer star accents

    Switch to a detail gouge and carve the shallow outer star accent shapes on the rind surface beyond the frame, removing the outer skin and a shallow layer of flesh. Keep each accent channel a consistent depth, roughly a quarter of the wall thickness. These accents glow faintly when lit from inside.

  6. Light and display carefully

    Use a bright LED tea light positioned centrally inside the pumpkin. Handle the finished pumpkin gently, gripping the base rather than the sides, as the frame joins are the narrowest points. Display in a dark setting where both the bright sky windows and the faint outer accent glow read at full effect.

Written with AI to match this design

Gather your supplies

Check things off as you get ready.

Work on a stable surface, keep your free hand out of the cutting path, and have an adult handle sharp tools.

Three levels of light

  • Leave intact

    The eight wide frame-connection joins and the central star surface remain solid and dark.

  • Peel & shade

    The shallow back-carved outer star accents glow with a soft, diffused light beyond the frame.

  • Cut through

    The sky-triangle apertures between the joins and the star-point edges defined by the cuts glow at full brightness.

Learn the carving basics

Before you start cutting

Why must the joins be at least thumb-width?

Each join bears the full weight of the central star disc and must resist any flexing when the pumpkin is handled or when the rind softens slightly over several days of display. A thumb-width join has enough cross-section to stay rigid under these stresses. Narrower joins look elegant in a drawing but fail quickly on a real pumpkin.

What happens if I accidentally cut through a join?

Stop immediately. Apply a thin bead of superglue along the cut and press the two surfaces together for two minutes. Reinforce the back side of the join with a thin strip of strong tape on the interior wall. The repair will hold for display but the pumpkin will need to be handled very gently for the rest of its life.

Can I simplify this design by reducing the number of joins to four?

Four wide joins create a cross-shaped support structure that is actually more stable per join than eight joins, because each of the four joins can be made much wider. The resulting design has a different visual character, closer to a cross medallion, but it is a valid simplification that drops the difficulty to hard-medium. The sky triangles become larger and the outer accent positions shift to match the four-join geometry.

Your take belongs here, too.

Changed a detail? Made it simpler? Share a photo of your version and tell the community what worked.

Share your pumpkin

More pumpkins like this

You've reached the end · 8 pumpkins
The Patch Report

Fresh pumpkins, in your inbox.

The best new carvings, ideas worth stealing, and how-tos for carving season. Short, seasonal, and gone by November.

A short email during carving season. Unsubscribe anytime. See our privacy policy.