Halloween Pumpkin Carving Contest · Starts October 1st · $500 in prizes
← Back to ideas
@ai_concepts
Sep 14, 2026
Oval Tree of Life PumpkinAI
0

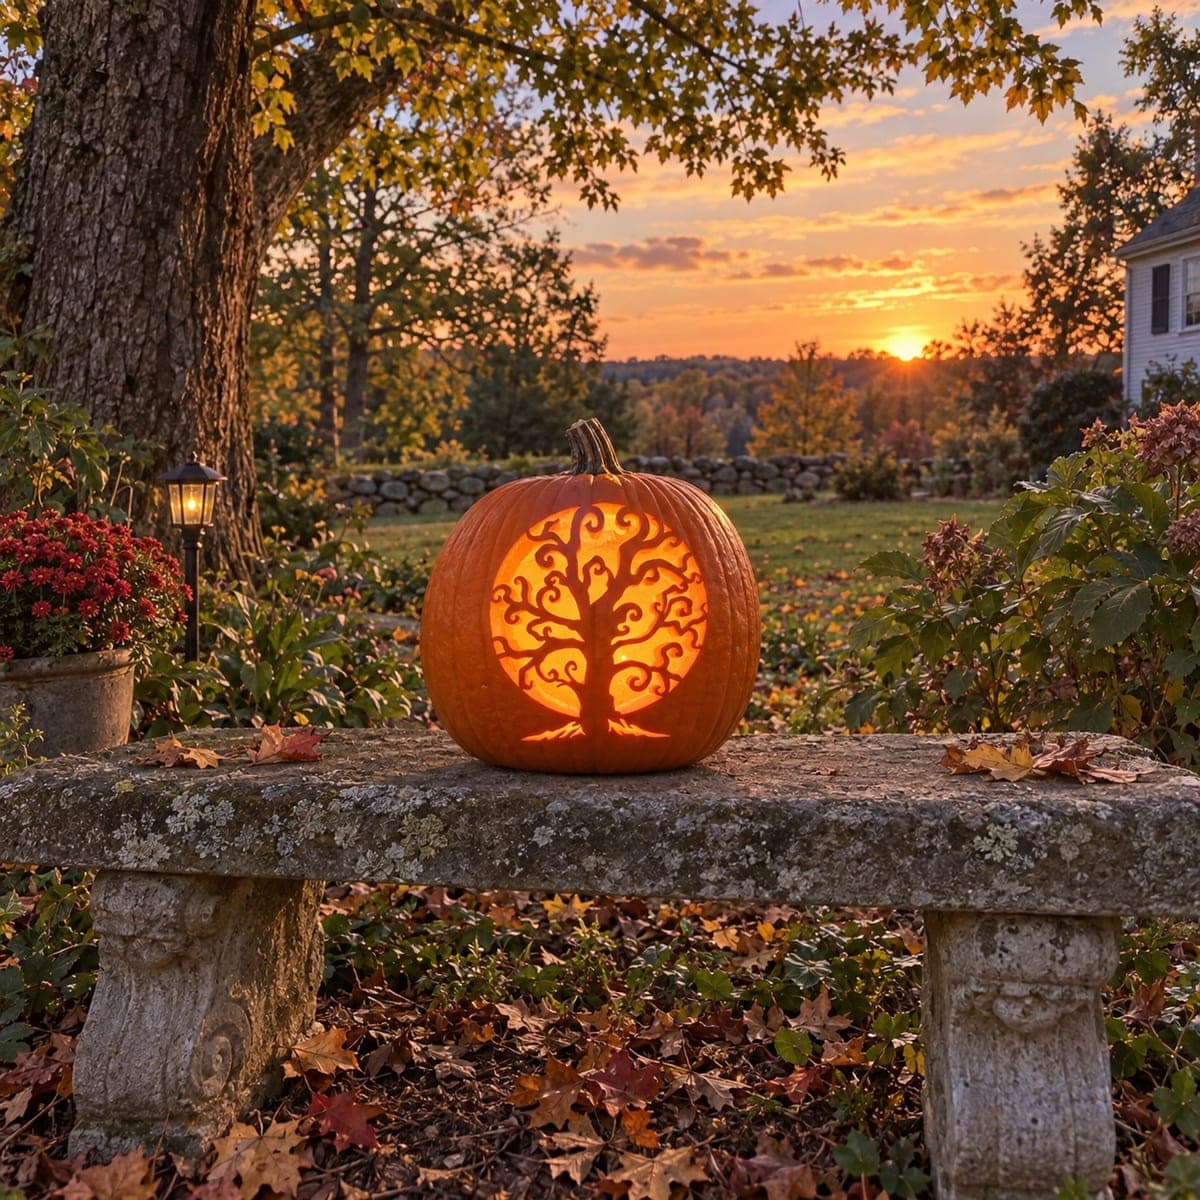
Oval Tree of Life Pumpkin

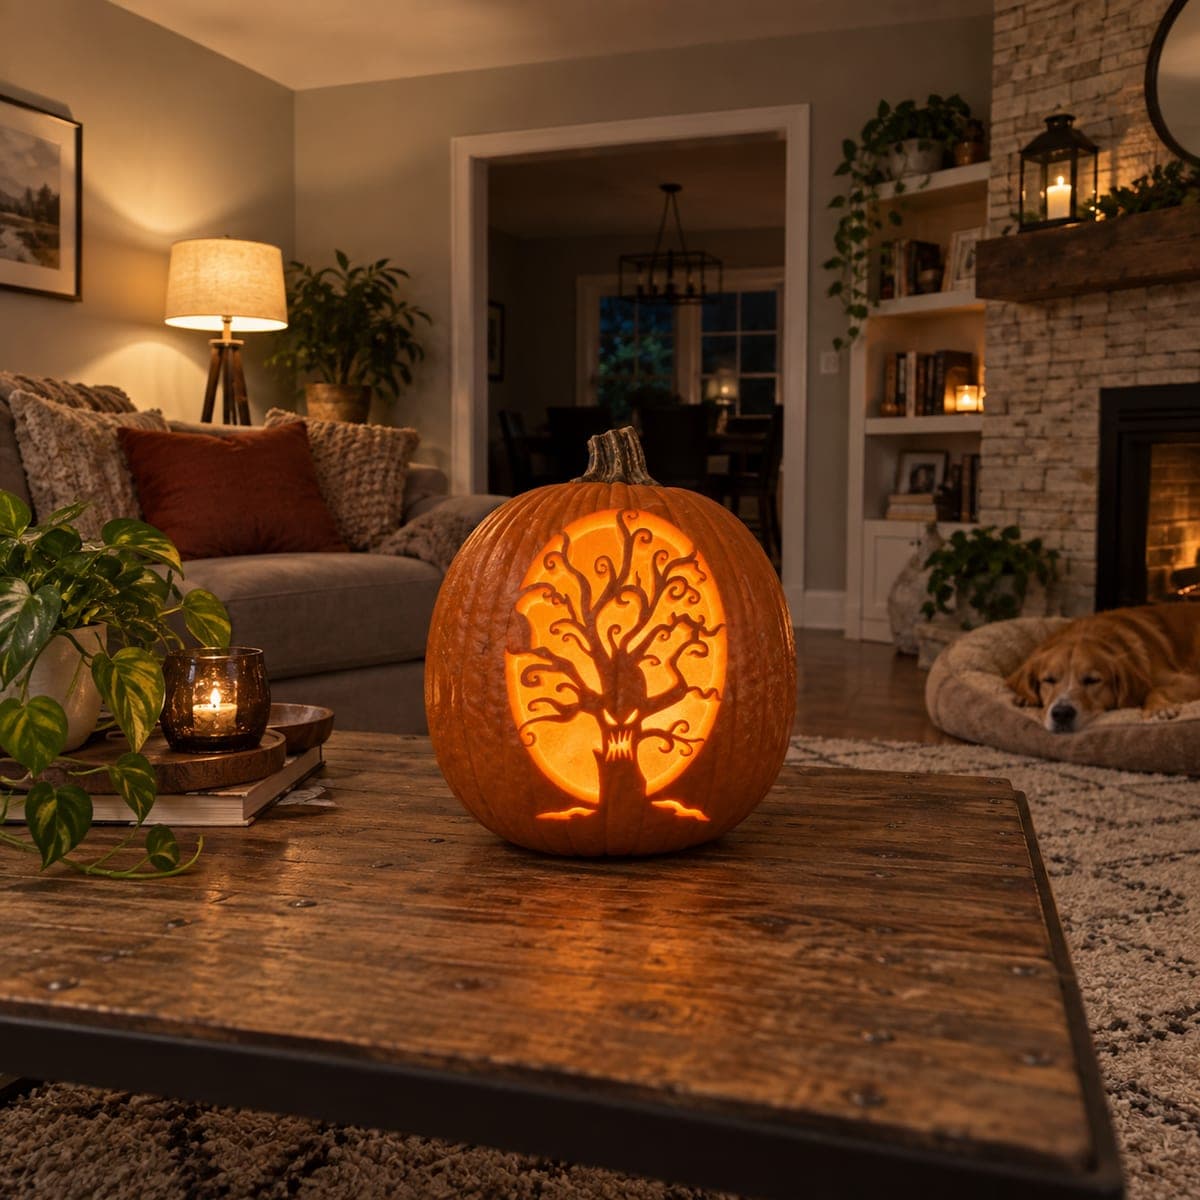
A dark ornamental tree with a stout trunk and delicately curling branch ends stands against a tall oval of pierced-out glow in this living-room display. The glowing oval background is entirely cut away while the tree remains as intact rind in this silhouette pumpkin carving design. Score the oval outline and cut it in two or three arcs rather than one continuous pass so the wall stays braced; the spiral branch tips at the crown need a small bridge left to the oval edge to prevent them from drooping.

This is an AI-generated concept image: a realistic, carvable design idea rather than a photo of a finished carve. AI concepts are always labeled and sit out the leaderboard and the contest.

No ratings yet · Sign in to rate
Comments (0)

  • No comments yet — be the first.

Save without an account. Sign in to like or comment.

Our tips for carving a similar design

The core trick here is the reverse silhouette: the tall oval behind the tree is fully cut away so it glows, while the trunk and every curling branch stay as solid rind. Plan the oval as a braced wall by cutting it in two or three arcs instead of one long pass, and leave tiny bridges where the spiral branch tips meet the oval edge so they never droop. Everything reads as a dark tree floating in light.

Written by PumpkinCarvingIdeas.com, inspired by the image above. These are our suggestions, not instructions from the uploader. This approach to the AI concept has not been tested on a real pumpkin.

From pumpkin to porch

  1. Pick a tall pumpkin and open the back

    Choose a tall, fairly flat-faced pumpkin so the oval has room to sit upright. Cut a lid or a hatch in the back rather than the top so the front face stays clean. Scoop the inside and thin the carving wall on the face to about one inch, which makes the fine branch curls easier to cut. Have an adult handle all the sharp tools.

  2. Transfer the oval and tree pattern

    Tape your stencil flat to the face and poke through the outlines with a pin or a transfer tool. Mark the full oval boundary, the stout trunk, and each curling branch tip so you can see what stays and what gets removed. Double check that the branch spirals near the crown touch the oval edge, because those contact points become your bridges. Step back and confirm the tree is centered before you cut anything.

  3. Score the oval and cut it in arcs

    Lightly score the entire oval outline first so you have a clean guide. Cut the oval away in two or three arc sections rather than one continuous pass, leaving short uncut spans between arcs so the wall stays braced while you work. Cut around the outside of the trunk and branches, removing only the background so the tree is left as intact rind. Save the widest openings near the bottom for last.

  4. Free the branches and leave the bridges

    Carefully cut the negative spaces between the curling branches, working from the center outward. Where a spiral tip reaches the oval edge, leave a small bridge of rind connecting them so the delicate ends stay supported and do not sag. Take slow, short strokes on these tight curves and reposition the pumpkin rather than forcing the blade. If a curl feels too thin, widen its base slightly for strength.

  5. Clean edges and add a peeled halo

    Run your blade back around each cut edge to remove ragged bits so the light throws crisp shapes. For a softer glow ring, lightly skin-peel a thin border of skin just outside the oval so it reads as a dim halo. Wipe the face and touch up any branch that looks lumpy. A gel or paring tool helps smooth the innermost curl gaps.

  6. Light it and photograph

    Set a battery LED puck inside, warm white for that classic amber tone, and skip open flame near these thin branches. Place the pumpkin on a mantel or table at eye level so the oval reads as a full backlit window. Dim the room and shoot slightly off to one side so the tree casts a little depth. Refresh the cut edges with a damp cloth if they dry out over a few days.

Gather your supplies

Check things off as you get ready.

Work on a stable surface, keep your free hand out of the cutting path, and have an adult handle sharp tools.

Three levels of light

  • Leave intact

    The trunk, branches, and curling tips stay as untouched rind so the tree reads dark.

  • Peel & shade

    A thin skin-peeled border just outside the oval for a soft dim halo.

  • Cut through

    The entire oval background is cut through for the brightest glow behind the tree.

Learn the carving basics

Before you start cutting

How do I keep the thin branch curls from drooping?

Leave small rind bridges wherever a spiral branch tip touches the oval edge, since those contact points carry the weight. Also widen the base of any curl that feels flimsy. Cutting the fine gaps last, after the wall is mostly intact, keeps everything stable.

Why cut the oval in arcs instead of one pass?

The oval is a large opening, and removing it all at once leaves the surrounding wall weak and prone to cracking. Cutting two or three arc sections with short uncut spans between them keeps the face braced while you work. You can finish those spans near the end once the branches are supported.

This is an AI concept image, so can a real pumpkin look like this?

Yes, the design is carveable if you keep the branches a bit thicker than the render suggests and use bridges at the crown. Real rind needs more support than a digital image, so favor gentle curves over hair-thin whips. Thin the wall and go slow and it will hold.

Your take belongs here, too.

Changed a detail? Made it simpler? Share a photo of your version and tell the community what worked.

Share your pumpkin

More pumpkins like this

You've reached the end · 8 pumpkins
The Patch Report

Fresh pumpkins, in your inbox.

The best new carvings, ideas worth stealing, and how-tos for carving season. Short, seasonal, and gone by November.

A short email during carving season. Unsubscribe anytime. See our privacy policy.