Halloween Pumpkin Carving Contest · Starts October 1st · $500 in prizes
← Back to ideas
@ai_concepts
Sep 14, 2026
Round-Canopy Tree Silhouette PumpkinAI
0

Round-Canopy Tree Silhouette Pumpkin

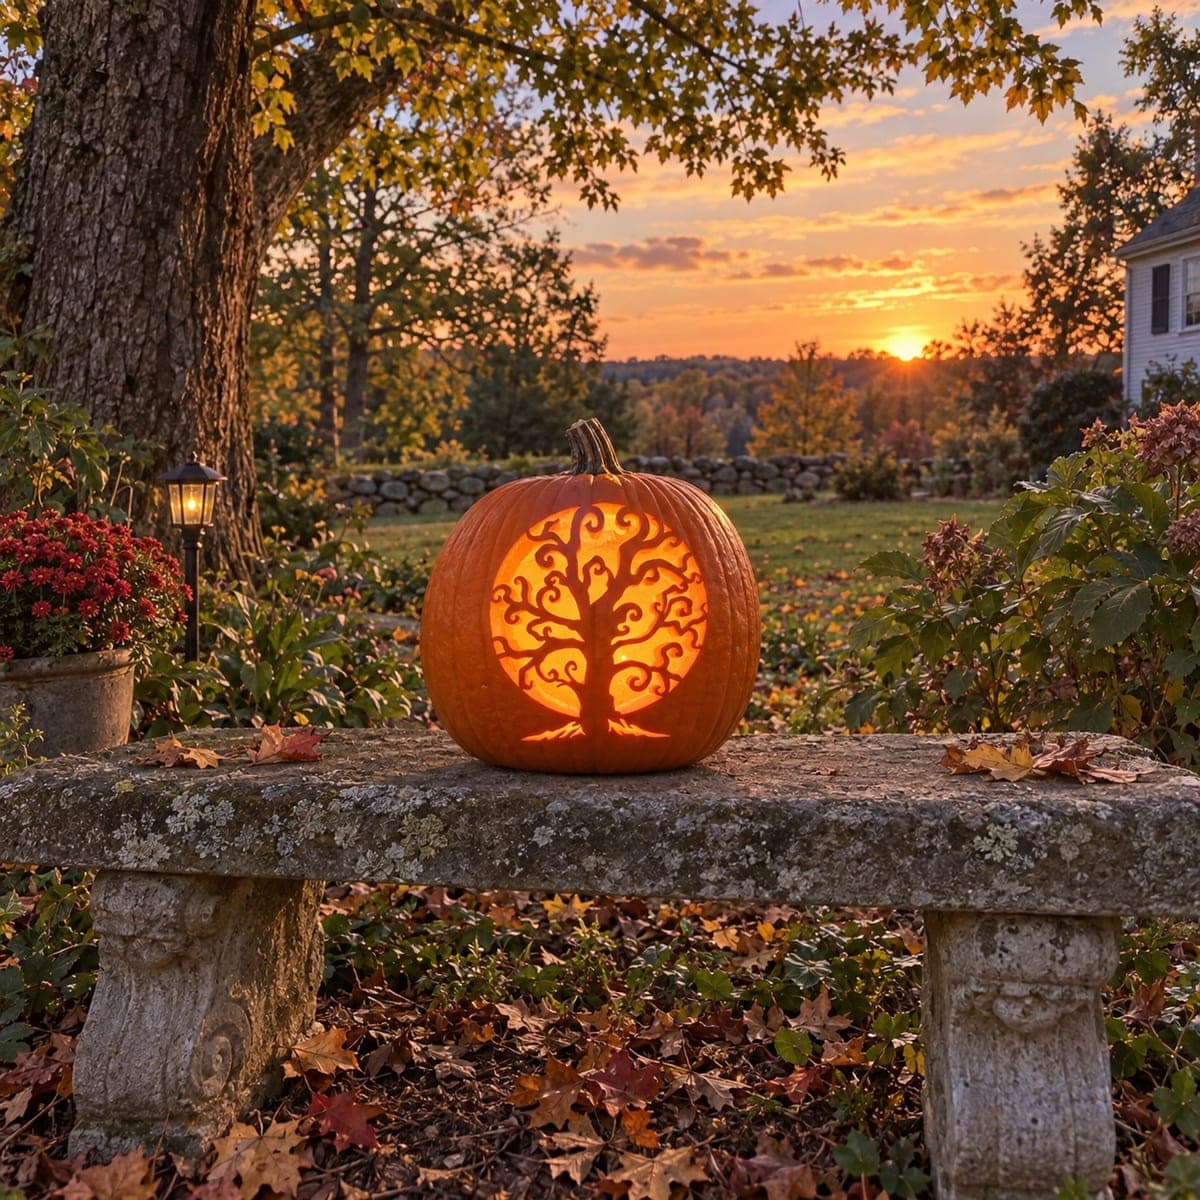
A decorative tree with a thick trunk fans into dozens of curling, spiral-tipped branches that fill a large circular opening, photographed against a vivid autumn sunset. In this silhouette pumpkin carving, the glowing background is cut away while the intricate tree and its swirling branches remain as dark skin. Because the outermost curl tips are small and unsupported, widen each to at least a quarter inch before transferring the pattern so they survive handling.

This is an AI-generated concept image: a realistic, carvable design idea rather than a photo of a finished carve. AI concepts are always labeled and sit out the leaderboard and the contest.

No ratings yet · Sign in to rate
Comments (0)

  • No comments yet — be the first.

Save without an account. Sign in to like or comment.

Our tips for carving a similar design

The core trick here is a reverse silhouette: instead of carving the tree, you cut away the round background around it so light pours through and the trunk, branches, and curling tips stay as dark skin. Plan the whole design as one circular window with the tree as a connected web of bridges, since every branch must physically link back to the trunk or the ring to stay attached. Keep the outer curl tips thick so they hold up while you work.

Written by PumpkinCarvingIdeas.com, inspired by the image above. These are our suggestions, not instructions from the uploader. This approach to the AI concept has not been tested on a real pumpkin.

From pumpkin to porch

  1. Pick a smooth pumpkin and open the lid

    Choose a tall, round pumpkin with a broad, blemish-free front panel big enough for the circular design. Cut a lid from the back or bottom rather than the top so the front face stays uninterrupted. Scrape the inside of the front wall down to about one inch thick with a scoop or loop tool. A thinner, even wall makes the fine branch cuts far easier and lets more light through.

  2. Prep and transfer the pattern

    Before transferring, thicken every unsupported curl tip to at least a quarter inch and confirm each branch connects to another branch, the trunk, or the outer ring. Tape the pattern flat against the front and poke the outlines with a pin or a transfer tool, spacing dots close together on the tight spirals. Peel the paper and darken the dots with a washable marker if you need a clearer map. Double check that the negative space you plan to remove is one connected background.

  3. Score the circle and map your cuts

    Lightly score the outer circle first so you have a clear boundary, but do not cut through yet. Mark which areas are background to remove and which are tree to keep, since it is easy to lose track once you start. Shade the keep areas with pencil so you never cut a branch by mistake. Work out a plan to cut the small inner gaps before the large open areas.

  4. Cut the fine background gaps first

    Using a small detail saw or a craft knife, cut the tiny slivers of background between the swirling branches before opening the big spaces. Saw slowly with gentle pressure and let the tool do the work, backing out and re-entering rather than forcing tight turns. Support the branch you are cutting beside with a finger from behind so it does not snap. Adults should handle all sharp tools, and keep your free hand clear of the blade path.

  5. Open the large background last

    Once the delicate inner gaps are done, remove the big open areas of the circle around the canopy and above the trunk. Cutting these last keeps the front wall rigid while you do the hard detail work. Push each freed piece gently inward or outward and trim any ragged edges. Bevel the inner edge of the cutouts slightly toward the light for a brighter, cleaner glow.

  6. Light it and photograph

    Set a battery LED or a string of warm LEDs inside so the whole circle glows evenly behind the dark tree. Skip candles, since the heat and open flame are risky around thin, dried edges. Test in a dim room and reposition the light if any branches cast uneven shadows. For the best photo, shoot at dusk when the sky still has color, and rub a little petroleum jelly on cut edges to slow drying.

Gather your supplies

Check things off as you get ready.

Work on a stable surface, keep your free hand out of the cutting path, and have an adult handle sharp tools.

Three levels of light

  • Leave intact

    The trunk, all the swirling branches, and the curl tips stay as untouched dark skin.

  • Peel & shade

    Optional: skin-peel a faint halo just inside the circle for a soft glow gradient behind the canopy.

  • Cut through

    The round background around and between the branches is cut through for the brightest light.

Learn the carving basics

Before you start cutting

How do I keep the thin curling branch tips from breaking?

Widen every outer tip to at least a quarter inch before you transfer the pattern, and make sure each branch links back to another branch, the trunk, or the outer ring. Thin, unsupported tips are the first things to snap during handling. Cutting the small background gaps before the large ones also keeps the wall stiff and protects the delicate points.

Should I carve the tree or the background?

Carve the background. This is a reverse silhouette, so the tree stays as solid dark skin and you remove the negative space around it. Shade all the keep areas with pencil first so you never accidentally cut a branch.

Why cut the big circle opening last?

The large open area removes a lot of structural support, so opening it early would leave the front wall floppy while you do the hardest detail work. Cut all the tiny slivers between branches first, then free the big background pieces. This keeps everything rigid and reduces the chance of cracking a branch.

Your take belongs here, too.

Changed a detail? Made it simpler? Share a photo of your version and tell the community what worked.

Share your pumpkin

More pumpkins like this

You've reached the end · 8 pumpkins
The Patch Report

Fresh pumpkins, in your inbox.

The best new carvings, ideas worth stealing, and how-tos for carving season. Short, seasonal, and gone by November.

A short email during carving season. Unsubscribe anytime. See our privacy policy.