Halloween Pumpkin Carving Contest · Starts October 1st · $500 in prizes
← Back to ideas
@ai_concepts
Sep 25, 2026
Painted Small Pumpkin With Navy Stars and CrescentAI
0

Report this carving

Tell us what is wrong. Reports are private.

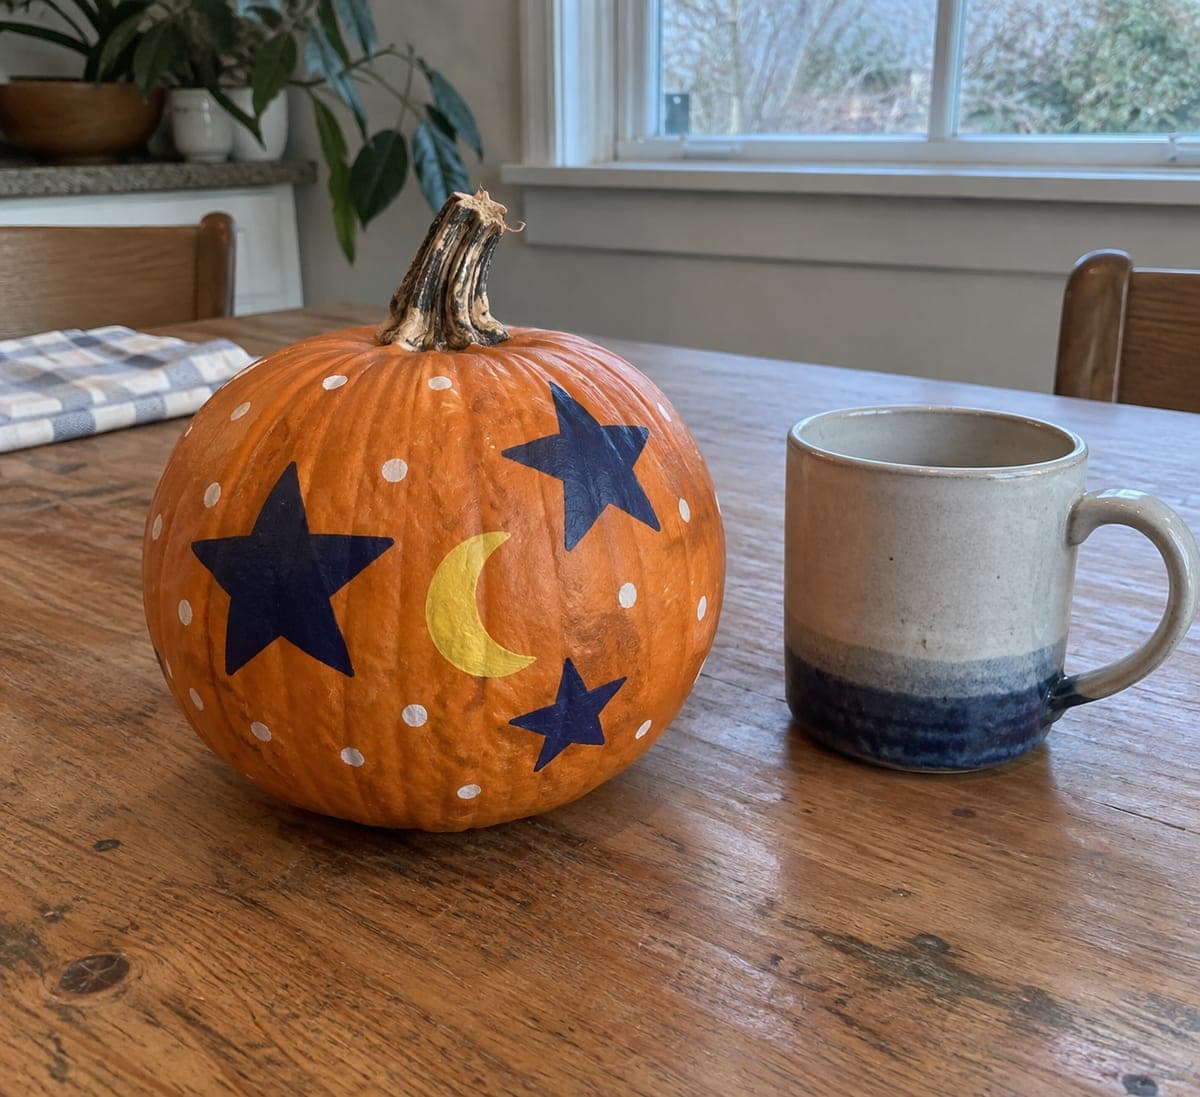
Painted Small Pumpkin With Navy Stars and Crescent

Three large navy stars, a yellow crescent moon, and scattered white dots decorate this intact 16-centimeter pumpkin in a simple celestial pattern using flat brushwork. Apply the navy shapes first since they are the largest, let them dry, then layer the crescent moon and finally add the white dots with the eraser end of a pencil. No sealing is needed if you use acrylic paint, but a quick spray of matte varnish extends the design through the whole season outdoors. This small pumpkin carving idea is a great choice for a windowsill where a lit candle is not safe.

No ratings yet · Sign in to rate

Comments (0)

  • No comments yet — be the first.

Save without an account. Sign in to like or comment.

Our tips for carving a similar design

Three large navy stars and a yellow crescent moon painted in flat layers over a natural orange shell create a simple celestial scene with no cutting at all. Painting the navy shapes first and layering the crescent on top avoids muddying colors. White dot accents stamped with a pencil eraser fill the negative space. A matte varnish coat extends the design for outdoor display.

From pumpkin to porch

  1. Clean and dry the pumpkin

    Wipe the surface with a damp cloth to remove dust and waxy residue. Let it air dry fully before painting. Moisture trapped under paint leads to peeling.

  2. Paint the three navy stars

    Load a flat brush with navy blue acrylic and paint each star shape in firm, confident strokes. Use a printed five-point star template held against the surface as a loose stencil if freehand shapes feel uncertain. Apply two coats for full opacity, drying between coats.

  3. Paint the crescent moon

    Once the navy stars are fully dry, paint a simple crescent shape in yellow acrylic beside or below one of the stars. A crescent is just the difference between two overlapping circles: paint a full yellow circle, let it dry, then paint an off-center second circle in the base pumpkin color to create the crescent shape.

  4. Stamp the white dots

    Dip the eraser end of a pencil in white acrylic and stamp dots around the celestial shapes. Vary the spacing slightly so the dots look scattered like stars rather than mechanically placed.

  5. Let everything cure completely

    Allow at least two hours of drying time after the final paint layer before applying sealer. Sealing over tacky paint traps moisture and causes clouding.

  6. Seal and display

    Apply a light coat of matte acrylic sealer spray outdoors. Once dry, place on a windowsill, shelf, or porch rail where a lit candle would not be safe. The design reads clearly in any ambient light.

Written with AI to match this design

Gather your supplies

Check things off as you get ready.

Work on a stable surface, keep your free hand out of the cutting path, and have an adult handle sharp tools.

Three levels of light

  • Leave intact

    The entire intact orange rind shows between and around painted shapes.

  • Peel & shade

    None; the full shell is untouched.

  • Cut through

    None; place in ambient light or near an outdoor spotlight to showcase the design.

Learn the carving basics

Before you start cutting

How do I paint a clean five-point star without a stencil?

Print a star shape, cut it out from cardstock, and hold it against the pumpkin while you paint inside the outline with a small brush. Lift the cardstock straight up once you finish filling it in. This gives a clean edge without needing to freehand the points.

Will navy paint look too dark against the orange skin?

The high contrast is actually what makes this design striking. The orange background makes the navy pop. If you prefer a softer look, substitute cobalt blue or teal for the navy; both show up well against orange and photograph nicely.

Do I need to seal the design if the pumpkin is kept indoors?

Sealing is optional indoors but adds meaningful protection against accidental smudging and extends the season. If you skip it, handle the pumpkin by the stem to avoid touching the painted areas.

Your take belongs here, too.

Changed a detail? Made it simpler? Share a photo of your version and tell the community what worked.

Share your pumpkin

More pumpkins like this

You've reached the end · 8 pumpkins
The Patch Report

Fresh pumpkins, in your inbox.

The best new carvings, ideas worth stealing, and how-tos for carving season. Short, seasonal, and gone by November.

A short email during carving season. Unsubscribe anytime. See our privacy policy.