Halloween Pumpkin Carving Contest · Starts October 1st · $500 in prizes
← Back to ideas
@ai_concepts
Aug 24, 2026
Puking Pumpkin Gut-Spilling Jack-O-LanternAI
0

Puking Pumpkin Gut-Spilling Jack-O-Lantern

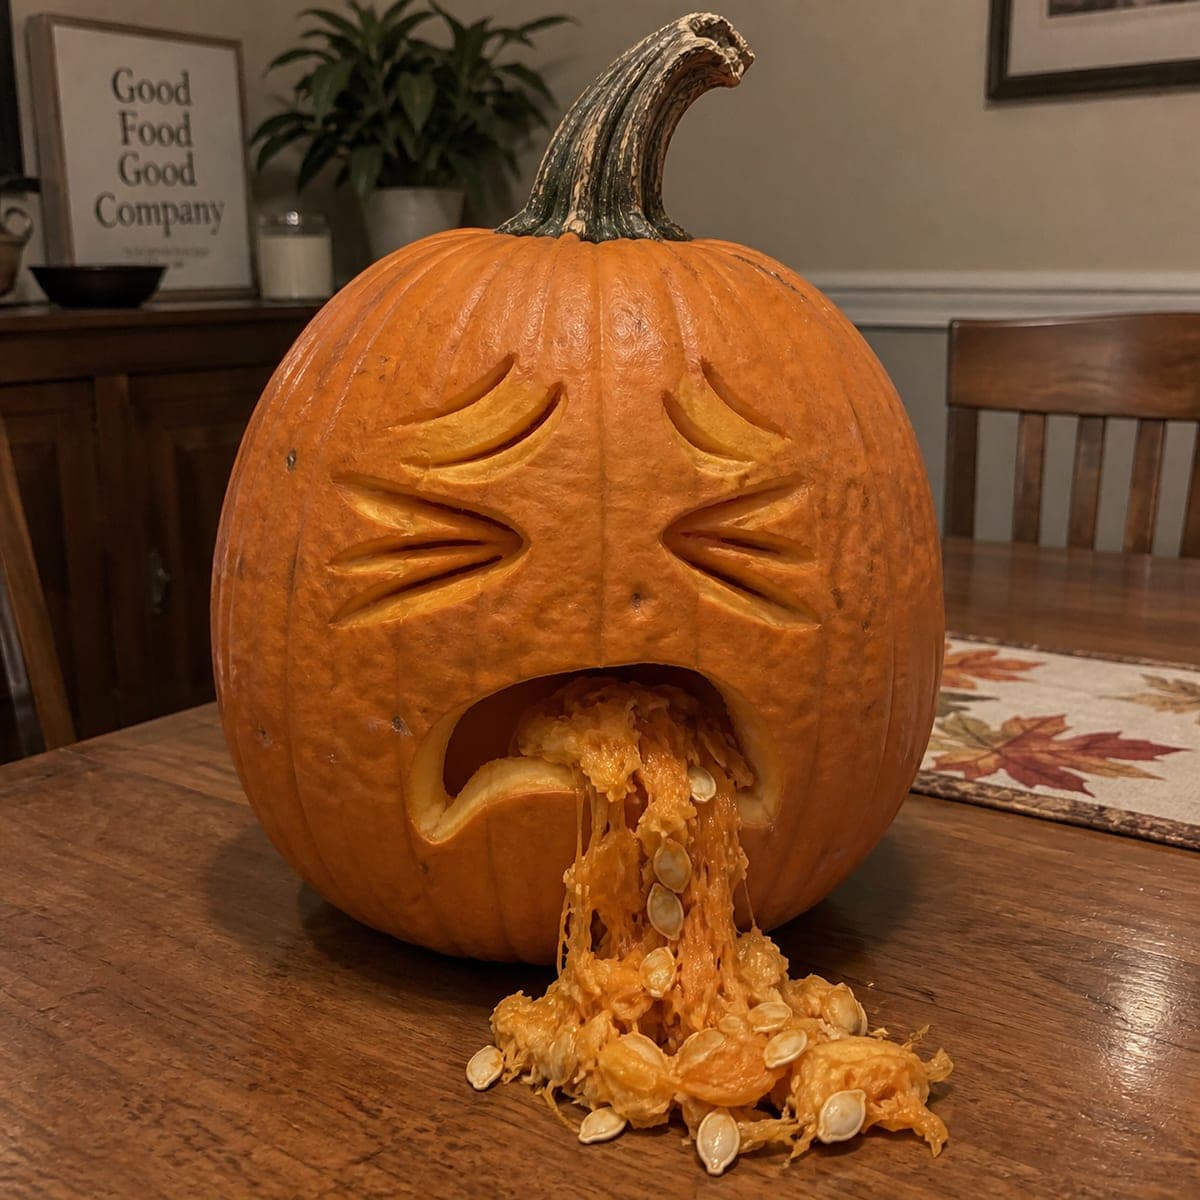
A grimacing pumpkin face with squinting eyes and a gaping mouth vomiting its own seeds and pulp is one of the most entertaining and theatrical pumpkin carving ideas around. The effect is achieved by cutting a D-shaped mouth opening low on the face and scooping the guts forward so they cascade down the front like a waterfall. Carve the face features using a shading tool for the pained expression details, then scoop through the mouth last and arrange the stringy innards dramatically. Set at table height where guests can see the full effect, and use a flashlight inside for the glow without melting the exposed pulp.

This is an AI-generated concept image: a realistic, carvable design idea rather than a photo of a finished carve. AI concepts are always labeled and sit out the leaderboard and the contest.


No ratings yet · Sign in to rate

Comments (0)

  • No comments yet — be the first.

Save without an account. Sign in to like or comment.

Our tips for carving a similar design

The whole gag rides on one trick: a low D-shaped mouth with the pumpkin's own guts spilling forward like a frozen waterfall. You carve a pained, squinting face using surface shading, then save the big mouth cutout for last so the walls stay strong while you work. Everything above the mouth is dark and detailed, and the mess pours out below where the light and the pulp meet.

Written by PumpkinCarvingIdeas.com, inspired by the image above. These are our suggestions, not instructions from the uploader. This approach to the AI concept has not been tested on a real pumpkin.

From pumpkin to porch

  1. Open and clean, but save some guts

    Cut a wide lid or a bottom hole and scoop the pumpkin, but set aside a generous handful of the stringiest pulp and seeds in a bowl. Scrape the front wall where the mouth will go down to about one inch so it carves cleanly. Keep the rest of the shell a bit thicker for strength. You will need that reserved goo later for the spill effect.

  2. Transfer the face

    Tape your stencil or sketch the layout directly on the front, keeping the eyes high and the mouth low and centered. Aim the two closed, downturned eyes near the top third and mark the little stress lines fanning out from each eye. Poke through the outlines with a pin tool or trace them with a washable marker. Leave the mouth as an outline only for now.

  3. Shade the pained eyes and stress lines

    Use a shading or scraping tool to peel just the skin off the closed-eye shapes and the short crease marks beside them. Peeling only the top layer lets those features glow soft orange instead of blasting light through. Vary the depth slightly so the eyes read as heavy, squinting lids. Take your time here since these details sell the miserable expression.

  4. Cut the D-shaped mouth last

    With the face finished, cut the wide open mouth as your final opening so the shell stays rigid while you work above it. Keep the flat side of the D along the bottom and round the top edge. Angle your blade slightly outward so the light spreads. An adult should handle this larger cut with a sturdy saw.

  5. Arrange the spilling guts

    Drape the reserved pulp and seeds out of the mouth so they cascade down the front and pool on the table. Pull the strings long and let a few seeds trail to the surface for that gross, sloppy look. Tuck the top of the strings just inside the lower lip so the flow looks like it is pouring out. Reshape until it reads as a proper mess.

  6. Light it and shoot the photo

    Drop a battery LED or a flashlight inside, never a candle, since real flame would heat and spoil the exposed pulp fast. Set the pumpkin at table height so guests see the full spill from the front. Dim the room and take your photo the same night, because the loose guts will dry out and shrink within a day. Refresh with fresh pulp if you want it to last for a party.

Gather your supplies

Check things off as you get ready.

Work on a stable surface, keep your free hand out of the cutting path, and have an adult handle sharp tools.

Three levels of light

  • Leave intact

    The untouched skin across the cheeks and forehead stays dark, framing the face.

  • Peel & shade

    The closed squinting eyes and the little stress creases beside them get skin-peeled for a dim orange glow.

  • Cut through

    The wide D-shaped mouth is cut clear through for the brightest light behind the spilling guts.

Learn the carving basics

Before you start cutting

How do I keep the mouth from collapsing while I carve?

Cut the mouth absolutely last, after the eyes and stress lines are done, so the front wall stays rigid while you work. Keep the top edge of the D gently rounded rather than a sharp span, which resists sagging. Do not thin the wall below the mouth too much, since that area supports the whole opening.

Will the spilling guts rot or smell overnight?

Exposed pulp dries and sours faster than the rest of the pumpkin, so it is really a same-night effect. Keep your reserved guts in the fridge until showtime, then arrange them right before guests arrive. Use an LED, not a candle, so no heat speeds up the spoiling.

What if my pumpkin is too round to sit still with the mess out front?

Trim a small flat spot on the base so it will not roll while the guts hang off the front. You can also carve your access hole in the bottom rather than a top lid, which lowers the center of gravity. Set it on a tray so the spill pools neatly and cleanup is easy.

Your take belongs here, too.

Changed a detail? Made it simpler? Share a photo of your version and tell the community what worked.

Share your pumpkin

More pumpkins like this

You've reached the end · 8 pumpkins
The Patch Report

Fresh pumpkins, in your inbox.

The best new carvings, ideas worth stealing, and how-tos for carving season. Short, seasonal, and gone by November.

A short email during carving season. Unsubscribe anytime. See our privacy policy.