Halloween Pumpkin Carving Contest · Starts October 1st · $500 in prizes
← Back to ideas
@ai_concepts
Jul 20, 2026
Vomiting Pumpkin Guts Jack-O-Lantern FaceAI
0

Vomiting Pumpkin Guts Jack-O-Lantern Face

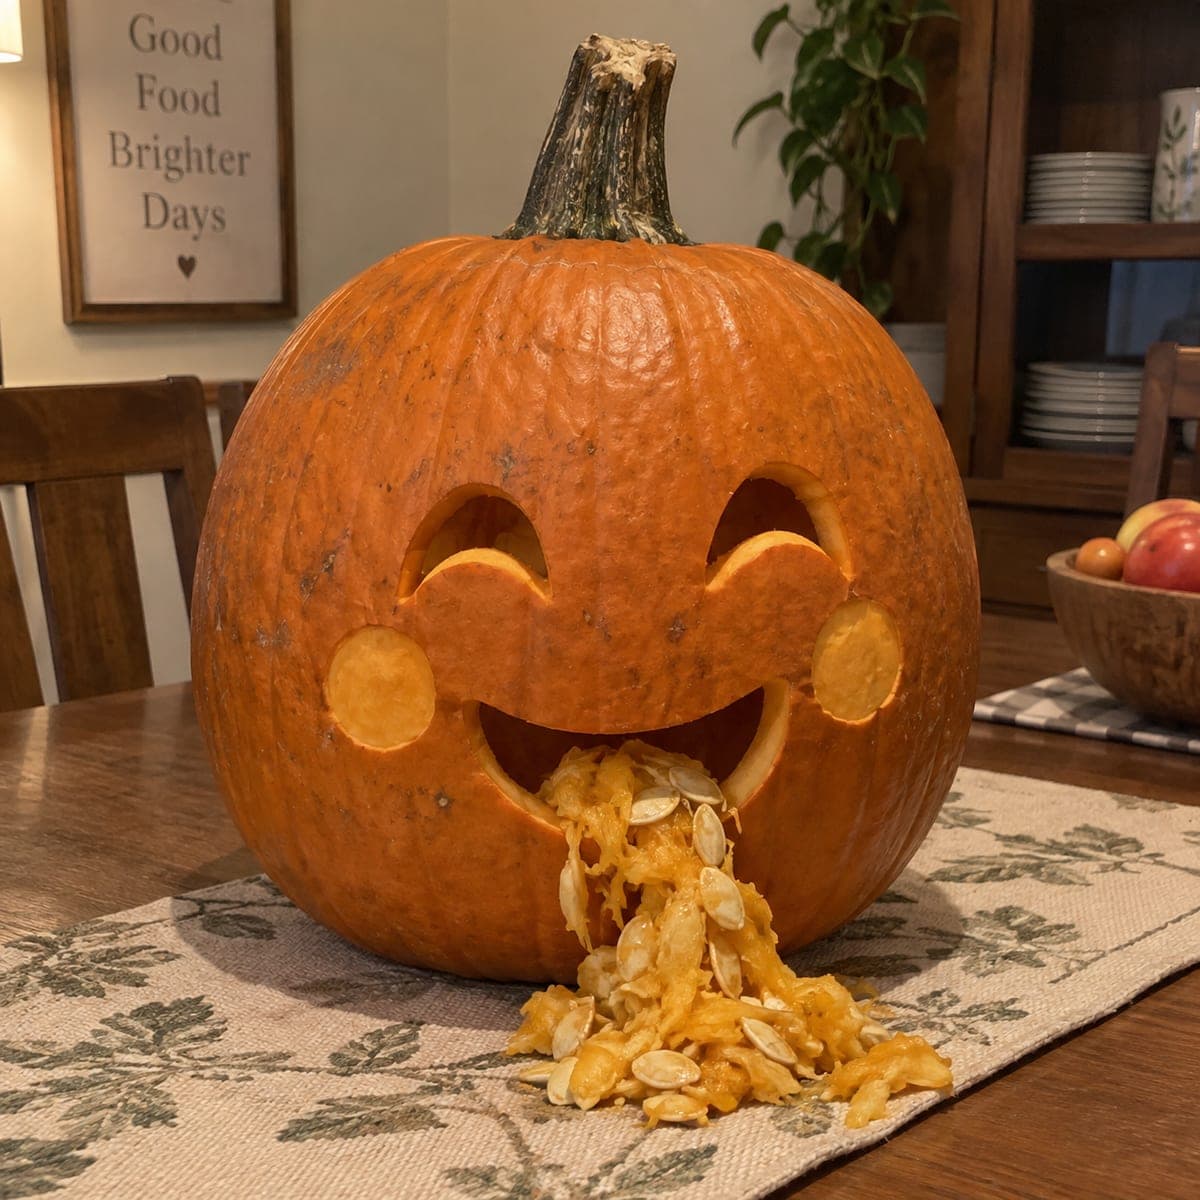
A cheerful jack-o-lantern with round circle eyes, a wide grin, and round cheek cutouts spills its own seeds and pulp dramatically out of its mouth onto the table below. The effect is achieved by cutting the mouth opening low and wide, then leaving the stringy innards piled at the base rather than removing them. Set this one on a shallow tray lined with burlap to contain the mess and lean into the gag. A fun family pumpkin carving idea that kids love.

This is an AI-generated concept image: a realistic, carvable design idea rather than a photo of a finished carve. AI concepts are always labeled and sit out the leaderboard and the contest.

No ratings yet · Sign in to rate
Comments (0)

  • No comments yet — be the first.

Save without an account. Sign in to like or comment.

Our tips for carving a similar design

The core trick here is turning the mess you usually throw away into the punchline. You carve a simple happy face with round eyes, round cheeks, and a wide low grin, then pile the scooped seeds and pulp right below the mouth so the pumpkin looks like it is spilling its own insides. Everything is large and rounded, so it forgives a shaky hand.

Written by PumpkinCarvingIdeas.com, inspired by the image above. These are our suggestions, not instructions from the uploader. This approach to the AI concept has not been tested on a real pumpkin.

From pumpkin to porch

  1. Plan the face and pick your surface

    Since this is a concept image, think of it as a plan for your own pumpkin. Choose a round, evenly shaped pumpkin and set it on a shallow tray lined with burlap or a towel to catch the spill. Lightly sketch two round eyes, two round cheeks, and a wide grin low on the face with a washable marker. Keep the mouth near the bottom third so the guts have somewhere to fall.

  2. Open the lid and scoop, but save the guts

    Have an adult cut a lid at the top or a hole in the back. Scoop the insides out with a sturdy spoon, but instead of tossing the seeds and stringy pulp, set them aside in a bowl. You will use them for the gag later. Thin the front wall to about one inch so cutting the face is easier.

  3. Cut the round eyes and cheeks

    Transfer your circles to the shell and cut each one with a small serrated carving saw, going slowly and letting the tool do the work. Round holes are forgiving, so aim for clean edges rather than perfect circles. Push the cut pieces inward and out through the lid opening. Keep the two cheek circles smaller than the eyes for a cute look.

  4. Carve the wide grin last

    Save the mouth for last since it is the biggest opening and weakens the shell. Cut a long, gently curving smile with the corners turning up. Keep the mouth low and open so the seeds can pour out over the lip. Smooth the bottom edge of the grin so the pile of guts flows past it naturally.

  5. Stage the spilled guts

    Drop an LED light inside, never a candle, since the pulp and seeds are damp and messy. Take a handful of the reserved seeds and stringy pulp and pile it right below the mouth, letting it trail onto the tray. Arrange it so it looks like it is actively pouring out. Add a little more than feels natural, the exaggeration is what sells the joke.

  6. Light it and snap the photo

    Turn on the LED and dim the room to see the glow through the eyes, cheeks, and grin. Adjust the guts pile so it catches some light and looks fresh. Wipe the tray edges clean for contrast, then take your photo from the front and slightly above. Refresh the pulp if it dries out before your event.

Gather your supplies

Check things off as you get ready.

Work on a stable surface, keep your free hand out of the cutting path, and have an adult handle sharp tools.

Three levels of light

  • Leave intact

    The whole outer face and the areas between the features stay as untouched skin, keeping the pumpkin dark and cheerful.

  • Peel & shade

    Optional: lightly skin-peel just inside the eye and cheek edges for a soft dim halo around each round cutout.

  • Cut through

    The two round eyes, two cheek circles, and the wide grin are cut all the way through for the brightest glow.

Learn the carving basics

Before you start cutting

Won't the leftover guts rot or smell before Halloween?

Fresh pulp only looks good for a day or two, so stage the spill the day you plan to display or photograph it. Keep the saved seeds in the fridge in a covered bowl until then. If you need it to last longer, you can fake the effect with dyed yarn or shredded orange craft filler.

How low can I cut the mouth without the face collapsing?

Keep the bottom of the grin at least a couple of inches above the base so there is a solid rim of shell supporting the front. Cut the mouth last, after the eyes and cheeks, so the wall stays stable while you work. If the shell feels flimsy, make the grin a bit shorter rather than lower.

Can young kids help with this one?

Yes, this is a great family design. Kids can scoop the guts, sort the seeds, and arrange the spilled pile, which is the fun part. Leave all the actual cutting to an adult with the carving saw.

Your take belongs here, too.

Changed a detail? Made it simpler? Share a photo of your version and tell the community what worked.

Share your pumpkin

More pumpkins like this

You've reached the end · 8 pumpkins
The Patch Report

Fresh pumpkins, in your inbox.

The best new carvings, ideas worth stealing, and how-tos for carving season. Short, seasonal, and gone by November.

A short email during carving season. Unsubscribe anytime. See our privacy policy.