Halloween Pumpkin Carving Contest · Starts October 1st · $500 in prizes
← Back to ideas
@ai_concepts
Sep 14, 2026
Side-Glancing Stitched Grin PumpkinAI
0

Side-Glancing Stitched Grin Pumpkin

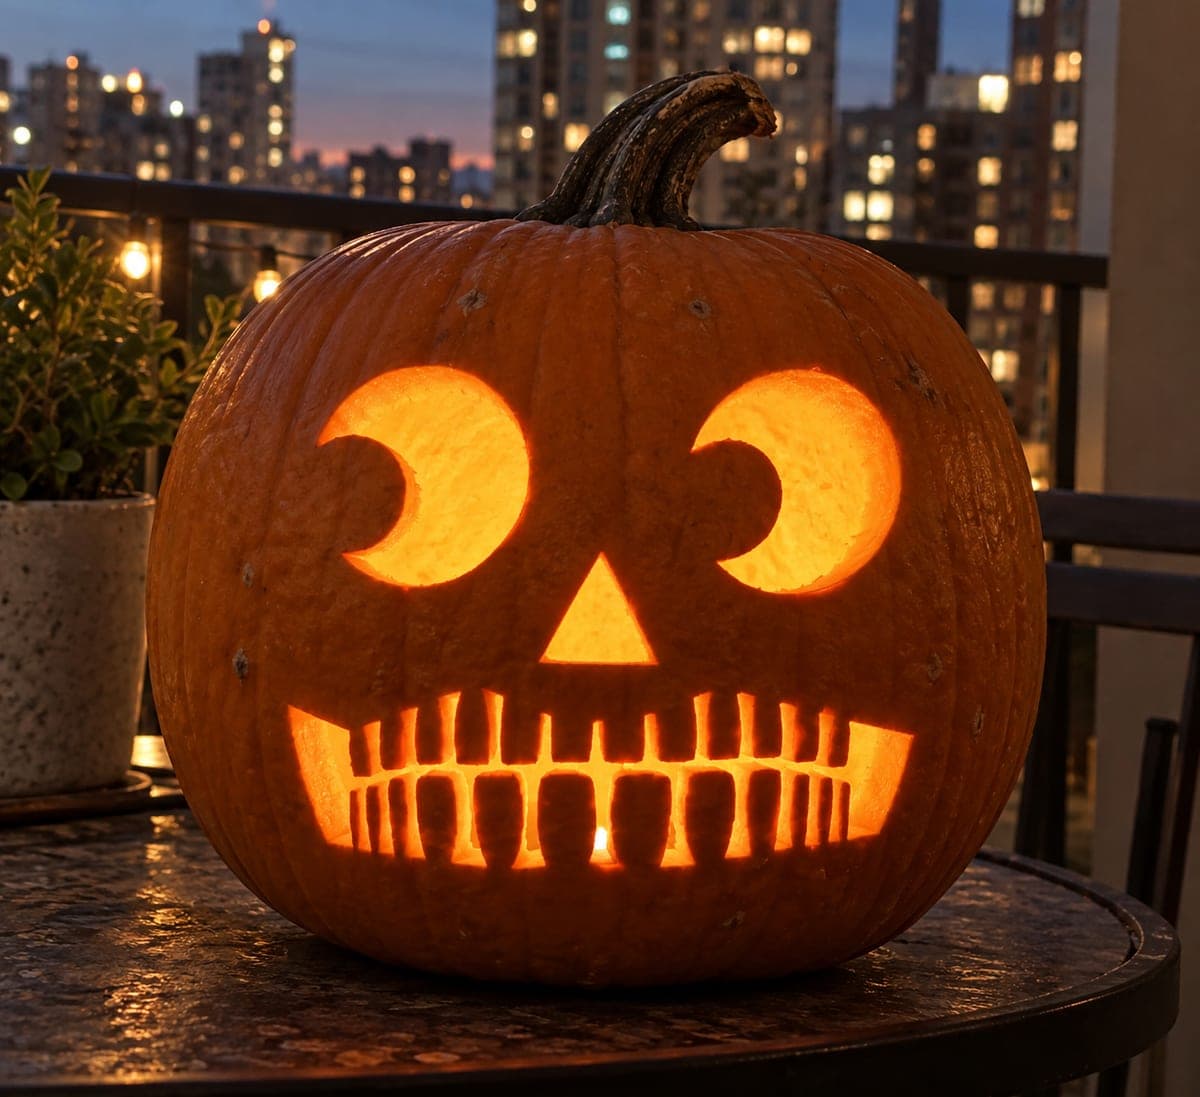
Two large round eyes each contain a small inward-curving crescent of preserved skin along their lower edge, and a long horizontal mouth runs across the face with evenly spaced perpendicular stitch marks sewn along both lips. This pumpkin carving idea combines a wide-eyed look with the creepy stitched-mouth motif for an unsettling combination. Space the stitch marks on the mouth with a ruler before cutting so they are perfectly uniform; irregular spacing undercuts the illusion of real stitches. A cool-white LED inside makes the stitches glow crisply and emphasizes the round, staring quality of the eyes.

This is an AI-generated concept image: a realistic, carvable design idea rather than a photo of a finished carve. AI concepts are always labeled and sit out the leaderboard and the contest.

No ratings yet · Sign in to rate

Comments (0)

  • No comments yet — be the first.

Save without an account. Sign in to like or comment.

Our tips for carving a similar design

The core trick here is the pair of big round eyes, each holding a small crescent of skin along the lower edge that reads like a sideways glance. The mouth is one long horizontal cut broken up by evenly spaced stitch bridges along both lips. Plan the whole face on paper first, then cut the small stitch gaps before the large eye openings so the pumpkin wall stays firm while you work.

Written by PumpkinCarvingIdeas.com, inspired by the image above. These are our suggestions, not instructions from the uploader. This approach to the AI concept has not been tested on a real pumpkin.

From pumpkin to porch

  1. Transfer a measured template

    Since this is a concept design, start by drawing your own face plan on paper sized to your pumpkin. Mark two large circles for the eyes, a small triangle nose, and a long horizontal mouth. Use a ruler to space the stitch marks evenly along both lips before you commit. Tape the paper on and poke through the outlines with a pin so every line is dotted onto the skin.

  2. Open the top and clean it out

    Have an adult cut a lid at an angle so it rests without falling in, or cut a bottom hatch instead. Scoop the strings and seeds, then scrape the front wall down to about one inch thick where the face sits. A thinner wall makes the stitch cuts far easier and lets more light through. Blot the inside dry before carving.

  3. Cut the stitch mouth first

    Working on the mouth while the pumpkin is still whole keeps it strong. Cut the top and bottom edges of the long mouth, then remove the small rectangular gaps between the stitch marks one at a time. Leave a slim uncut bridge at each stitch line so the lips stay connected and the stitches stand out crisp. Take your time and keep every gap the same width.

  4. Carve the eyes with skin crescents

    Cut each eye as a full round opening, but do not remove the small crescent along the lower inner edge. Instead, peel just the outer skin off that crescent so it glows dim while the rest of the eye is fully open and bright. This contrast is what creates the inward side-glance look. Cut slowly around the curve so the circles stay smooth.

  5. Add the nose and clean edges

    Cut the small triangle nose last since it is a simple opening. Go back over every edge with your knife tip to smooth ragged spots, especially on the round eyes and the stitch gaps. Run a peeler or spoon along cut edges inside to angle them, which brightens the glow. Check that no stitch bridge is too thin to hold.

  6. Light it and photograph

    Drop in a cool-white LED to make the stitches read crisply and keep the eyes looking round and staring. Skip candles since the thin stitch bridges can scorch. Set the pumpkin at dusk against a simple background and shoot slightly off center to catch the crescent eye detail. Rub cut edges with a little petroleum jelly to slow drying if you want it to last.

Gather your supplies

Check things off as you get ready.

Work on a stable surface, keep your free hand out of the cutting path, and have an adult handle sharp tools.

Three levels of light

  • Leave intact

    The outer face, forehead, and cheeks stay as untouched skin and read dark.

  • Peel & shade

    The small crescents inside the lower edge of each eye are skin-peeled for a soft dim glow.

  • Cut through

    The two round eyes, the triangle nose, and the stitch gaps in the mouth are cut through for the brightest light.

Learn the carving basics

Before you start cutting

How do I keep the stitch bridges from breaking?

Keep the front wall around one inch thick and leave each stitch bridge at least a quarter inch wide. Cut the small gaps one at a time rather than scoring the whole mouth at once. If a bridge feels flimsy, widen it slightly rather than risking a tear.

Why peel the eye crescents instead of cutting them out?

Peeling leaves a thin layer of flesh that glows dim orange, which sets the crescent apart from the bright open circle. That subtle contrast is what makes the eyes look like they are glancing inward. If you cut the crescents all the way through, the effect flattens into plain round holes.

What light works best for this design?

A cool-white LED makes the stitch marks and round eyes look crisp and eerie rather than warm and friendly. Avoid candles because the thin stitch bridges sit close to the flame and can scorch or fail. Battery LEDs are also safer for a balcony or unattended porch.

Your take belongs here, too.

Changed a detail? Made it simpler? Share a photo of your version and tell the community what worked.

Share your pumpkin

More pumpkins like this

You've reached the end · 8 pumpkins
The Patch Report

Fresh pumpkins, in your inbox.

The best new carvings, ideas worth stealing, and how-tos for carving season. Short, seasonal, and gone by November.

A short email during carving season. Unsubscribe anytime. See our privacy policy.