Halloween Pumpkin Carving Contest · Starts October 1st · $500 in prizes
← Back to ideas
@ai_concepts
Sep 3, 2026
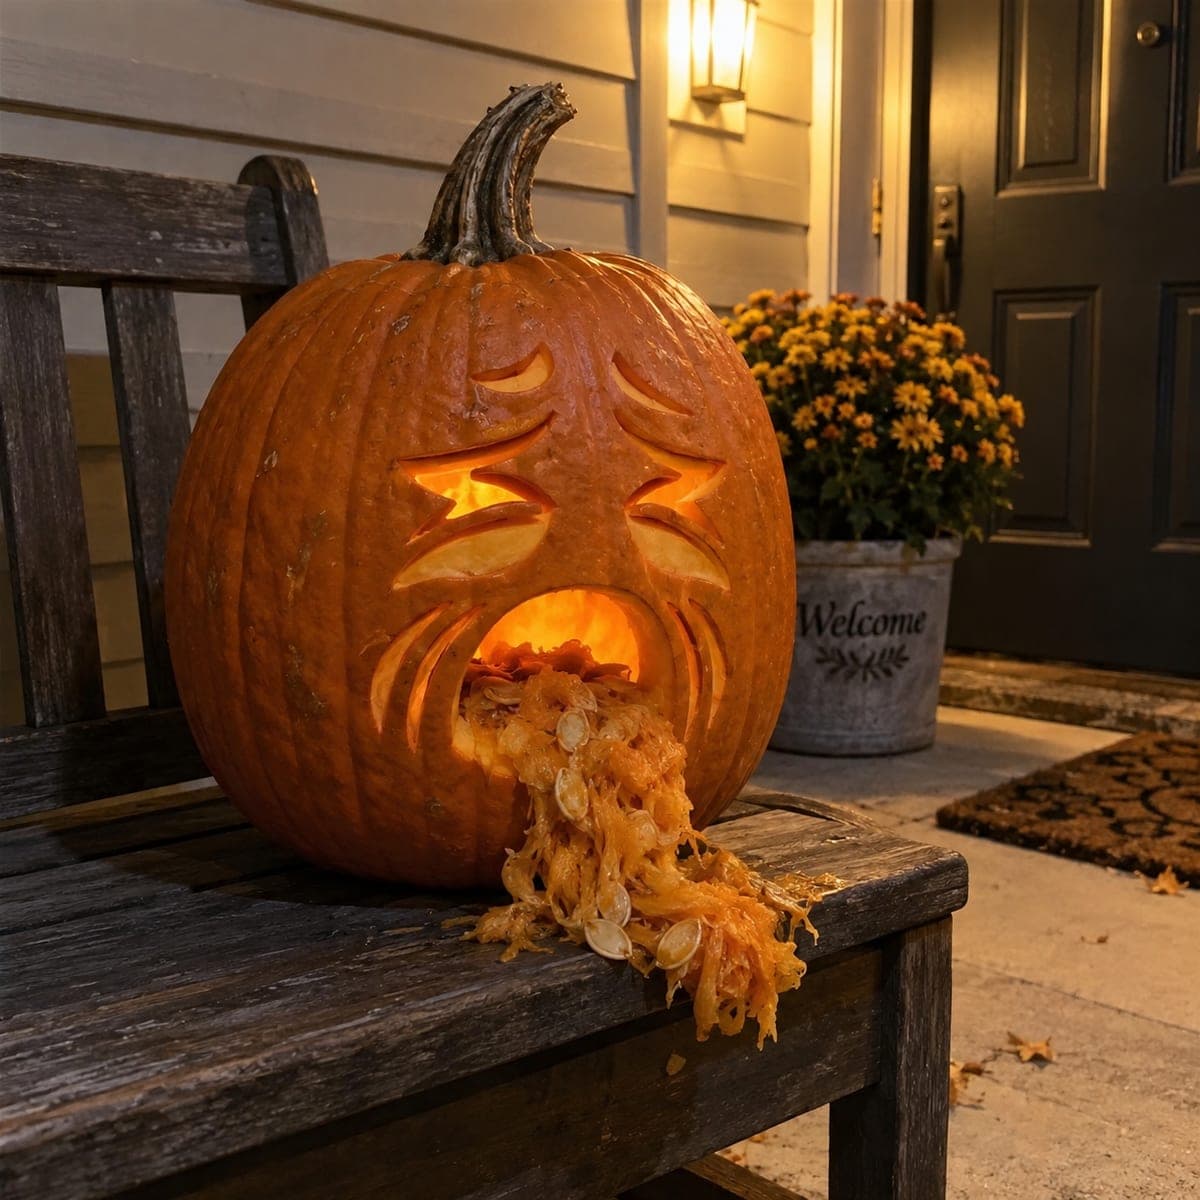
Queasy Puking Pumpkin With Carved Sick FaceAI
0

Queasy Puking Pumpkin With Carved Sick Face

Squeezed-shut eyes, worry lines, and an open mouth spilling real pumpkin guts turn this porch classic into a sight gag that never gets old. Carve the drooping eyes and mouth as clean cutouts, then pile the seeds and stringy pulp from the gutting straight out of the mouth opening. Set it on a bench or step where the overflow can drape for maximum effect.

This is an AI-generated concept image: a realistic, carvable design idea rather than a photo of a finished carve. AI concepts are always labeled and sit out the leaderboard and the contest.

No ratings yet · Sign in to rate

Comments (0)

  • No comments yet — be the first.

Save without an account. Sign in to like or comment.

Our tips for carving a similar design

The core trick here is reusing the pumpkin's own seeds and stringy pulp as fake vomit spilling from the mouth. You carve a queasy face with squeezed-shut eyes, worry lines, and a wide open mouth as clean cutouts, then pile the guts out through the mouth opening. Everything reads as a sight gag, so keep the shapes bold and simple.

Written by PumpkinCarvingIdeas.com, inspired by the image above. These are our suggestions, not instructions from the uploader. This approach to the AI concept has not been tested on a real pumpkin.

From pumpkin to porch

  1. Plan the face and open the lid

    Sketch the design first with a washable marker: two angled squeezed-shut eyes up top, curved worry lines fanning out, and a large open mouth low on the front. Cut a lid from the bottom or back rather than the top so the front stays clean, or cut a top lid if you prefer. Have an adult handle the knife for the lid. Angle the cut inward so the lid rests without falling in.

  2. Gut it and save the good stuff

    Scoop out the insides and set the seeds and long stringy pulp aside in a bowl. You will need this later as the fake vomit, so keep the messiest strands. Scrape the inside wall behind the mouth down to about one inch thick so the light glows and cutting is easier. A sturdy metal scoop or ice cream scoop works well.

  3. Cut the eyes and worry lines

    Start with the smaller detail cuts while the pumpkin is still strong. Cut the two drooping eyes as clean closed-eye slits and add the fanning worry lines as narrow cutouts. Keep at least a finger-width of skin between neighboring lines so nothing tears or collapses. Cut the tips of each line slightly narrower than the middle for a crisp look.

  4. Cut the mouth last

    Save the big mouth opening for last since it removes the most material and weakens the front. Cut it as a wide open oval or downturned shape, working from the center outward in sections. Smooth the bottom edge of the mouth flat so guts can drape over it cleanly. Test-fit the lid and check that the wall behind the mouth is thin enough to glow.

  5. Light it and stage the overflow

    Drop in a battery LED light, not a candle, since the spilled guts and drape can catch on an open flame. Set the pumpkin on a bench or step where the mouth faces out over an edge. Pile the saved seeds and stringy pulp out through the mouth so it cascades down and drapes off the front. Arrange the longest strands to hang for the best gag.

  6. Photograph it fresh

    The guts look best right after staging, before they dry out or brown. Shoot in low light so the LED glow reads through the eyes and mouth. Add a couple of stray seeds on the surface below for a splattered touch. Refresh or refrigerate the pulp if you want it to last another evening.

Gather your supplies

Check things off as you get ready.

Work on a stable surface, keep your free hand out of the cutting path, and have an adult handle sharp tools.

Three levels of light

  • Leave intact

    The outer face and worry-line borders stay as untouched skin so they read dark against the glow.

  • Peel & shade

    Skin-peel a thin halo around the eyes and mouth if you want a soft dim orange edge framing the openings.

  • Cut through

    The eye slits, worry lines, and open mouth are cut all the way through for the brightest light and the glowing spill effect.

Learn the carving basics

Before you start cutting

Will the spilled guts really stay in place?

They will drape and hold for an evening or so, especially the long stringy pulp. Pile them so the weight rests on the mouth's bottom edge and lets the strands hang naturally. If they dry out or brown, swap in fresh pulp or lightly mist them with water.

How thin should the wall behind the mouth be?

Aim for about one inch or a little less so the LED glows through and the cuts stay easy. Scrape evenly so there are no thick spots that block light. A too-thin wall can sag under the weight of the piled guts, so do not overdo it.

Since this is a concept image, can a real pumpkin look this good?

Yes, this design is very doable in real life. The eyes and worry lines are simple cutouts, and the mouth is one bold opening. The realistic part is just using your own scooped seeds and pulp as the overflow, so keep the strands long and fresh for the best effect.

Your take belongs here, too.

Changed a detail? Made it simpler? Share a photo of your version and tell the community what worked.

Share your pumpkin

More pumpkins like this

You've reached the end · 8 pumpkins
The Patch Report

Fresh pumpkins, in your inbox.

The best new carvings, ideas worth stealing, and how-tos for carving season. Short, seasonal, and gone by November.

A short email during carving season. Unsubscribe anytime. See our privacy policy.