Halloween Pumpkin Carving Contest · Starts October 1st · $500 in prizes
← Back to ideas
@ai_concepts
Sep 14, 2026
Round Spotted Ladybug PumpkinAI
0

Round Spotted Ladybug Pumpkin

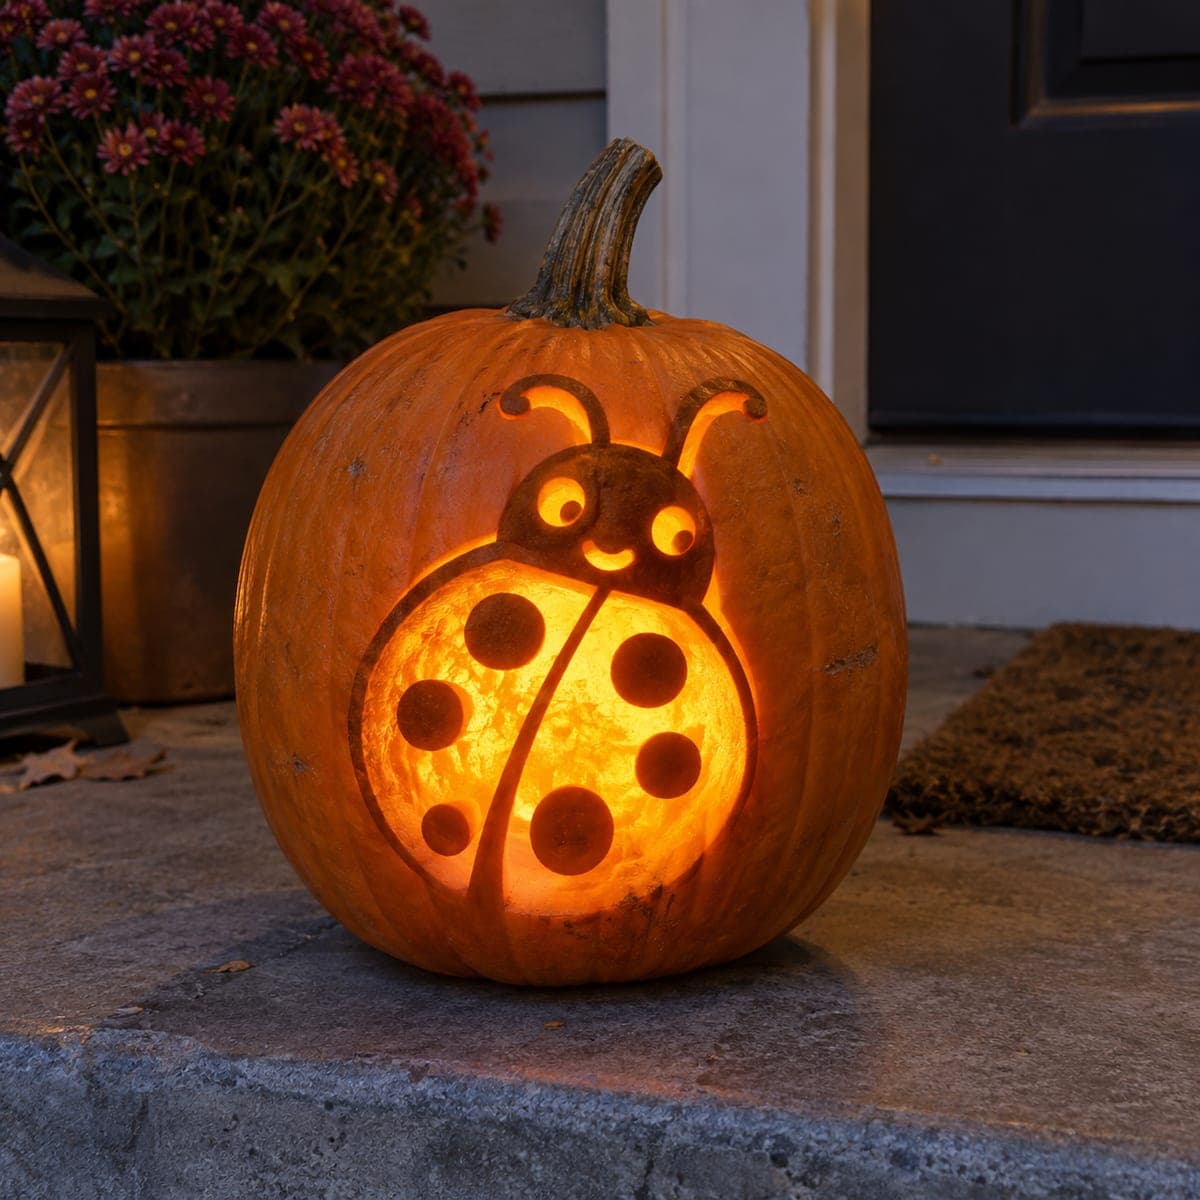
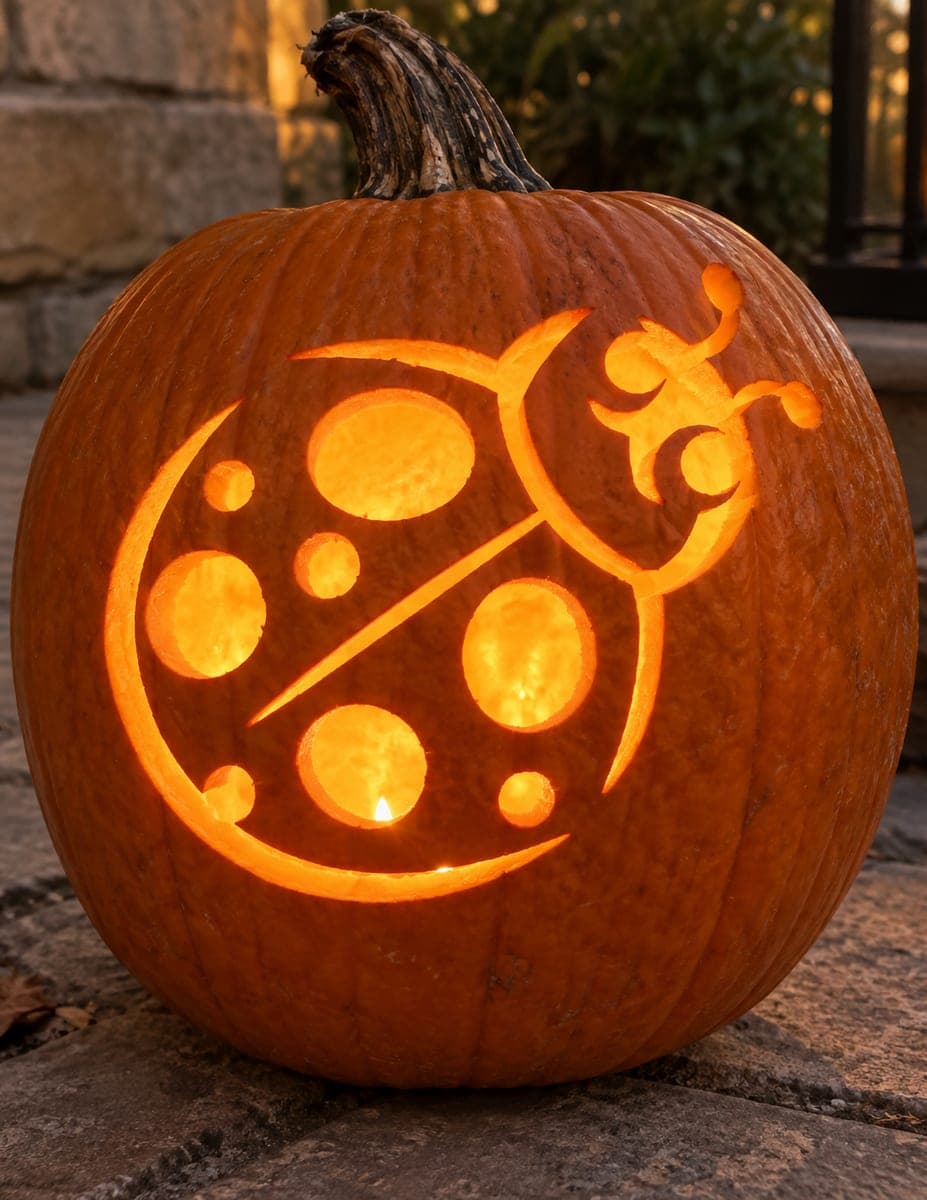
A large ladybug shell with a diagonal center line divides the design into two halves, each side holding a mix of large and small circular spots all glowing brightly through the cutout technique, with a small curling antenna and head emerging from the upper-right corner. The round spots vary in size from a large circle on the upper left down to tiny dots near the bottom edge. Drill all the circular spots with progressively sized bits before tracing the outer shell border, since clean round holes are much easier to make before the surrounding pumpkin wall is weakened by the larger cuts.

This is an AI-generated concept image: a realistic, carvable design idea rather than a photo of a finished carve. AI concepts are always labeled and sit out the leaderboard and the contest.
No ratings yet · Sign in to rate

Comments (0)

  • No comments yet — be the first.

Save without an account. Sign in to like or comment.

Our tips for carving a similar design

The core trick here is drilling all the round spots first, working from the largest circle down to the tiniest dots, before you ever touch the outer shell border. Clean round holes are far easier to make while the pumpkin wall is still solid, so the ring, the diagonal split line, and the curling head come last. This is a concept design, so treat these as a plan for how you could recren a similar ladybug on a real pumpkin.

Written by PumpkinCarvingIdeas.com, inspired by the image above. These are our suggestions, not instructions from the uploader. This approach to the AI concept has not been tested on a real pumpkin.

From pumpkin to porch

  1. Pick a round pumpkin and open a back lid

    Choose a tall, rounded pumpkin with a smooth front face, since the ladybug shell wants an even canvas. Cut an access hole in the back rather than the top so the carved front stays uninterrupted. Scoop the inside until the front wall is about one inch thick, scraping the carving area a little thinner if you want the glow to come through easily. Even walls make the drilled circles cut cleaner.

  2. Transfer the pattern

    Print or draw the full ladybug so the outer shell ring, the diagonal center line, the spots, and the curling head all sit in place. Tape the pattern flat and poke closely spaced dots along every line and around each circle. Mark the center point of every spot so your drill bit lands dead on. A fully transferred map now saves you from guessing once the pattern comes off.

  3. Drill the spots largest to smallest

    With an adult handling the tools, use spade or hole-saw bits and start with the biggest circle on the upper left, then step down through the medium spots to the tiny dots near the bottom. Drill slowly and let the bit do the work so the edges stay round and clean. Doing this while the wall is still solid keeps the holes from tearing. Support the pumpkin against your body or a folded towel so it does not roll.

  4. Cut the shell border and center line

    Now trace the outer shell ring with a fine saw, cutting a thin channel all the way through. Cut the diagonal line that splits the two halves the same way. Because the wall is now dotted with holes, work gently and support the areas between spots as you go. Cut in short strokes and clear the plug before moving on.

  5. Shape the head and antenna

    The curling antenna and head in the upper-right corner are the delicate part, so leave narrow uncut bridges of skin where the curls loop back so they stay attached and do not snap. Cut the head opening as a small full cutout and keep the thin swirl lines connected to the surrounding pumpkin. Take your time and cut thin lines a hair wider than you think, since narrow channels close up under light. If a curl feels fragile, thicken it slightly rather than risk a break.

  6. Light it and photograph

    Drop in an LED light or two, never a candle, since the many cutouts need bright, safe, even light. Push one light toward the front wall so the spots and shell all glow together. Wait for dusk and shoot slightly off to one side to catch the depth of the drilled circles. Mist the cut edges with water if you display it over several evenings to keep them from drying out.

Gather your supplies

Check things off as you get ready.

Work on a stable surface, keep your free hand out of the cutting path, and have an adult handle sharp tools.

Three levels of light

  • Leave intact

    The outer shell field and the pumpkin skin around the head stay untouched and dark to hold the ladybug shape.

  • Peel & shade

    Shave the skin thin just inside the shell if you want a soft outer halo, letting a dim orange edge frame the design.

  • Cut through

    The graduated round spots, the shell border ring, the diagonal center line, and the small head all cut through for the brightest glow.

Learn the carving basics

Before you start cutting

What order should I drill the spots in?

Start with the single largest circle on the upper left, then work down through the medium spots and finish with the tiny dots near the bottom edge. Drilling big to small while the wall is solid keeps every hole round and tear free. Save the outer ring and diagonal cuts for after all the circles are done.

How do I keep the thin antenna curls from breaking?

Leave small uncut bridges of pumpkin skin where the curls loop back on themselves so they stay anchored to the surrounding wall. Cut those swirl lines slightly wider than the pattern shows, since narrow channels look thinner once lit. If a curl still feels weak, thicken it rather than chase a perfect thin line.

Do I need special drill bits for the round spots?

Graduated spade bits or hole-saw bits give the cleanest circles and match the size range in this design. Run the drill slowly and let the bit cut on its own so the edges do not tear. An adult should handle the drill, and always support the pumpkin so it cannot spin.

Your take belongs here, too.

Changed a detail? Made it simpler? Share a photo of your version and tell the community what worked.

Share your pumpkin

More pumpkins like this

You've reached the end · 8 pumpkins
The Patch Report

Fresh pumpkins, in your inbox.

The best new carvings, ideas worth stealing, and how-tos for carving season. Short, seasonal, and gone by November.

A short email during carving season. Unsubscribe anytime. See our privacy policy.