Halloween Pumpkin Carving Contest · Starts October 1st · $500 in prizes
← Back to ideas
@ai_concepts
Sep 14, 2026
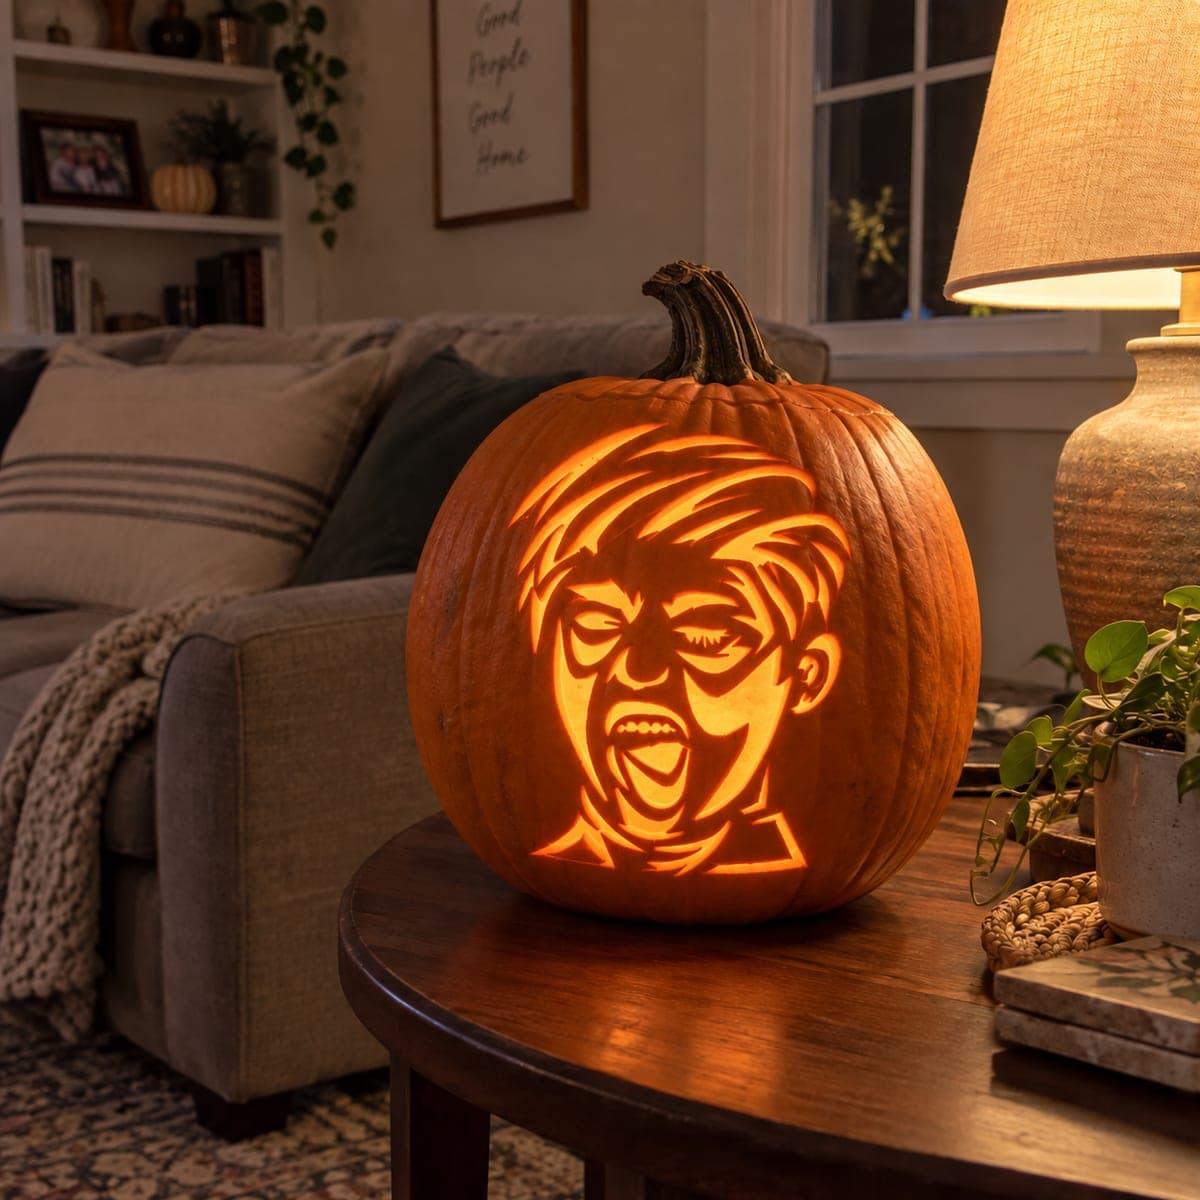
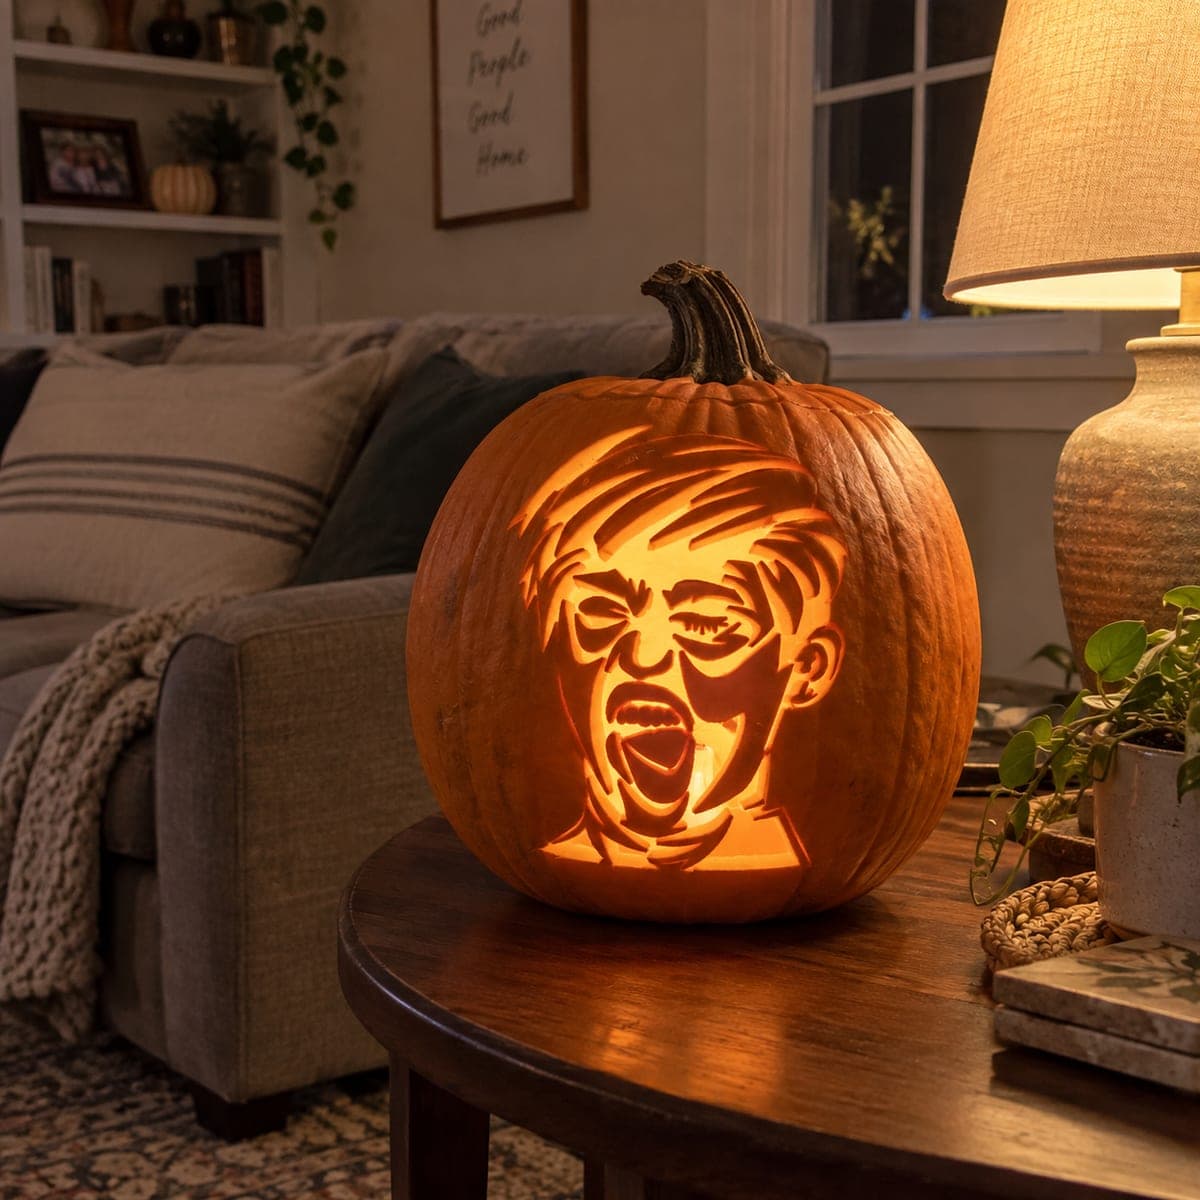
Shouting Swept-Hair Caricature Pumpkin
1/2
AI
0

Shouting Swept-Hair Caricature Pumpkin

A shouting face pumpkin carving idea shows a young person with side-swept short hair, squinting eyes, and a huge wide-open mouth stretched across most of the lower face, all carved as glowing cutout shapes. The cutout technique removes the mouth interior and lit facial areas completely, making the broad open mouth the dramatic focal point of this jack-o-lantern. Since the mouth is so large, remove the interior section in one clean pass rather than nibbling from the edges, which reduces the risk of cracking the thin skin strips at the corners.

This is an AI-generated concept image: a realistic, carvable design idea rather than a photo of a finished carve. AI concepts are always labeled and sit out the leaderboard and the contest.

No ratings yet · Sign in to rate
Comments (0)

  • No comments yet — be the first.

Save without an account. Sign in to like or comment.

Our tips for carving a similar design

The core trick here is contrast: the whole face reads as big blocks of light with just a few skin strips holding the eyes, teeth, and hair together. Plan the mouth as one large opening that anchors the design, then let the swept hair and squinting eyes frame it. Save every big cutout for last so the shell stays strong while you work.

Written by PumpkinCarvingIdeas.com, inspired by the image above. These are our suggestions, not instructions from the uploader. This approach to the AI concept has not been tested on a real pumpkin.

From pumpkin to porch

  1. Pick a tall pumpkin and transfer the pattern

    Choose a large, evenly round pumpkin with a smooth front face so the portrait has room to breathe. Tape your printed stencil over the front, then poke the outlines with a pin or transfer tool so the dots stay visible in low light. Focus your dots on the eye edges, teeth bridges, and hair strips, since those are the details that make or break the face. Step back and check the whole layout is centered before you cut anything.

  2. Open the pumpkin and clean it out

    Cut a lid from the bottom or the back rather than the top so the stem stays intact for that natural look. Scoop the guts and scrape the inside wall behind the face down to about one inch thick. A thinner wall is much easier to cut cleanly and lets more light through. Dry the inside with a paper towel before you start detailing.

  3. Shade the skin areas for a dim glow

    Use a shading tool or a lino gouge to peel just the outer skin on softer transition zones, like the edges of the hair and the shadow under the jaw. These peeled areas will glow a dim orange and add depth without full cutting. Keep your strokes shallow and even so the color stays consistent. This is where you build the sense of a face rather than flat shapes.

  4. Cut the fine details first

    With a small detail saw, cut the narrow lit lines of the hair sweep, the squinting eye slits, and the gaps between the teeth. Work slowly and leave thin skin bridges between the teeth so they do not collapse into one big hole. Cutting these delicate shapes while the shell is still solid keeps everything aligned. Support the wall with your free hand from outside, not inside.

  5. Remove the big mouth opening last

    Save the wide open mouth for the final cut since it is the largest opening. Score the full outline first, then push the whole interior section out in one clean pass rather than nibbling from the edges. That single motion protects the thin skin strips at the mouth corners from cracking. Gently clean up any ragged edges with light passes.

  6. Light it and photograph

    Drop in a battery LED puck or string, never a candle, since the tight cutouts and thin bridges can scorch. Set the pumpkin on a dark surface and dim the room to make the shouting mouth pop as the focal point. Try angling the light slightly upward for dramatic shadows in the eyes. Snap your photo from straight on to keep the face proportions true.

Gather your supplies

Check things off as you get ready.

Work on a stable surface, keep your free hand out of the cutting path, and have an adult handle sharp tools.

Three levels of light

  • Leave intact

    The outer cheeks, forehead edges, and background skin stay untouched and dark to frame the face.

  • Peel & shade

    The hair edges and the jaw shadow are skin-peeled for a soft dim glow that adds depth.

  • Cut through

    The wide open mouth, eye slits, and swept hair lines are cut through for the brightest light.

Learn the carving basics

Before you start cutting

How do I keep the teeth bridges from breaking?

Leave each tooth gap as a narrow slot and keep a solid skin strip between them rather than cutting one long opening. Cut these while the rest of the shell is still intact for support. Use a sharp detail saw and light pressure so you do not stress the strips.

Why cut the mouth interior in one pass?

The mouth is the largest opening, so nibbling at it from the edges puts repeated stress on the thin corners and can crack the skin. Score the full outline first, then push the whole center piece out at once. This keeps the corner strips clean and strong.

This is a concept image, so can a real pumpkin look like this?

Yes, a design like this is carvable if you keep the thin details attached with small bridges and pick a large smooth pumpkin. Treat the reference as inspiration and adjust the fine hair lines to match your own shell thickness. Go a bit wider on delicate strips if your pumpkin feels soft.

Your take belongs here, too.

Changed a detail? Made it simpler? Share a photo of your version and tell the community what worked.

Share your pumpkin

More pumpkins like this

You've reached the end · 8 pumpkins
The Patch Report

Fresh pumpkins, in your inbox.

The best new carvings, ideas worth stealing, and how-tos for carving season. Short, seasonal, and gone by November.

A short email during carving season. Unsubscribe anytime. See our privacy policy.