Halloween Pumpkin Carving Contest · Starts October 1st · $500 in prizes
← Back to ideas
@ai_concepts
Sep 14, 2026
Simple Fan-Tailed Goldfish PumpkinAI
0

Simple Fan-Tailed Goldfish Pumpkin

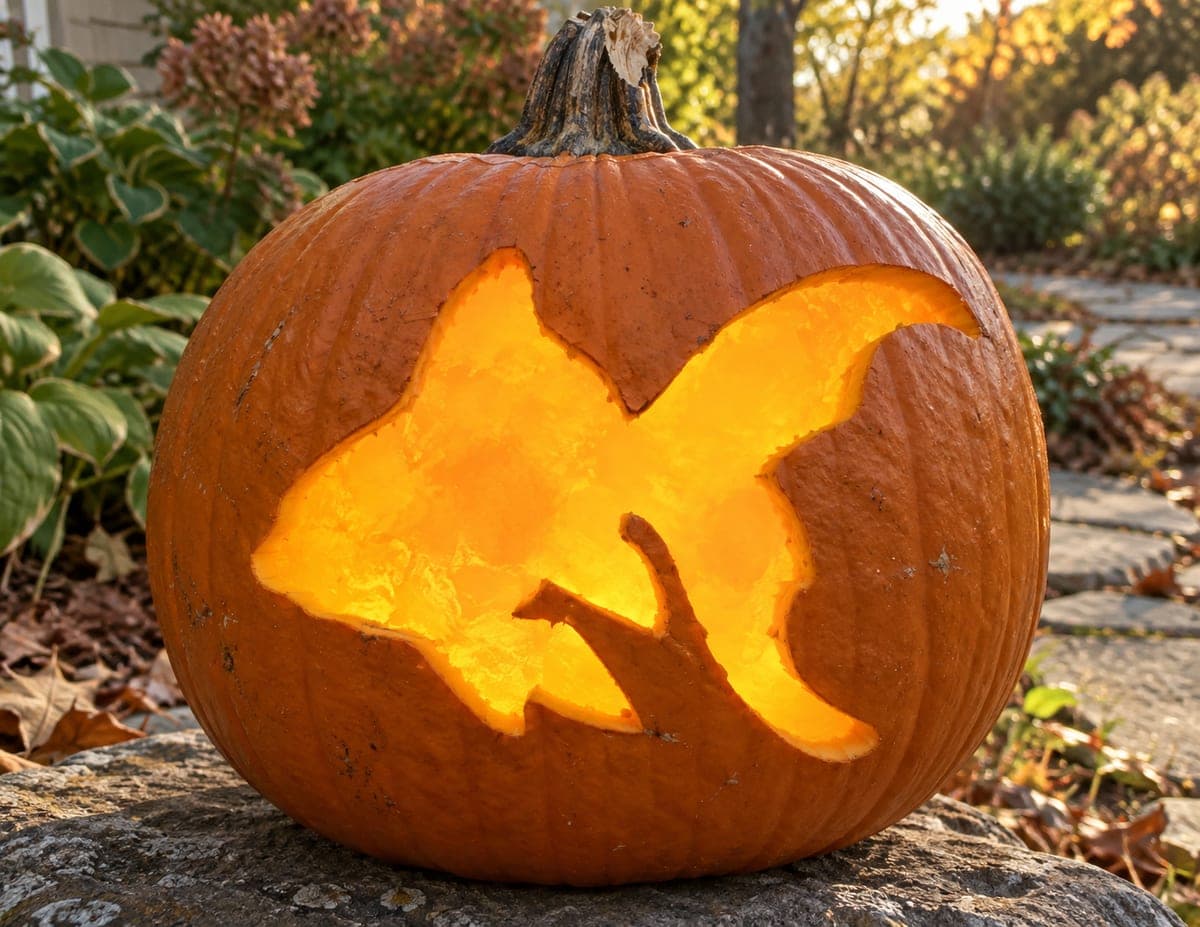
A broad-bodied goldfish with a large divided forked tail is carved as a single open glowing shape, the fins clearly distinguishable by the V-notch where the tail splits in this simple pumpkin carving idea for beginners. One small fin detail near the belly remains as a thin rind bridge dividing the lower body opening from the tail opening. Cut the main fish body first and leave the tail split for last -- the thin V-notch between the two tail lobes is the most delicate cut and is safest to complete when most of the wall around it is already removed.

This is an AI-generated concept image: a realistic, carvable design idea rather than a photo of a finished carve. AI concepts are always labeled and sit out the leaderboard and the contest.

No ratings yet · Sign in to rate
Comments (0)

  • No comments yet — be the first.

Save without an account. Sign in to like or comment.

Our tips for carving a similar design

The whole trick here is treating the goldfish as one large open glow shape, with the body and forked tail read purely by their outline. A single thin rind bridge near the belly keeps the lower body and the tail from becoming one shapeless hole, and the V-notch splitting the two tail lobes is the only fussy cut. Carve the body first and save that delicate notch for last, once most of the wall around it is already gone.

Written by PumpkinCarvingIdeas.com, inspired by the image above. These are our suggestions, not instructions from the uploader. This approach to the AI concept has not been tested on a real pumpkin.

From pumpkin to porch

  1. Prep the pumpkin and pick your side

    Choose a broad, fairly flat-faced pumpkin so the wide goldfish body has room to spread. Cut a lid from the bottom or the back rather than the top so the fish face stays clean, and scrape the inside wall down to about one inch thick where the design will sit. A thinner wall makes the outline easier to cut and lets more light through. Wipe the surface dry before you transfer the pattern.

  2. Transfer the goldfish outline

    Tape your stencil flat against the pumpkin and poke the outline with a pin or pointed tool, following the rounded body, the flowing top fin, and the big divided tail. Mark the small belly fin and the V-notch of the tail clearly so you remember those are special. Pull the paper off and connect the dots lightly with a marker if it helps. Take a moment to confirm the whole shape fits before any blade touches the shell.

  3. Save the bridge, then start the body

    Before cutting, shade in the one small belly fin that stays as a thin rind bridge dividing the lower body from the tail opening. Cut everything except that bridge. Begin with the main body opening, sawing the rounded belly and back with a small serrated carving saw held straight in and out. Work in short strokes and let the tool do the work rather than forcing it.

  4. Open the fins and upper tail

    Continue the cutout up into the top fin and out along the two spreading tail lobes, keeping your line just inside your marks so you can clean up later. Remove the waste pieces gently as they come free rather than prying, which can crack the wall. Leave a little extra shell around the delicate V-notch for now. The more surrounding material you clear first, the more stable that final detail will be.

  5. Finish the delicate tail V-notch

    With most of the tail wall already removed, carefully cut the thin V-notch that splits the tail into two lobes. Use a fresh, sharp detail blade and make slow, deliberate passes, supporting the pumpkin with your free hand well away from the cut. Trim any ragged edges on the body and fins with a paring cut so the silhouette reads clean. Double-check that the belly rind bridge is still intact and gently rounded.

  6. Light it and photograph

    Drop a battery LED puck or string light inside and set it low so the glow fills the whole open fish shape evenly. Skip candles, since the large opening and warm rind dry out fast. Set the pumpkin on a flat stone or step at dusk and shoot slightly off to one side to catch the tail detail. If any spot looks dim, scrape a little more from the inside wall behind it.

Gather your supplies

Check things off as you get ready.

Work on a stable surface, keep your free hand out of the cutting path, and have an adult handle sharp tools.

Three levels of light

  • Leave intact

    The uncut orange skin across the body and around the fish, staying dark to frame the shape.

  • Peel & shade

    Optional shallow-scraped scales or a faint eye spot on the body for a soft dim glow.

  • Cut through

    The full body, top fin, and both tail lobes cut clean through for the brightest light.

Learn the carving basics

Before you start cutting

Do I really need the belly fin bridge, or can I cut it all as one hole?

Keep the bridge. That thin strip of rind is what separates the lower body opening from the tail opening so the eye reads a fish instead of one blob of light. It also adds a little structural support across a wide cutout. Round its edges gently so it does not look accidental.

How thin should the V-notch between the tail lobes be?

Aim for a notch you can cut cleanly without leaving a paper-thin sliver of shell that might snap. On this design the notch is a wedge, not a hairline slit, so you have some forgiveness. Cut it last, when the wall around it is already open, and go slow with a sharp blade.

Since this is a concept image, will a real pumpkin hold this shape?

Yes, this design is very carving-friendly because it is one large opening with only a single bridge. Keep your wall around one inch thick and do not over-thin the area near the tail lobes. A broad, firm pumpkin will support the wide body without sagging.

Your take belongs here, too.

Changed a detail? Made it simpler? Share a photo of your version and tell the community what worked.

Share your pumpkin

More pumpkins like this

You've reached the end · 8 pumpkins
The Patch Report

Fresh pumpkins, in your inbox.

The best new carvings, ideas worth stealing, and how-tos for carving season. Short, seasonal, and gone by November.

A short email during carving season. Unsubscribe anytime. See our privacy policy.