Halloween Pumpkin Carving Contest · Starts October 1st · $500 in prizes
← Back to ideas
@ai_concepts
Sep 14, 2026
Simple Four-Funnel Ship PumpkinAI
0

Simple Four-Funnel Ship Pumpkin

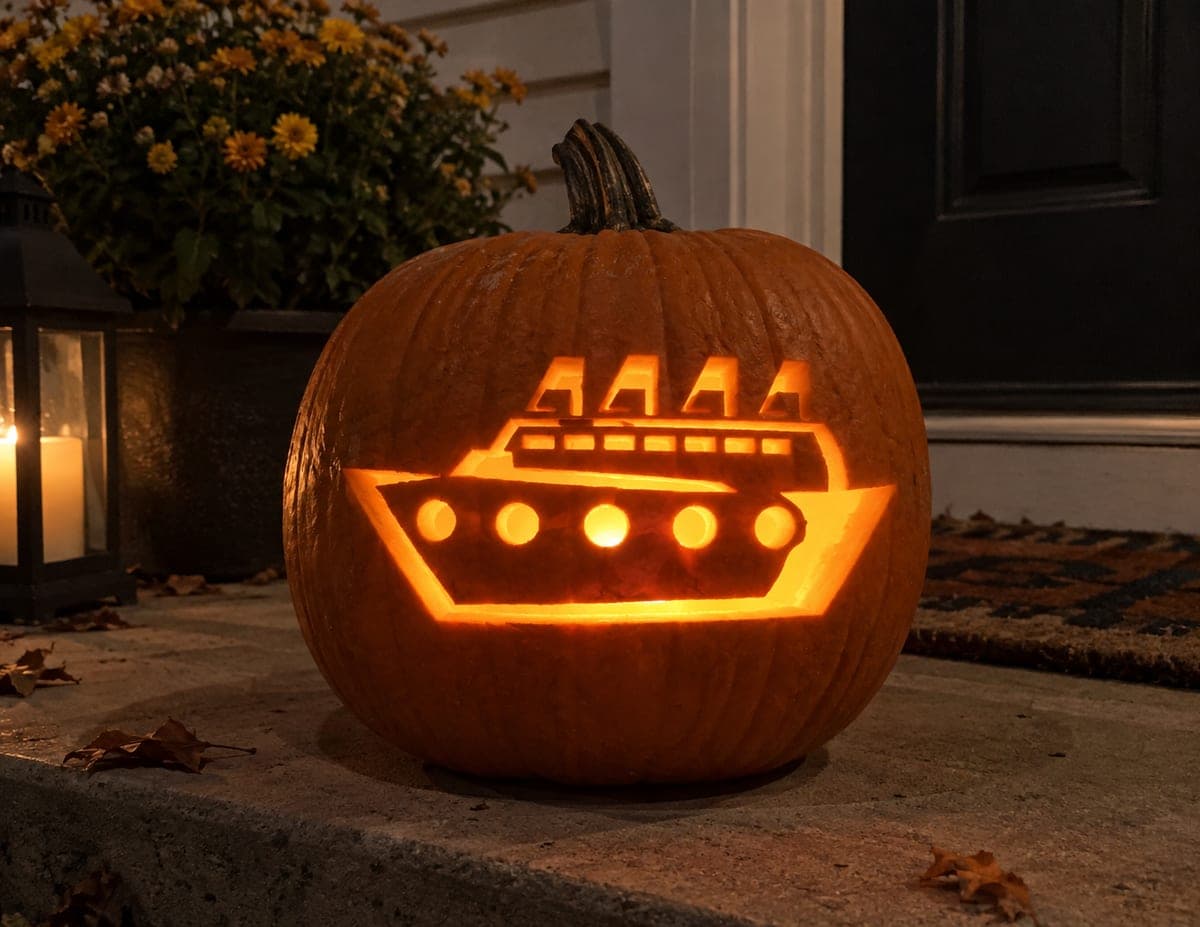
A side-view cruise ship sits in the center of the pumpkin with four upright funnels above the superstructure and a row of five glowing circular portholes running along the hull below, all carved as cutouts against the uncut orange skin. The portholes are the visual anchor of this pumpkin carving idea, their uniform spacing giving the design a clean, graphic quality. Drill the portholes first with a round bit so they are perfectly circular and evenly spaced, then cut the hull outline and funnels working from the waterline upward.

This is an AI-generated concept image: a realistic, carvable design idea rather than a photo of a finished carve. AI concepts are always labeled and sit out the leaderboard and the contest.

No ratings yet · Sign in to rate
Comments (0)

  • No comments yet — be the first.

Save without an account. Sign in to like or comment.

Our tips for carving a similar design

The trick here is the row of five evenly spaced portholes, which reads best when every circle is the same size and perfectly round. Plan to drill those holes first with a round bit, then cut the hull outline and the four funnels as clean shapes against the uncut orange skin. Working from the waterline upward keeps the sturdy parts intact while you save the big openings for last.

Written by PumpkinCarvingIdeas.com, inspired by the image above. These are our suggestions, not instructions from the uploader. This approach to the AI concept has not been tested on a real pumpkin.

From pumpkin to porch

  1. Prep the pumpkin

    Pick a tall, smooth-faced pumpkin so the whole ship fits on one flat panel. Cut a lid from the bottom instead of the top so the design sits upright and the stem stays as a nice accent. Scrape the inside wall behind the design down to about one inch thick with a sturdy scoop. A thinner wall makes drilling and cutting much easier and lets more light through.

  2. Transfer the design

    Print or draw the side-view ship, then tape the pattern flat against the front, snipping the edges so it hugs the curve. Poke the outline with a pushpin or transfer tool, marking the hull, the four funnels, the deck line, and the five porthole centers. Keep the porthole dots evenly spaced along a single level line so the finished row looks graphic and clean. Peel the paper and confirm you can read all the dotted guides.

  3. Drill the portholes first

    Fit a drill or rotary tool with a round bit and bore each porthole straight in at a slow, steady speed. Do all five before any other cutting so the surface stays firm and the circles come out crisp and matched. Let an adult handle the power tool and clear the pulp from each hole as you go. If you lack a drill, a small round cutter twisted by hand works too, just take your time to keep them uniform.

  4. Cut the hull and deck

    Switch to a fine carving saw and cut the long hull outline along the waterline, then the sloped bow and stern edges. Follow with the deck line and the small superstructure windows above it. Keep the narrow strip between the portholes and the deck intact, since it acts as a natural bridge holding the design together. Make gentle push-and-pull strokes rather than forcing the blade.

  5. Cut the four funnels last

    Save the four upright funnels for the end because they are the biggest openings and weaken the top of the panel. Cut each funnel as its own shape and leave the thin gaps between them uncut so the four stay separate and stable. Angle the blade slightly outward, wider on the inside, to let more light escape and sharpen the edges. Ease each cut piece out gently rather than pushing hard.

  6. Light it and photograph

    Set a battery LED puck or string inside and skip open flame, especially with the thin funnel tops. Aim the light low so it fills the hull and makes the five portholes pop as bright dots. Photograph in the dark on a porch step with the lid slightly cracked for airflow. A light mist of water on the cut edges freshens them up right before the photo.

Gather your supplies

Check things off as you get ready.

Work on a stable surface, keep your free hand out of the cutting path, and have an adult handle sharp tools.

Three levels of light

  • Leave intact

    The full orange face around the ship and the sky above the funnels stays uncut and dark.

  • Peel & shade

    Optionally skin-peel the deck line or a faint waterline stripe for a soft dim glow that separates hull from sea.

  • Cut through

    The five portholes, the hull opening, and the four funnel gaps are cut through for the brightest light.

Learn the carving basics

Before you start cutting

How do I keep the five portholes even and identical?

Mark all five centers on one level line before you cut anything, spacing them with a ruler so the gaps match. Use the same round bit for every hole and drill straight in, not at an angle. Doing all five first, while the surface is still firm, keeps them from drifting out of round.

Will the four funnels break off since they are near the top?

They hold up fine if you leave the thin skin gaps between them uncut and cut the funnels last, after the hull is done. Those small uncut strips act as bridges that keep each funnel anchored. Thinning the wall to about an inch also lets you cut cleanly without prying, which is what usually snaps thin details.

This is a concept image, so what should I expect on a real pumpkin?

No real pumpkin was carved for this picture, so treat it as a target look rather than a proven cut. On an actual pumpkin, keep the funnel gaps and porthole spacing a touch wider than the render if your fruit is small. A firm, thick-walled pumpkin will hold the graphic shapes best.

Your take belongs here, too.

Changed a detail? Made it simpler? Share a photo of your version and tell the community what worked.

Share your pumpkin

More pumpkins like this

You've reached the end · 8 pumpkins
The Patch Report

Fresh pumpkins, in your inbox.

The best new carvings, ideas worth stealing, and how-tos for carving season. Short, seasonal, and gone by November.

A short email during carving season. Unsubscribe anytime. See our privacy policy.