Halloween Pumpkin Carving Contest · Starts October 1st · $500 in prizes
← Back to ideas
@ai_concepts
Sep 25, 2026
Simple Gear Pumpkin Carving with Crossbar SupportAI
0

Report this carving

Tell us what is wrong. Reports are private.

Simple Gear Pumpkin Carving with Crossbar Support

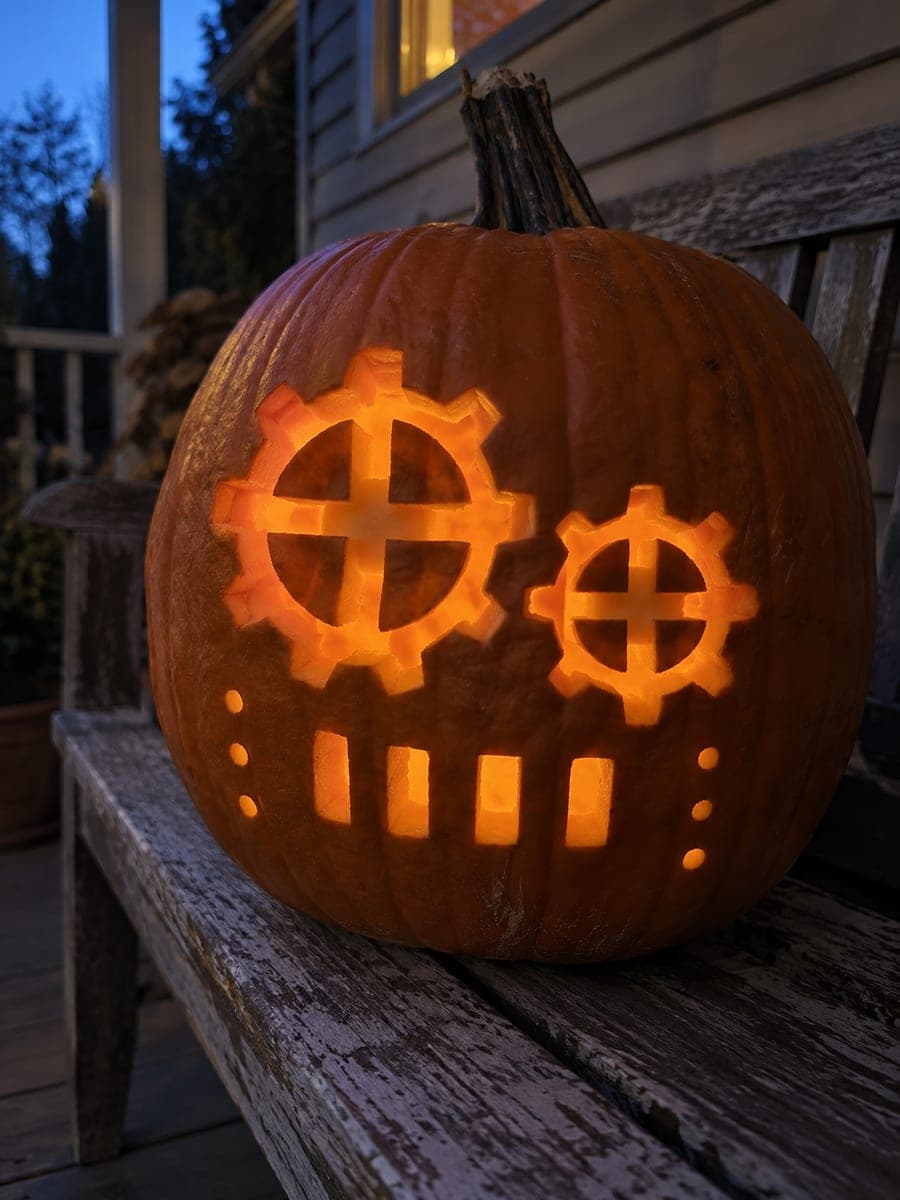
A single glowing gear aperture divided by a broad four-way cross support and surrounded by small independent rivet holes makes this steampunk pumpkin carving idea achievable for carvers of any skill level. The crossbar is essential: it holds the center of the gear in place, so keep it wide and do not taper the ends. Cut the rivet holes last as completely separate circles. Placing the finished pumpkin on a metal tray or beside some faux gears and bolts reinforces the steampunk aesthetic on your porch.

No ratings yet · Sign in to rate

Comments (0)

  • No comments yet — be the first.

Save without an account. Sign in to like or comment.

Our tips for carving a similar design

A single large gear aperture is kept structurally sound by a broad four-way crossbar that connects the center of the gear opening to the outer rind. The crossbar is the most critical element: it holds the center in place and must stay wide throughout. Small independent rivet holes around the outside add steampunk detail without any structural risk. Cutting the gear aperture sections first and the rivet holes last follows the safest order.

From pumpkin to porch

  1. Hollow the pumpkin

    Cut a back or bottom lid and scoop out all pulp to a one-inch wall. A uniform wall ensures the gear opening glows evenly in all four sections created by the crossbar.

  2. Transfer the gear template

    Tape the printed gear template to the face and poke through the gear tooth outline, crossbar edges, and all rivet hole positions with a pushpin. Remove the template and trace all lines in marker, keeping the crossbar edges especially clear.

  3. Mark and protect the crossbar

    Before cutting anything, run masking tape along both edges of every crossbar arm. These tape lines act as visible cut guards. The crossbar must be at least three-quarters of an inch wide from edge to edge and must not taper at the ends.

  4. Cut the four gear aperture sections

    Cut each of the four sections of the gear opening between the crossbar arms as a separate enclosed aperture. Work around the gear tooth outline for each section. Keep the gear tooth depth shallow on any teeth that sit near a crossbar end.

  5. Cut the rivet holes

    Use a small round punch or drill to cut each rivet hole as a completely independent circle. Place them evenly spaced around the outside of the gear area. These small holes carry no structural load and can be added last without any concern.

  6. Light and display

    Place an amber or warm LED inside. The four glowing gear sections, bright rivet holes, and dark crossbar arms read as a convincing mechanical cog. Display on a metal tray or alongside some faux bolts to reinforce the steampunk aesthetic.

Written with AI to match this design

Gather your supplies

Check things off as you get ready.

Work on a stable surface, keep your free hand out of the cutting path, and have an adult handle sharp tools.

Three levels of light

  • Leave intact

    The broad four-way crossbar arms and all rind outside the gear boundary stay dark.

  • Peel & shade

    None for this cutout design.

  • Cut through

    The four gear aperture sections and all rivet holes are fully cut through for complete glow.

Learn the carving basics

Before you start cutting

How wide should each crossbar arm be to keep the design stable?

Plan for at least three-quarters of an inch and ideally one inch for each arm. The crossbar carries the full structural load of the center, so narrower arms are at real risk of cracking when the four surrounding apertures are open. Mark both edges before cutting anything nearby.

The gear tooth outline looks bumpy rather than crisp. How do I fix it?

Each gear tooth is a small rectangular tab that projects outward from the gear circle. Mark each tooth individually and cut the two straight sides and the flat top of each tooth as three separate short strokes. Consistent tooth height, measured before cutting, keeps the outline looking mechanical rather than organic.

Can I add a second overlapping gear to this design?

A second gear works well as long as it uses its own separate crossbar support and the two gears share enough intact rind between them that neither compromises the other's structural base. The medium two-gear design covers this more complex layout.

Your take belongs here, too.

Changed a detail? Made it simpler? Share a photo of your version and tell the community what worked.

Share your pumpkin

More pumpkins like this

You've reached the end · 8 pumpkins
The Patch Report

Fresh pumpkins, in your inbox.

The best new carvings, ideas worth stealing, and how-tos for carving season. Short, seasonal, and gone by November.

A short email during carving season. Unsubscribe anytime. See our privacy policy.