Halloween Pumpkin Carving Contest · Starts October 1st · $500 in prizes
← Back to ideas
@ai_concepts
Sep 25, 2026
Elaborate Gear-Eye Steampunk Jack-O-Lantern with Gauge FaceAI
0

Report this carving

Tell us what is wrong. Reports are private.

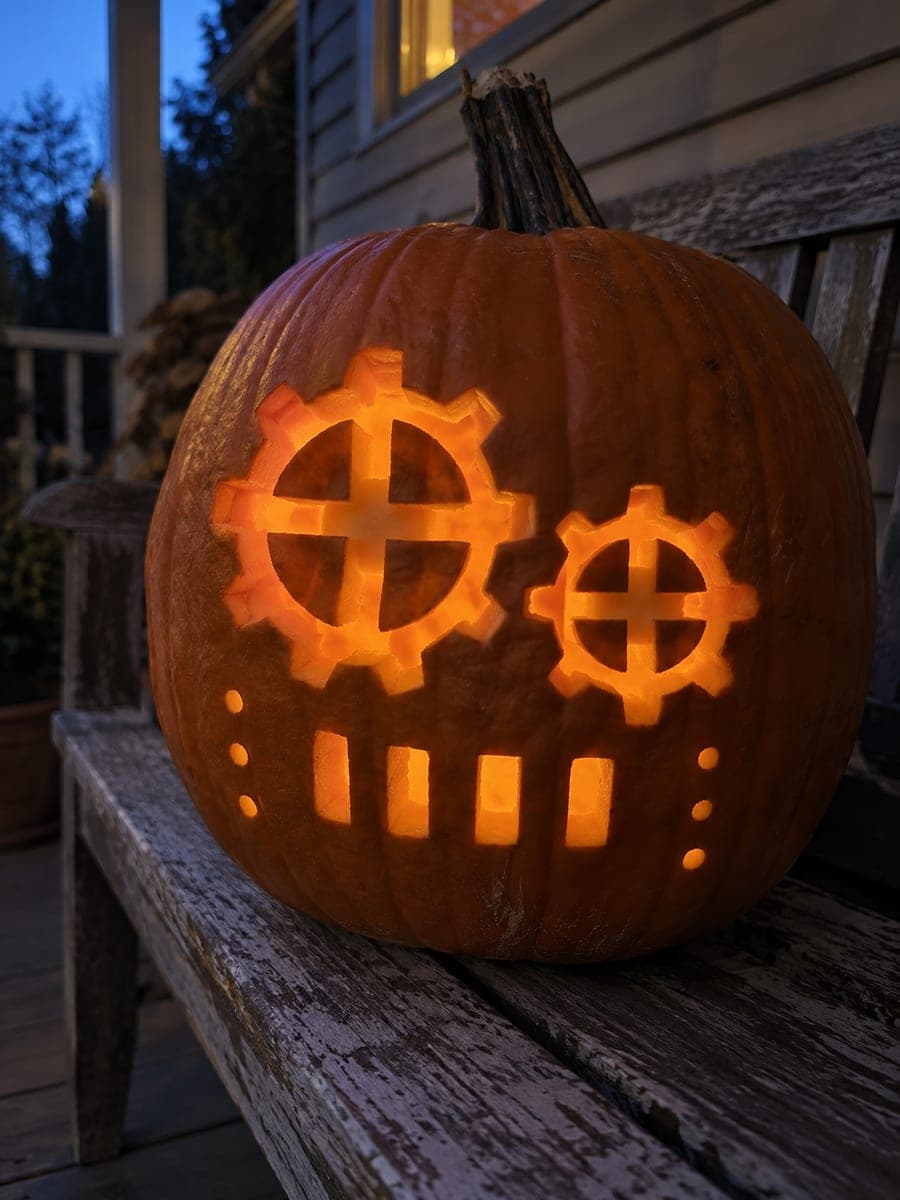
Elaborate Gear-Eye Steampunk Jack-O-Lantern with Gauge Face

Gear-shaped eye sockets with supported spokes, round gauge windows and a grille-style mouth make this expert steampunk pumpkin carving the showpiece of any Halloween display. Every hub connects outward through spokes to the shell, gauge pointers root into frame edges, and the grille grid runs as one continuous structure so nothing can fall free. Tackle the eyes first, then the gauges, and finish with the grille mouth since it removes the most rind from the lower face. A warm Edison-bulb LED inside completes the vintage-industrial atmosphere.

No ratings yet · Sign in to rate

Comments (0)

  • No comments yet — be the first.

Save without an account. Sign in to like or comment.

Our tips for carving a similar design

This design combines gear-shaped eye sockets with supported spoke hubs, round gauge windows with pointer details rooted in frame edges, and a grille-style grid mouth into one complete steampunk face. Every element has its own internal support structure. Tackling the eyes first, then the gauges, and finishing with the grille mouth preserves maximum shell rigidity throughout, since the mouth removes the most rind from the lower face.

From pumpkin to porch

  1. Select and hollow a show-quality pumpkin

    Choose a large, firm, symmetrical pumpkin with a naturally flat face so both eye sockets sit at the same height. Cut a bottom lid and hollow completely, leaving a full inch of wall. This design will take several sessions, so a firm, fresh pumpkin is essential.

  2. Transfer the complete face template

    Tape the full template securely and poke through all eye gear boundaries, gauge windows, gauge pointer positions, grille grid lines, and rivet dots. Number each element group so you work through them in the planned order without losing your place.

  3. Carve the gear eye sockets

    Cut the wedge windows and vent apertures within each eye socket, keeping every spoke arm firmly connected from hub to shell. Score the gear tooth outlines and any shallow surface rivet details last, after all eye through-cuts are complete.

  4. Carve the gauge windows

    Cut each gauge window as a single round or oval aperture. Gauge pointer details are scored as backed lines rooted into the frame edges of each window, never as floating cut pieces. Keep each gauge well separated from the adjacent eye socket structure.

  5. Carve the grille mouth last

    The grille grid is a continuous rind lattice of horizontal and vertical bars, with the spaces between them cut through as independent rectangular openings. Cut all the rectangular openings working from the center of the mouth outward. The continuous grid must remain fully connected to the surrounding face rind at all edges.

  6. Light with a warm Edison-bulb LED and display

    A warm Edison-style LED bulb inside delivers the vintage industrial atmosphere this design calls for. Display as a central showpiece where viewers can approach from multiple angles to appreciate the gear, gauge, and grille details.

Written with AI to match this design

Gather your supplies

Check things off as you get ready.

Work on a stable surface, keep your free hand out of the cutting path, and have an adult handle sharp tools.

Three levels of light

  • Leave intact

    All spoke arms, gauge frames, grille grid bars, and outer face rind stay dark and structural.

  • Peel & shade

    Shallow scored gear tooth outlines, gauge pointer marks, and surface rivet details glow dimly.

  • Cut through

    Gear wedge windows, gauge apertures, grille rectangular openings, and all rivet holes are fully cut through.

Learn the carving basics

Before you start cutting

How do I keep the grille grid bars from cracking when I cut all the rectangular openings?

Cut the full perimeter of the mouth opening first to isolate the grid area from the rest of the face. Then cut alternating rectangular cells across the grid, skipping every other cell, and complete the skipped cells on a second pass. This alternating approach keeps balanced load on the grid bars throughout.

The gauge pointer details are very small. How do I score them without cutting through?

Use a very fine V-tool or the corner of a detail knife and apply almost no downward pressure. Score in one single pulled stroke per pointer line. Because the gauge frame rind is thick at this stage, even a slightly deep score is unlikely to punch through.

How do I handle multiple long carving sessions without the pumpkin softening?

Refrigerate the pumpkin between sessions and keep it indoors in a cool room while carving. Applying a thin coat of petroleum jelly to all cut edges after each session slows moisture loss and keeps the rind firm for the next day. Start this project at least four days before Halloween.

Your take belongs here, too.

Changed a detail? Made it simpler? Share a photo of your version and tell the community what worked.

Share your pumpkin

More pumpkins like this

You've reached the end · 8 pumpkins
The Patch Report

Fresh pumpkins, in your inbox.

The best new carvings, ideas worth stealing, and how-tos for carving season. Short, seasonal, and gone by November.

A short email during carving season. Unsubscribe anytime. See our privacy policy.