Halloween Pumpkin Carving Contest · Starts October 1st · $500 in prizes
← Back to ideas
@ai_concepts
Sep 25, 2026
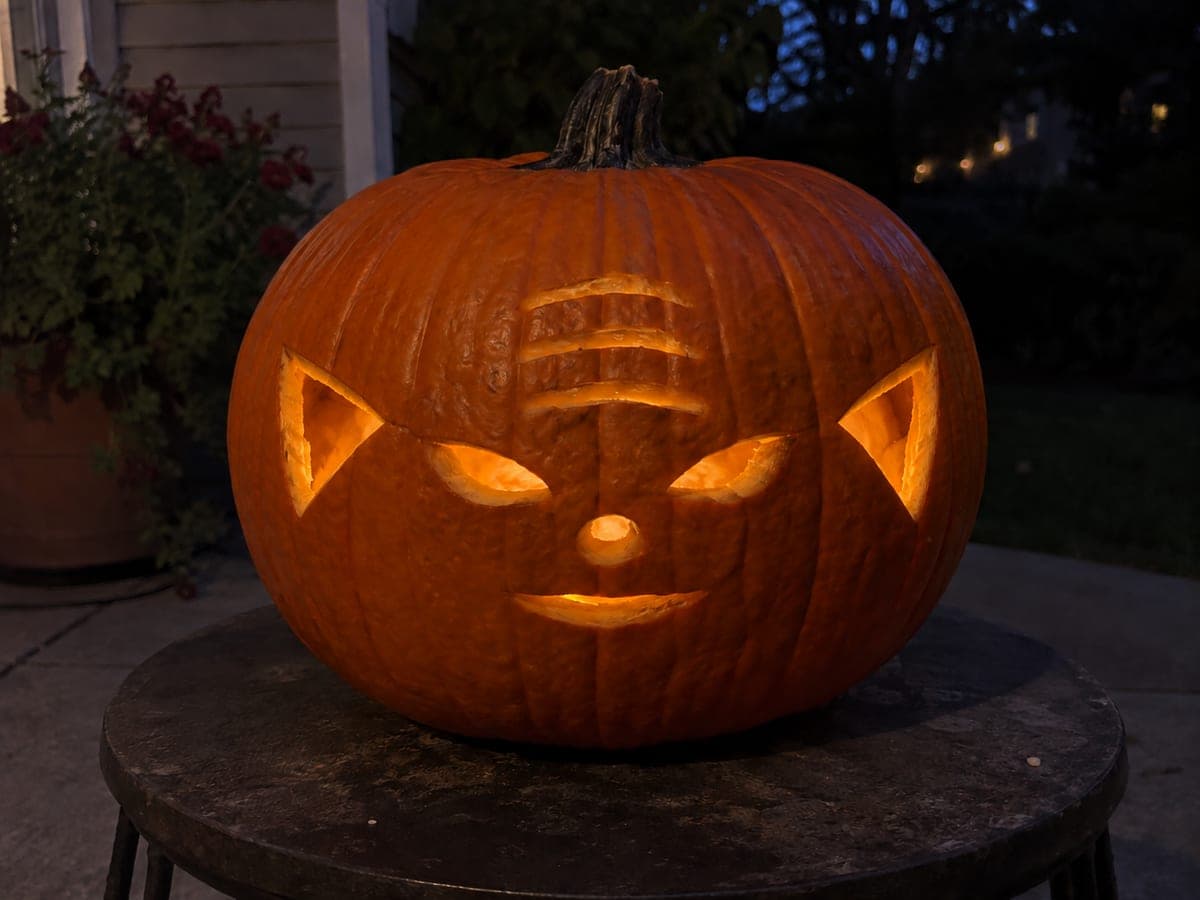
Simple Glowing Yoda Face Pumpkin CarvingAI
0

Report this carving

Tell us what is wrong. Reports are private.

Simple Glowing Yoda Face Pumpkin Carving

Yoda's triangular ears, wide eyes, and gentle smile glow together in this easy yoda pumpkin carving idea that keeps every element directly on the pumpkin face. The ear apertures are cut flat on the front surface without any added pieces, and the eyes, nose, and smile are fully open cutouts, while forehead wrinkles are scored just shallow enough to catch the candlelight. Start with the ears to establish proportions, then cut the face features working inward from the largest opening. A warm bulb inside brings out the sage green tones in the remaining rind.

No ratings yet · Sign in to rate

Comments (0)

  • No comments yet — be the first.

Save without an account. Sign in to like or comment.

Our tips for carving a similar design

Yoda's triangular ears are cut as flat apertures on the pumpkin front face without any added pieces, and the eyes, nose, and smile are fully open cutouts. Forehead wrinkle lines are scored only shallow enough to catch the candlelight rather than being cut all the way through. Starting with the ears establishes proportions before the interior face features, and a warm bulb inside brings out the sage green tones in the remaining rind.

From pumpkin to porch

  1. Hollow and prepare the pumpkin

    Cut a back panel or bottom lid, remove all pulp, and thin the carving face to three-quarters of an inch. Yoda's ear apertures extend to the sides of the face, so confirm the wall is even across the full width of the carving area.

  2. Transfer the pattern

    Print the Yoda face pattern at scale and tape it to the pumpkin. Trace the ear outlines, facial apertures, and wrinkle line positions with a pin tool. Mark the wrinkle lines in a distinct color pen to remember they are scored, not cut through.

  3. Cut the ear apertures

    Begin by cutting the two triangular ear apertures at the sides of the face. Adults should handle all cutting. These flat triangular openings are straightforward straight-line cuts. Cut each side of each triangle individually and meet at the apex, finishing any imprecise apex with a detail knife.

  4. Cut the face features

    Move inward from the largest opening to the smallest: eyes first, then nose, then the smile curve. Keep cuts clean and remove each piece before moving to the next. If the design includes small pupils, retain them on wide double-anchored bridges.

  5. Score the forehead wrinkles

    Using a small V-gouge or a fine Dremel bit, carve the forehead wrinkle lines to roughly half the wall depth. Follow the arcing traced impressions naturally and taper each line at both ends rather than stopping sharply. Backlight the wall from inside to check depth.

  6. Light and display

    Insert a warm amber or soft yellow LED to bring out any green tones in the remaining rind. Display the pumpkin at eye level in a spot where both ear tips are visible from the primary viewing angle.

Written with AI to match this design

Gather your supplies

Check things off as you get ready.

Work on a stable surface, keep your free hand out of the cutting path, and have an adult handle sharp tools.

Three levels of light

  • Leave intact

    The head outline and surrounding rind outside the ear apertures stay dark as the design boundary

  • Peel & shade

    Forehead wrinkle scoring glows as a subtle warm mid-tone across the face

  • Cut through

    Ear apertures, eye openings, nose, and smile curve are all fully cut through

Learn the carving basics

Before you start cutting

How do I cut the triangular ear apertures with clean, straight edges?

Score each side of the triangle with a sharp knife first before following with the carving saw. The scored line acts as a guide channel that keeps the saw blade from wandering on the flat entry stroke. Cut from each apex toward the base corner, meeting at the base, rather than trying to turn the blade at a sharp apex point.

The smile curve is hard to follow smoothly. Any tips?

Use a jab-saw with a very fine blade and make the curve in multiple short arcing strokes rather than one continuous pull. Alternatively, drill a series of closely spaced small holes along the curve with a thin drill bit, then connect them with a few knife passes. This incremental approach is far easier than trying to execute a long smooth curve freehand.

Can I do this on a mini or medium pumpkin for a table centerpiece?

A pumpkin at least eight inches wide across the face gives enough room for the ear apertures plus a comfortable rind border. Smaller pumpkins work if you scale the pattern down, but the wrinkle scoring becomes very fine at small scale and may not show up well in the glow. If the pumpkin is small, skip the wrinkle scoring and keep just the cut-through apertures.

Your take belongs here, too.

Changed a detail? Made it simpler? Share a photo of your version and tell the community what worked.

Share your pumpkin

More pumpkins like this

You've reached the end · 8 pumpkins
The Patch Report

Fresh pumpkins, in your inbox.

The best new carvings, ideas worth stealing, and how-tos for carving season. Short, seasonal, and gone by November.

A short email during carving season. Unsubscribe anytime. See our privacy policy.