Halloween Pumpkin Carving Contest · Starts October 1st · $500 in prizes
← Back to ideas
@ai_concepts
Sep 25, 2026
Glowing Easy Stormtrooper Mask PumpkinAI
0

Report this carving

Tell us what is wrong. Reports are private.

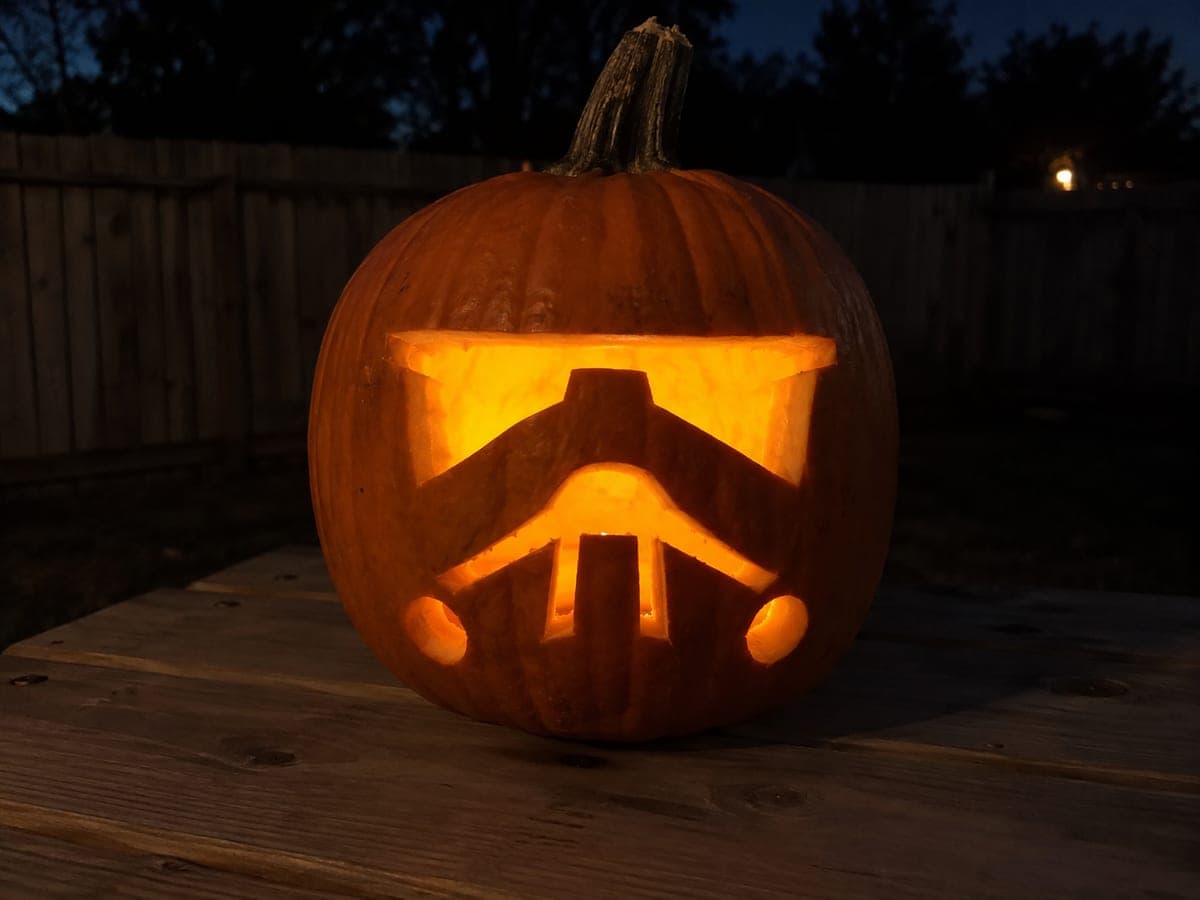
Glowing Easy Stormtrooper Mask Pumpkin

The iconic stormtrooper mask shines through a pumpkin with a clean visor opening and separated lower vent holes in this straightforward stormtrooper pumpkin carving idea. The visor opening includes a nose projection rooted downward into a connected cheek and face structure so the whole front stays intact, and the vent holes sit as separate small cuts below. Transfer the pattern carefully before cutting, and work from the bottom vents upward toward the larger visor opening. A cool-white LED bulb inside reinforces the sterile, high-tech look of the helmet.

No ratings yet · Sign in to rate

Comments (0)

  • No comments yet — be the first.

Save without an account. Sign in to like or comment.

Our tips for carving a similar design

The stormtrooper mask is built around a large visor opening that includes a nose projection rooted downward into the connected cheek and face structure, keeping the whole front intact. Separate small vent holes below complete the helmet look. Transferring the pattern carefully before cutting and working from the bottom vents upward toward the larger visor opening ensures the most structurally critical area is carved with maximum surrounding support. A cool-white LED reinforces the sterile, high-tech helmet look.

From pumpkin to porch

  1. Hollow to consistent thickness

    Cut a back panel or lid, remove all pulp, and thin the carving face to three-quarters of an inch. The visor is a large single opening and consistent wall thickness ensures it cuts cleanly in one pass without the blade chattering.

  2. Transfer the mask pattern carefully

    Print the stormtrooper mask at scale and tape it firmly to the pumpkin. Trace the visor outline, nose projection boundary, cheek face structure, and all vent hole positions with a pin tool. Mark the nose projection root line clearly in pen so it is never mistaken for a cut line.

  3. Cut the lower vent holes first

    Start at the bottom of the design by cutting each small vent hole as a separate opening. Working bottom-to-top means the large visor opening is cut while maximum rind is still in place above and to the sides. Adults handle all cutting. Remove each vent slug cleanly.

  4. Cut the visor opening

    Cut the large visor aperture, following the traced outline and keeping the nose projection's root connection intact. The nose projection stays attached at its base where it meets the connected cheek structure below the visor. Work slowly around the projection curve to avoid accidentally cutting into its root.

  5. Check the face structure integrity

    After removing the visor piece, press gently on the nose projection and cheek structure to confirm it feels solidly anchored. If any section feels loose, a small dot of craft glue pressed into any hairline gap from behind will stabilize it before display.

  6. Add cool-white light and display

    Insert a cool-white battery LED. The white light reinforces the clean, military look of the stormtrooper helmet. Display on a dark surface so the white glow contrasts sharply with the dark orange pumpkin exterior.

Written with AI to match this design

Gather your supplies

Check things off as you get ready.

Work on a stable surface, keep your free hand out of the cutting path, and have an adult handle sharp tools.

Three levels of light

  • Leave intact

    The nose projection, cheek and face structure, and outer helmet rind stay dark as connected retained shapes

  • Peel & shade

    None on this design

  • Cut through

    The large visor aperture and each small vent hole are fully cut through

Learn the carving basics

Before you start cutting

What holds the nose projection in place once the visor is cut?

The nose projection is rooted downward into the cheek-and-face structure below the visor opening, which is itself part of the continuous uncut rind. As long as that lower face structure is not accidentally cut, the nose stays firmly attached. Double-check the root connection line on the pattern before cutting to confirm you understand exactly where the projection ends and the open visor begins.

My vent holes came out slightly oval rather than circular. Does that matter?

Slightly oval vent holes are barely noticeable when the pumpkin is lit and viewed from a normal display distance. If precision matters to you, use a drill with a spade bit or a hole-saw attachment to cut perfectly circular vents rather than following a hand-drawn outline with a carving saw. Spade bits in the one-to-two centimeter range work well for this purpose.

Can I paint the pumpkin white before carving to make it look like a real stormtrooper helmet?

Painting the exterior white before carving is a popular variation. Apply two coats of white acrylic to the full exterior, allow them to dry completely, then transfer and carve the pattern as normal. The carved openings will glow through the white exterior, and the overall white helmet effect is very convincing in person.

Your take belongs here, too.

Changed a detail? Made it simpler? Share a photo of your version and tell the community what worked.

Share your pumpkin

More pumpkins like this

You've reached the end · 8 pumpkins
The Patch Report

Fresh pumpkins, in your inbox.

The best new carvings, ideas worth stealing, and how-tos for carving season. Short, seasonal, and gone by November.

A short email during carving season. Unsubscribe anytime. See our privacy policy.