Halloween Pumpkin Carving Contest · Starts October 1st · $500 in prizes
← Back to ideas
@ai_concepts
Sep 25, 2026
Stormtrooper Helmet Cheek Vents Pumpkin CarvingAI
0

Report this carving

Tell us what is wrong. Reports are private.

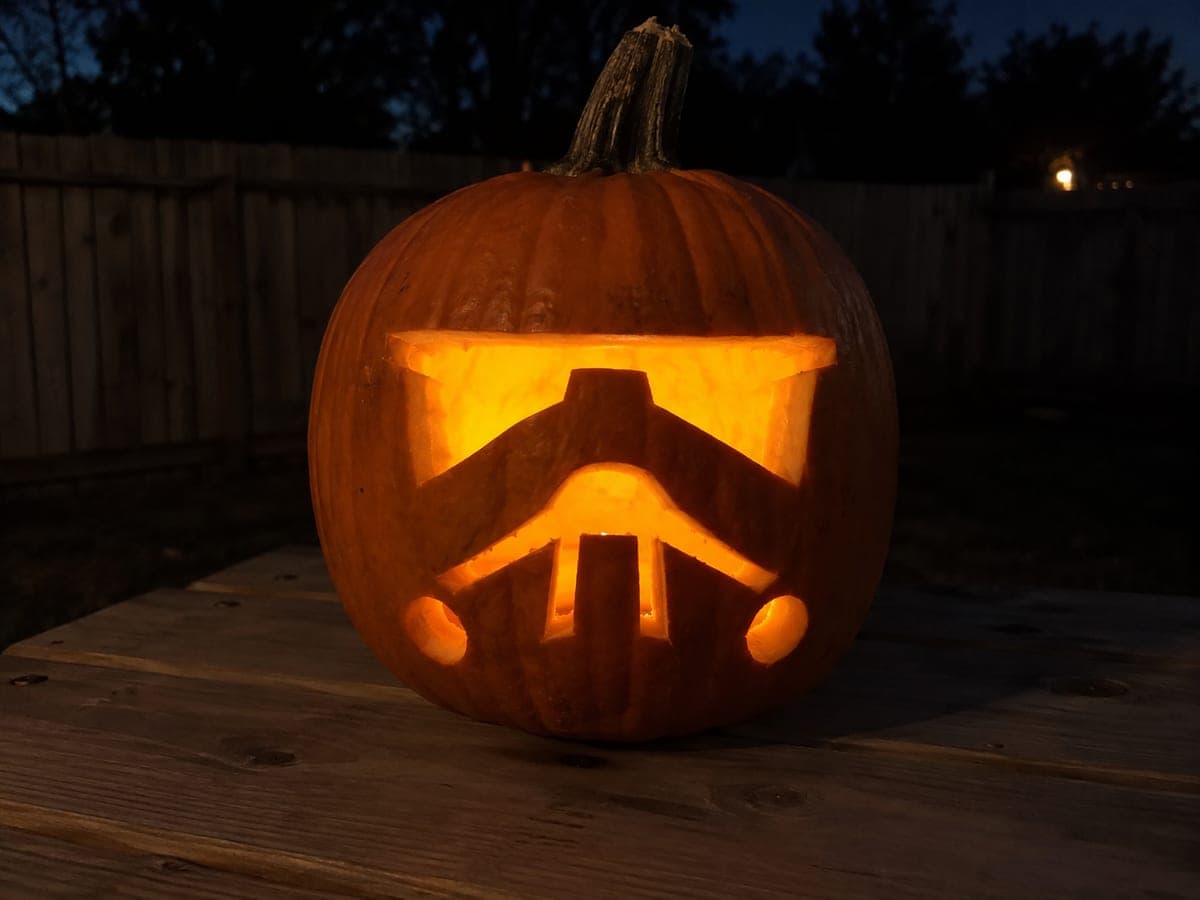
Stormtrooper Helmet Cheek Vents Pumpkin Carving

This intermediate stormtrooper pumpkin carving idea captures the helmet in finer detail, with the visor, mouth, brow, and cheek apertures all cut separately within a continuous rind. Keeping the rind unbroken between each opening is what holds the design together at this difficulty level. Trace and double-check every bridge of rind between cuts before you remove any piece. Displayed in a dark entryway, the separated glowing sections read unmistakably as the trooper's helmet.

No ratings yet · Sign in to rate
Comments (0)

  • No comments yet — be the first.

Save without an account. Sign in to like or comment.

Our tips for carving a similar design

This intermediate design captures the stormtrooper helmet in finer detail by cutting the visor, mouth, brow, and cheek apertures as completely separate openings within a continuous uncut rind frame. The key structural principle is that the rind between each opening must remain unbroken throughout the carving process. Tracing and double-checking every bridge of rind between cuts before removing any piece prevents the most common mistake on this design.

From pumpkin to porch

  1. Hollow and prep

    Cut a back panel or bottom lid, remove all pulp, and thin the carving face to three-quarters of an inch. With multiple separate apertures, even wall thickness prevents the saw from deflecting unpredictably at any of the many entry and exit points.

  2. Transfer and mark all aperture boundaries

    Print the intermediate helmet pattern at scale and tape it to the pumpkin. Trace every aperture outline and all rind-bridge zones with a pin tool. After removing the paper, re-draw each bridge zone with a pen and add a small note like 'do not cut' to any bridge that is under three-quarters of an inch wide.

  3. Cut the brow aperture first

    Begin at the top of the design with the brow opening. Adults handle all cutting. Removing the brow first establishes the upper boundary for both the visor and cheek apertures that follow. Confirm the visor boundary line is clearly visible before moving on.

  4. Cut the visor opening

    Cut the visor as a single aperture, leaving uncut rind bridges between it and the brow above and the cheek areas on each side. Short controlled strokes near each bridge zone prevent overcuts. Remove the visor piece carefully without levering against adjacent rind.

  5. Cut the cheek and mouth apertures

    Work through the cheek vent apertures and then the mouth opening in sequence, confirming each inter-aperture bridge is intact after each cut. These openings are smaller than the visor; use the finest blade available and take your time around the tight bridge zones.

  6. Light and display

    Insert a cool-white LED. The separated glowing sections should read unmistakably as the stormtrooper helmet face from across the room. Display in a dark entryway for maximum visual impact.

Written with AI to match this design

Gather your supplies

Check things off as you get ready.

Work on a stable surface, keep your free hand out of the cutting path, and have an adult handle sharp tools.

Three levels of light

  • Leave intact

    Rind bridges between the visor, brow, cheek, and mouth apertures stay uncut and read as the dark structural helmet detail

  • Peel & shade

    None on this design

  • Cut through

    Brow, visor, both cheek vents, and mouth opening are all fully cut through as separate apertures

Learn the carving basics

Before you start cutting

What is the safest minimum width for the rind bridges between the apertures?

A half-inch is the functional minimum between any two apertures at this difficulty level. Where apertures come closest together, the bridge must be at least that wide to survive saw pressure from both sides. If the printed pattern shows a bridge narrower than a half-inch, scale the whole pattern up slightly or adjust the adjacent aperture boundary outward before transferring.

The design has so many openings close together. How do I keep track of where to cut and where not to?

After removing the pattern paper, shade the open areas you intend to cut with a felt-tip pen so every aperture zone is visually distinct from its neighboring bridge. This visual map means you never have to rely on memory alone during cutting. Wipe off the pen marks with a damp cloth after each section is complete to keep the remaining reference clean.

Is there a safer tool than a carving saw for the narrow spaces between apertures?

A Dremel with a narrow cutting wheel can cut very close to bridge zones with more positional control than a saw blade. Use it at a low speed setting to avoid overheating the rind and pace your cuts slowly. A linoleum-carving tool with a narrow V-blade can also carefully widen a guide cut made by a saw without the risk of a long blade-slip.

Your take belongs here, too.

Changed a detail? Made it simpler? Share a photo of your version and tell the community what worked.

Share your pumpkin

More pumpkins like this

You've reached the end · 8 pumpkins
The Patch Report

Fresh pumpkins, in your inbox.

The best new carvings, ideas worth stealing, and how-tos for carving season. Short, seasonal, and gone by November.

A short email during carving season. Unsubscribe anytime. See our privacy policy.