Halloween Pumpkin Carving Contest · Starts October 1st · $500 in prizes
← Back to ideas
@ai_concepts
Sep 25, 2026
Millennium Falcon Pumpkin With Glowing VentsAI
0

Report this carving

Tell us what is wrong. Reports are private.

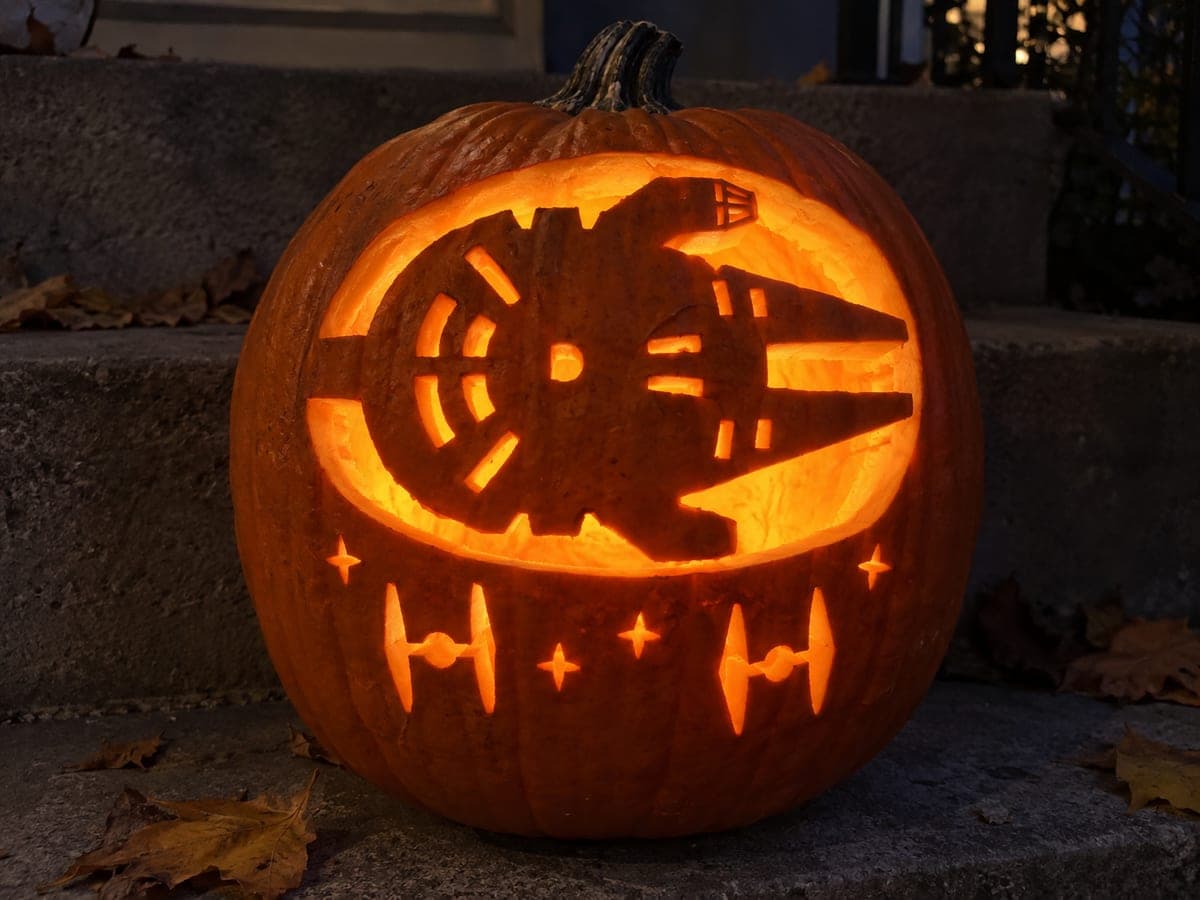
Millennium Falcon Pumpkin With Glowing Vents

The Millennium Falcon fills the face of a pumpkin with detailed hull plating, illuminated vent slots, and smaller fighter silhouettes floating nearby. A broad bridge along the left engine section connects the hull to the outer shell, while forward tips meet the right rim for stability in this demanding star wars pumpkin carving idea. Carve the smaller vent slots and star accents last, leaving shallow backing on any detail that would otherwise float free. Bright LED lighting shows off every panel line.

No ratings yet · Sign in to rate
Comments (0)

  • No comments yet — be the first.

Save without an account. Sign in to like or comment.

Our tips for carving a similar design

The Millennium Falcon fills the pumpkin face with detailed hull plating and illuminated vent slots, supported by a broad bridge along the left engine section and forward tips meeting the right rim. Carving the small vent slots and star accents last, after all large hull pieces are confirmed secure, prevents the accumulated small cuts from destabilizing the larger retained sections. Any accent detail that would otherwise float free gets a shallow backing rather than a full cut.

From pumpkin to porch

  1. Annotate the stencil thoroughly

    Print the hull pattern and circle every retained piece, noting bridge contact points for the engine section and the forward hull tips. The Falcon has many small retained areas in close proximity; this annotation is the most critical prep step for the whole project. Mark the two primary structural bridges, the broad left engine bridge and the forward-to-right-rim contacts, in red so they are never mistaken for cut areas.

  2. Hollow precisely

    Cut a back panel, remove all pulp, and thin the face walls to three-quarters of an inch using a flat rasp for uniform depth. Vent slot sections need thin, even walls to glow clearly and to allow fine saw work without the blade jumping.

  3. Transfer and re-mark bridges

    Transfer the full pattern with a pounce wheel. After removing the paper, re-draw all bridge positions in pen and physically re-verify the two primary structural bridges are at least half an inch wide on the pumpkin surface before any cutting begins.

  4. Cut the large hull background areas

    Open the large open-background sections first to establish the hull boundary. Use a fine-tipped carving saw, adults only, and stop well before any bridge zone. Removing large background sections first reveals the hull shape and confirms the design is correctly placed before you commit to detailed cuts.

  5. Work through hull plating and vent slots

    Cut the intermediate hull sections, then move to the vent slots. Each slot should be cut as a separate aperture with retained hull plating between them. Keep the saw blade parallel to the slot's long axis to avoid angling into adjacent retained plating. Any slot narrower than three-eighths of an inch should be back-carved rather than fully cut.

  6. Add star accents and light

    Cut any small star-shaped accents last. Add shallow backing to any that would otherwise float free. Insert a bright white or cool-blue LED. Photograph the completed design in darkness to capture the full contrast of the hull detail.

Written with AI to match this design

Gather your supplies

Check things off as you get ready.

Work on a stable surface, keep your free hand out of the cutting path, and have an adult handle sharp tools.

Three levels of light

  • Leave intact

    Retained hull plating sections and the broad engine bridge stay as dark structural rind shapes

  • Peel & shade

    Shallow-backed vent and star accents glow at a mid-tone level, suggesting depth in the hull surface

  • Cut through

    Large open background areas, full vent slots, and star cutouts are completely cut through for full brightness

Learn the carving basics

Before you start cutting

How do I keep the many small hull sections from cracking during the long carving session?

Work in one direction across the hull rather than jumping randomly between sections, so each completed area provides a stable reference for the next. Mist the carving face lightly with cold water every thirty minutes to prevent the rind from drying and becoming brittle. Avoid leaving the pumpkin in a warm room between cuts.

The vent slots are very narrow. What saw blade is best?

A blade with very fine teeth and a tip no wider than three-sixteenths of an inch is ideal for slot cuts. If your kit does not include a blade that narrow, use a fine Dremel cutting bit to make the slot openings instead of a saw. The Dremel gives precise width control and is safer for cuts this close to retained hull sections.

What happens if one of the fighter accent silhouettes breaks off?

Small accent silhouettes near the edge of the design can be re-attached with a short toothpick pressed horizontally through both the piece and the shell wall, secured with craft glue. If the piece is too small to re-attach cleanly, simply leave the opening as a full cut-through, which reads as a small star at display distance and does not significantly change the overall design.

Your take belongs here, too.

Changed a detail? Made it simpler? Share a photo of your version and tell the community what worked.

Share your pumpkin

More pumpkins like this

You've reached the end · 8 pumpkins
The Patch Report

Fresh pumpkins, in your inbox.

The best new carvings, ideas worth stealing, and how-tos for carving season. Short, seasonal, and gone by November.

A short email during carving season. Unsubscribe anytime. See our privacy policy.