Halloween Pumpkin Carving Contest · Starts October 1st · $500 in prizes
← Back to ideas
@ai_concepts
Sep 25, 2026
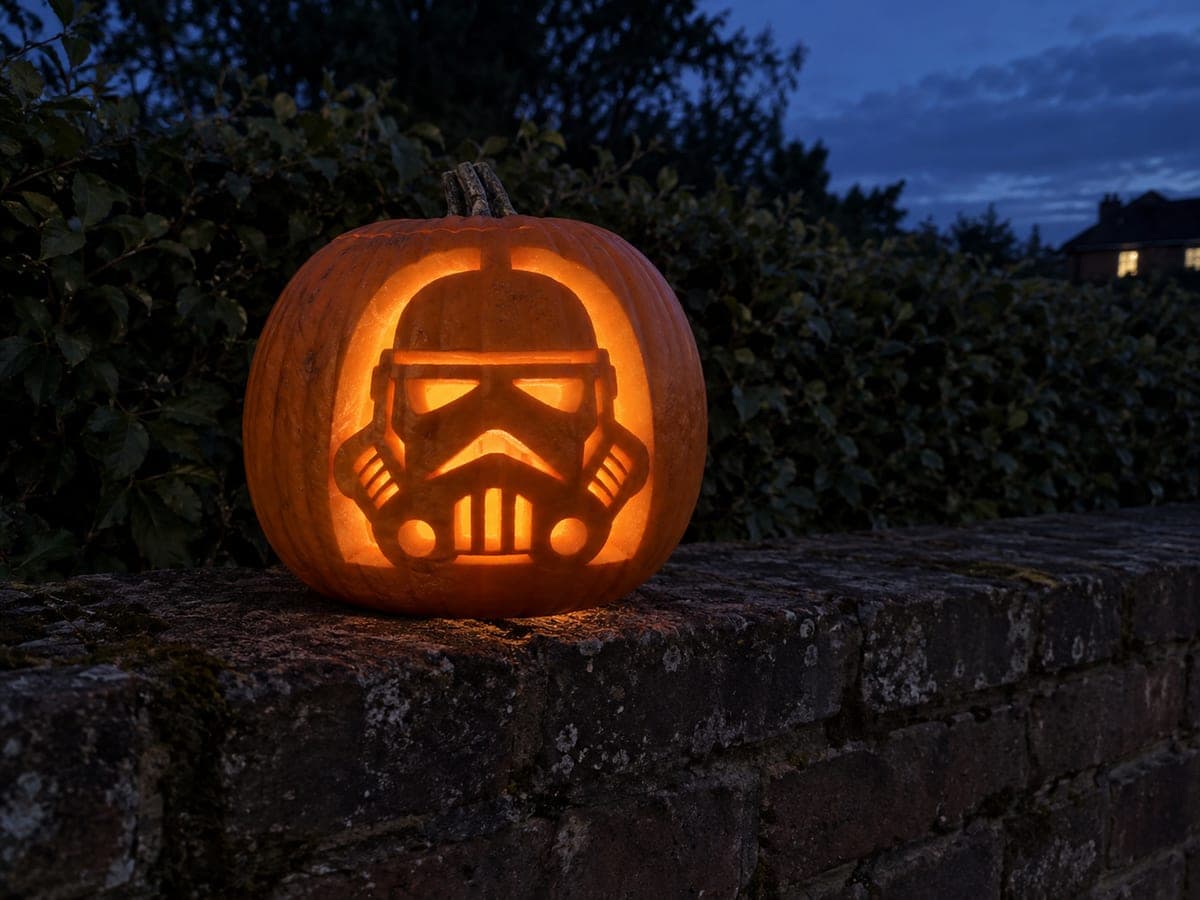
Arched Window Stormtrooper Jack-O-LanternAI
0

Report this carving

Tell us what is wrong. Reports are private.

Arched Window Stormtrooper Jack-O-Lantern

The stormtrooper helmet floats dramatically inside a fully open arched background, retained by a broad bridge at the top and a chin connection at the base in this hard stormtrooper pumpkin carving idea. Eye, grille, and cheek openings are each carved separately, linked only by narrow rind bridges, while any tiny surface details can be kept as shallow-backed carvings rather than full cuts. Carve the large arched background first to remove bulk, then work inward on the helmet details. A bright LED creates a halo effect around the suspended helmet.

No ratings yet · Sign in to rate
Comments (0)

  • No comments yet — be the first.

Save without an account. Sign in to like or comment.

Our tips for carving a similar design

The stormtrooper helmet is retained as a connected shape floating inside a fully open arched background window, held in place by a broad bridge at the top and a chin connection at the base. Eye, grille, and cheek apertures within the helmet are each carved separately, linked by narrow rind bridges. Carving the large arched background first removes bulk before the delicate helmet-internal details are attempted.

From pumpkin to porch

  1. Plan the two primary structural bridges

    Before hollowing, identify the two critical bridges: the broad top bridge connecting the helmet crown to the arch frame, and the chin-to-base connection at the bottom. Mark both on the printed pattern in red. These two connections are what keep the helmet from falling inward once the background is opened. Confirm each is at least three-quarters of an inch wide on the pattern.

  2. Hollow precisely

    Cut a back panel, remove all pulp, and thin the face walls to three-quarters of an inch. The arched background and helmet-internal details require consistent thickness for clean cutting and even glow distribution across the large open area.

  3. Transfer the full design

    Transfer with a pounce wheel and re-draw all bridge positions and the two primary structural bridges in pen. Measure the top and chin bridges with a small ruler to confirm they are at least three-quarters of an inch on the pumpkin surface before picking up the saw.

  4. Cut the arched background first

    Open the large arched background window in sections, working around the helmet outline and stopping well before the two primary bridge zones. Remove each background section without levering against the helmet. Once the full background is open, the helmet should feel solidly anchored by the top and chin bridges.

  5. Carve the helmet-internal apertures

    Cut the eye, grille, and cheek openings as separate apertures within the retained helmet, preserving narrow rind bridges between each one. Adults handle all cutting. Complete the smallest apertures last when surrounding helmet rind is still stable.

  6. Back-carve fine details and light

    Add any shallow back-carved surface details to the helmet face using a Dremel ball bit or small gouge. Insert a bright LED to create the halo effect around the suspended helmet. Display in a darkened room where the open arch frames the lit helmet like a spotlight.

Written with AI to match this design

Gather your supplies

Check things off as you get ready.

Work on a stable surface, keep your free hand out of the cutting path, and have an adult handle sharp tools.

Three levels of light

  • Leave intact

    The full retained helmet and its internal rind bridges stay dark against the surrounding open arch glow

  • Peel & shade

    Shallow back-carved surface detail on the helmet reads as a soft mid-tone within the dark retained shape

  • Cut through

    The arched background window and all helmet-internal apertures are fully cut through

Learn the carving basics

Before you start cutting

How do I cut the arch background without accidentally slicing through a bridge?

Cut the arch background in two or three separate sections rather than one continuous pass. Stop the saw at least an inch before the top bridge zone and complete the surrounding cut on the other side, leaving the bridge area as the last material to clean up with a detail knife at minimum depth. This two-direction approach to the bridge zone prevents a momentum-driven overcut.

The helmet feels slightly wobbly after the background is opened. What do I do?

Wobble usually means one bridge is narrower than intended. Inspect both the top and chin connections. If a bridge is under half an inch wide, carefully carve the arch background slightly away from the helmet on the opposite side to widen the bridge indirectly. If the bridge has already fully separated, press it back and apply thin craft glue along the joint, hold for a minute, and allow a full hour to cure before continuing.

Is there a way to make the halo glow effect around the helmet more pronounced?

Position the LED directly below the chin connection so the light radiates outward from the bottom of the open arch, creating even illumination around all sides of the helmet silhouette. A slightly brighter LED than you would normally use also helps, since the large open arch needs more light to glow brightly at its far edges.

Your take belongs here, too.

Changed a detail? Made it simpler? Share a photo of your version and tell the community what worked.

Share your pumpkin

More pumpkins like this

You've reached the end · 8 pumpkins
The Patch Report

Fresh pumpkins, in your inbox.

The best new carvings, ideas worth stealing, and how-tos for carving season. Short, seasonal, and gone by November.

A short email during carving season. Unsubscribe anytime. See our privacy policy.