Halloween Pumpkin Carving Contest · Starts October 1st · $500 in prizes
← Back to ideas
@ai_concepts
Sep 25, 2026
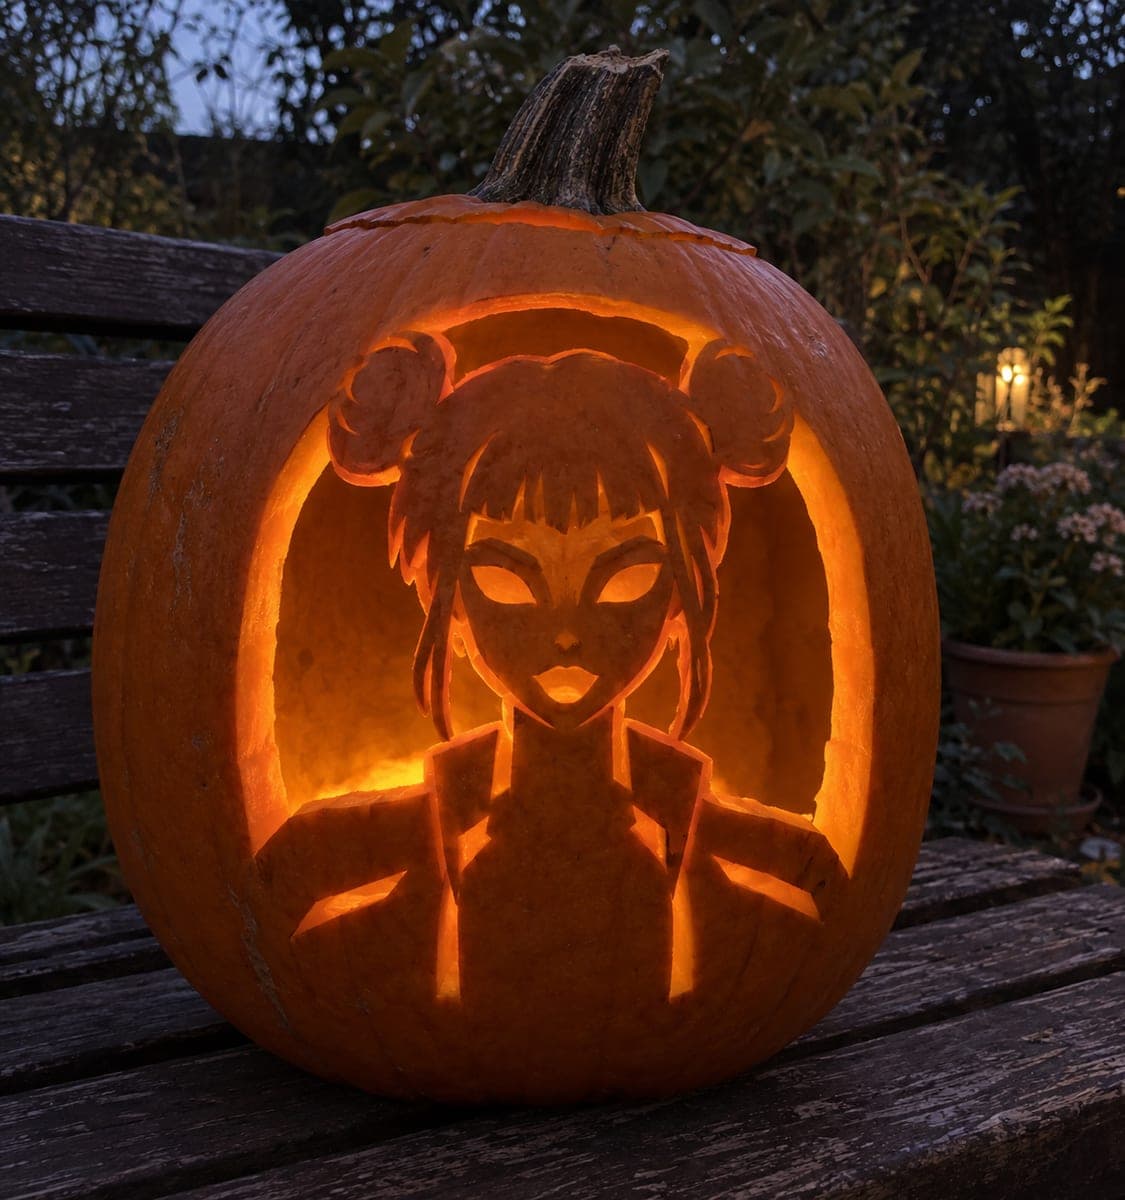
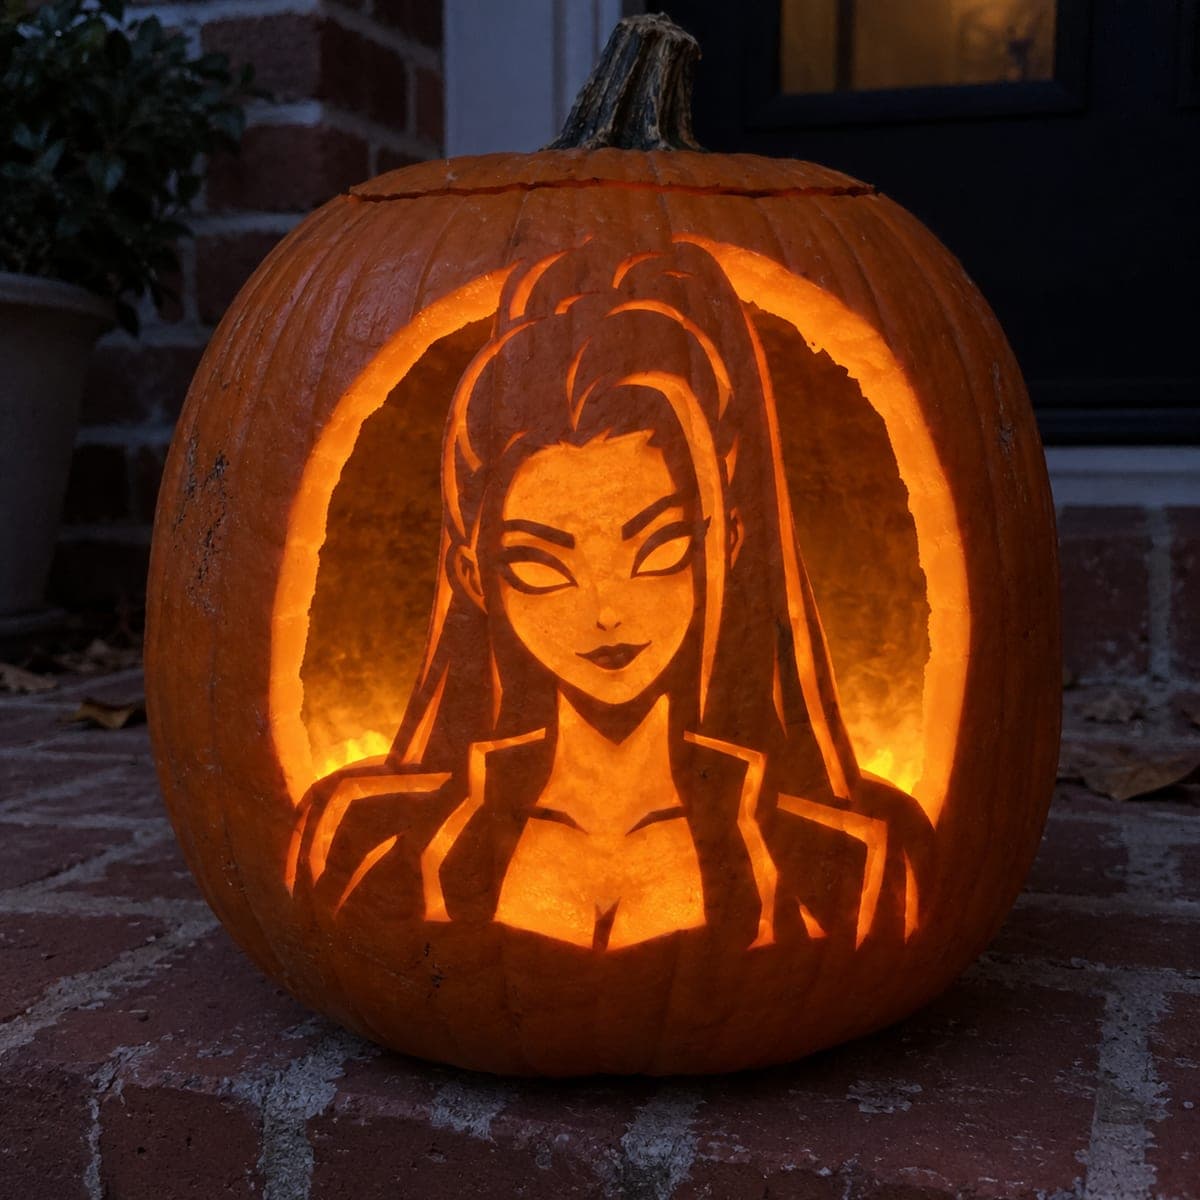
Hard Zoey KPop Bust in Glowing Arch PumpkinAI
0

Report this carving

Tell us what is wrong. Reports are private.

Hard Zoey KPop Bust in Glowing Arch Pumpkin

Zoey's bust and twin space buns are retained inside a large glowing arched opening in this hard zoey pumpkin carving idea, with each bun bridging broadly to the upper side frame and the thick neck and torso rooting to the bottom. Open eye and mouth holes have no pupils at this level, and two broad jacket slits add costume detail. Carve the large arch opening first to establish the frame, then cut the eye and mouth holes, and add the jacket slits last.

No ratings yet · Sign in to rate
Comments (0)

  • No comments yet — be the first.

Save without an account. Sign in to like or comment.

Our tips for carving a similar design

The hard Zoey design places a retained character bust inside a large glowing arched opening, with each twin bun bridging broadly to the upper side frame and the thick neck and torso rooting firmly to the base. Open eye and mouth holes cut fully through the bust, and two broad jacket slits add costume detail. Cutting the large arch opening first establishes the structural frame before any of the internal bust detail is cut.

From pumpkin to porch

  1. Hollow and map the composition

    Cut a back opening and hollow to a consistent 1 inch throughout. Sketch the arch outline and the two bun bridge positions on the front face before transferring. Each bun bridge should span at least 1.5 cm wide where it connects to the upper frame. The thick torso root at the base should span at least one-third of the bust width.

  2. Transfer the full design

    Transfer the arch boundary, the retained bust outline, the bun positions and their frame connections, the eye and mouth hole positions, and the two jacket slit locations. Mark all structural connections explicitly. The jacket slits are wide cutout areas within the bust, so their boundaries need clear marking to distinguish them from the arch openings.

  3. Cut the arch opening

    Remove all arch background sections in small pieces starting from the outer arch panels and working inward toward the bust boundary. Stop well short of each bun bridge, confirming both are fully intact before cutting any material adjacent to them. Complete the arch before moving to any internal bust cuts.

  4. Cut the eye and mouth holes

    With the arch complete, cut the eye openings inside the retained bust using a thin detail saw. At hard level the eyes have no retained pupils, so each eye is a simple open hole. Then cut the mouth opening. Keep all cuts clean and well within the retained bust boundary.

  5. Cut the jacket slits

    Cut the two broad jacket slit openings in the lower bust area, one on each side of the center. Each slit is a wide rectangular cutout suggesting the jacket lapels or front opening. Confirm that the rind between each slit and the adjacent arch opening is at least 1 cm wide.

  6. Light and display

    Place a cool white or warm LED inside and view the design in a dark room. The arch opening and internal holes should all blaze at full brightness while the retained bust stands as a dark shape against the light. Display at eye level where both the twin bun bridges and the jacket detail are visible.

Written with AI to match this design

Gather your supplies

Check things off as you get ready.

Work on a stable surface, keep your free hand out of the cutting path, and have an adult handle sharp tools.

Three levels of light

  • Leave intact

    Retained dark bust body including hair surface, short bangs, and the sections between the eye, mouth, and jacket slit openings

  • Peel & shade

    None in this design at hard level

  • Cut through

    The large arch background opening, both eye holes, the mouth hole, and the two broad jacket slits, all blazing at full brightness

Learn the carving basics

Before you start cutting

How do I prevent the bun-to-frame bridges from cracking during the arch removal?

Cut all arch sections that are not adjacent to the bun bridges first. Once every other arch section is cleared, return to the bun bridge areas and make very short slow strokes parallel to the bridge edge rather than angled into it. Stop cutting and remove the adjacent arch piece before working the next pass. Two or three slow passes beats one fast cut every time.

The two jacket slits are close to the arch opening. How much rind should remain between them?

At least 1 cm of rind should separate each jacket slit from the nearest arch opening edge. Less than 1 cm and the bridge becomes fragile after three to four days of drying. If the template puts the slits very close to the arch, scale the slits inward slightly or narrow their width.

Can I add shallow engraving to the retained bust at hard level?

Yes, adding a face texture or bun detail engraving pass is within reach at hard difficulty and would elevate the finished design. Complete all hollow cuts first, then add the engraving in a second pass. Keep the engraving at one-third depth or less so it does not weaken the connections between the arch, bun bridges, and torso root.

Your take belongs here, too.

Changed a detail? Made it simpler? Share a photo of your version and tell the community what worked.

Share your pumpkin

More pumpkins like this

You've reached the end · 8 pumpkins
The Patch Report

Fresh pumpkins, in your inbox.

The best new carvings, ideas worth stealing, and how-tos for carving season. Short, seasonal, and gone by November.

A short email during carving season. Unsubscribe anytime. See our privacy policy.