Halloween Pumpkin Carving Contest · Starts October 1st · $500 in prizes
← Back to ideas
@ai_concepts
Sep 25, 2026
Zoey Space Bun Silhouette Pumpkin CarvingAI
0

Report this carving

Tell us what is wrong. Reports are private.

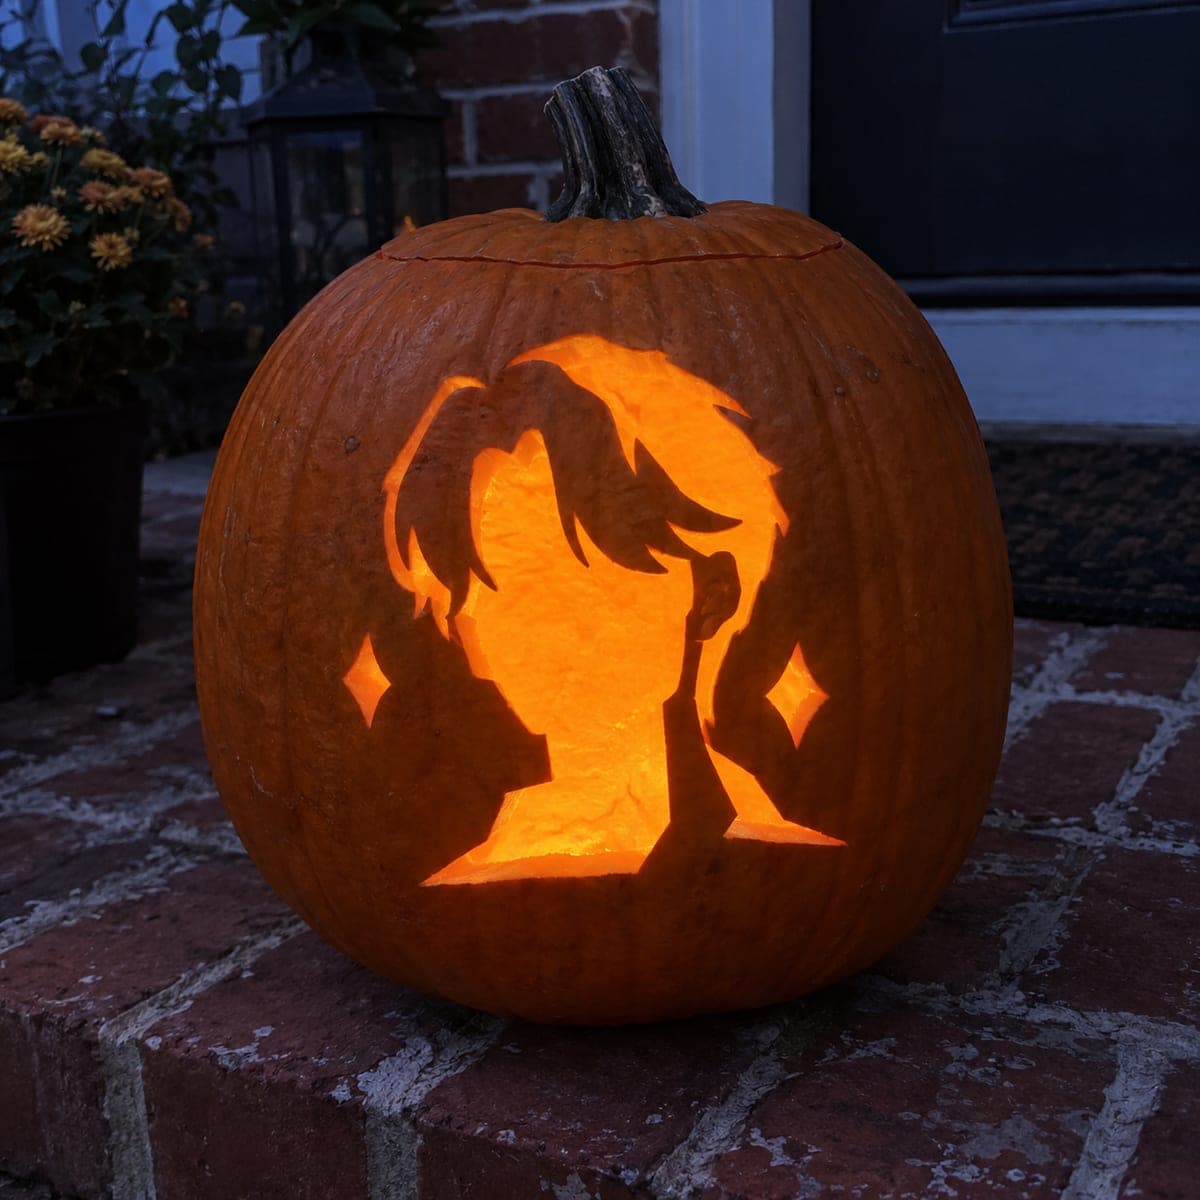
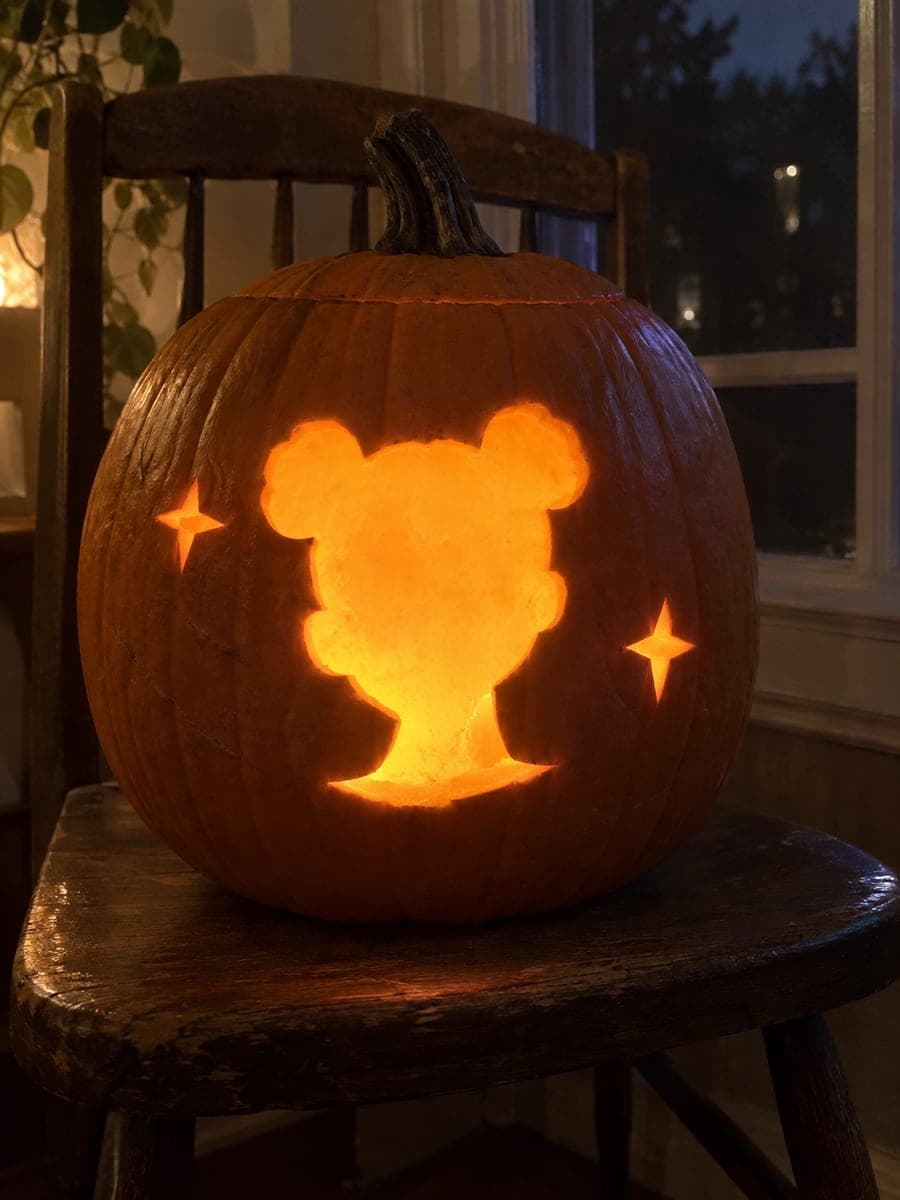
Zoey Space Bun Silhouette Pumpkin Carving

Zoey's iconic twin space buns and neck profile glow as a single fully open silhouette hole in this easy zoey pumpkin carving idea, flanked by two small separate star cutouts that complete the fandom look. The entire head-and-bun shape is removed as one empty glowing hole with no inner outline or eye pieces, making this one of the most beginner-friendly designs in the KPop Demon Hunters set. Trace the bun silhouette shape carefully to keep the two buns proportionally round before cutting. Warm backlight turns the two bun shapes into an instantly recognizable glowing symbol for any fan.

No ratings yet · Sign in to rate
Comments (0)

  • No comments yet — be the first.

Save without an account. Sign in to like or comment.

Our tips for carving a similar design

The entire Zoey head-and-bun silhouette, including the neck and both round buns, is removed as one fully open glowing hole with no inner facial detail required. Two separate small star cutouts complete the fandom look. With no retained islands inside the opening and no enclosed rind sections, this is one of the simplest structural carving challenges in the entire KPop Demon Hunters set. Tracing both buns so they are proportionally round before cutting is the single most important step.

From pumpkin to porch

  1. Hollow and prep

    Cut a back or bottom opening and hollow the pumpkin clean, leaving about 1 inch of wall on the front face. An even wall means the silhouette opening will glow at a consistent brightness all the way around the shape. Dry the interior before beginning the design transfer.

  2. Transfer the silhouette and stars

    Transfer the full Zoey silhouette outline with a stylus, making sure both bun shapes are round and symmetrically placed above the head. Transfer the two small star openings in their positions on either side of the silhouette. Confirm the rind between the silhouette and the stars is at least 1.5 cm wide.

  3. Cut the silhouette opening

    Begin cutting along the outer silhouette boundary using a thin pumpkin saw. Work around the organic head curves in short smooth strokes. Take extra care around the bun outlines, using very short strokes to maintain the roundness of each bun. Remove the silhouette piece once the full outline is cut.

  4. Cut the two star openings

    Cut each small star shape separately using a thin detail saw. For each star point, cut from the outer tip inward toward the center rather than across the tip. This approach preserves crisp star points and avoids cracking the thin tips. Remove each star piece cleanly.

  5. Check the rind bridges

    After all three openings are cut, verify that the rind between the silhouette and each star is still firmly attached and undamaged. If any bridge section feels thin or flexible, reinforce it from the inside with a strip of packing tape.

  6. Light and display

    Insert a warm LED and view the pumpkin in a dark room. The Zoey silhouette should glow as a clear organic shape with the two round buns recognizable at the top. The star openings add bright accent points on each side. Display where viewers will see the silhouette straight on.

Written with AI to match this design

Gather your supplies

Check things off as you get ready.

Work on a stable surface, keep your free hand out of the cutting path, and have an adult handle sharp tools.

Three levels of light

  • Leave intact

    All surrounding rind outside the three openings, completely dark

  • Peel & shade

    None in this design

  • Cut through

    The fully open Zoey head-and-bun silhouette and the two small star holes, all blazing with full warm light

Learn the carving basics

Before you start cutting

How do I keep the bun shapes round rather than lumpy?

Use a circle template or a coin of the right diameter to draw each bun outline in pencil on the template before perforating. On the pumpkin, follow the perforated outline with the saw in very short strokes, stepping around the arc rather than trying to curve the saw in one continuous motion. Short controlled steps produce cleaner circles than long curved saw runs.

Can I add Zoey's bangs as a separate scoring detail above the silhouette opening?

Yes. Score a short fringe line just above the top of the silhouette opening as a shallow V-gouge pass, angled to suggest blunt bangs. Keep the scoring at one-third rind depth and at least 1 cm above the silhouette boundary. The scored bangs will glow softly just above the bright silhouette opening.

The silhouette neck area is narrow. Is it structurally safe to cut all the way around it?

The neck is part of the removed silhouette piece, not a retained element, so you are cutting around it rather than through a structure. The narrow neck shape is fine to cut as an opening as long as the rind on each side of the neck outline stays at least 8 mm thick. If your template places the neck very close to the edge of the pumpkin, scale the design inward to increase the surrounding rind margin.

Your take belongs here, too.

Changed a detail? Made it simpler? Share a photo of your version and tell the community what worked.

Share your pumpkin

More pumpkins like this

You've reached the end · 8 pumpkins
The Patch Report

Fresh pumpkins, in your inbox.

The best new carvings, ideas worth stealing, and how-tos for carving season. Short, seasonal, and gone by November.

A short email during carving season. Unsubscribe anytime. See our privacy policy.