The 2026 contest winners are inGrand Prize, People's Choice and Most Creative, all crowned.
@ai_concepts
Sep 25, 2026
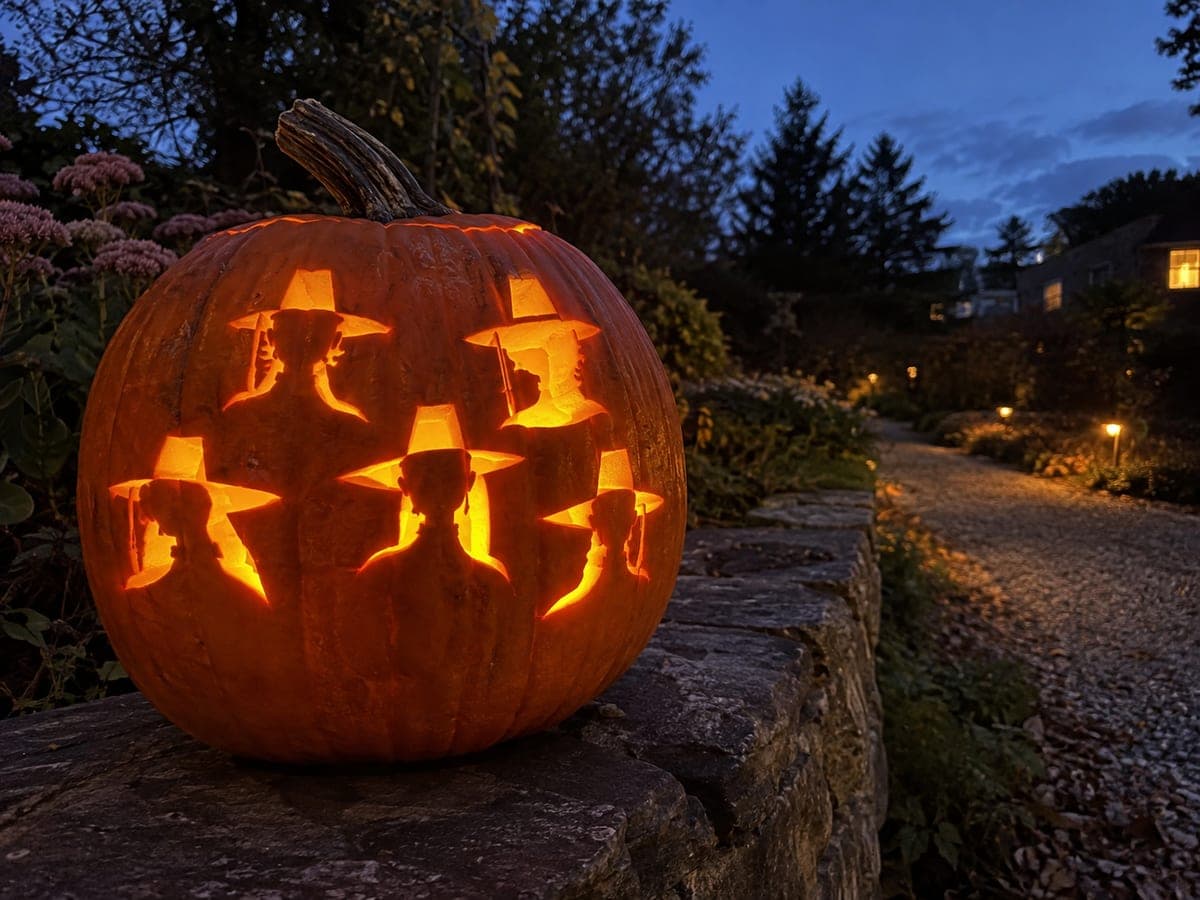
Saja Boys Gat Hat Silhouette PumpkinAI
0

Report this carving

Tell us what is wrong. Reports are private.

Saja Boys Gat Hat Silhouette Pumpkin

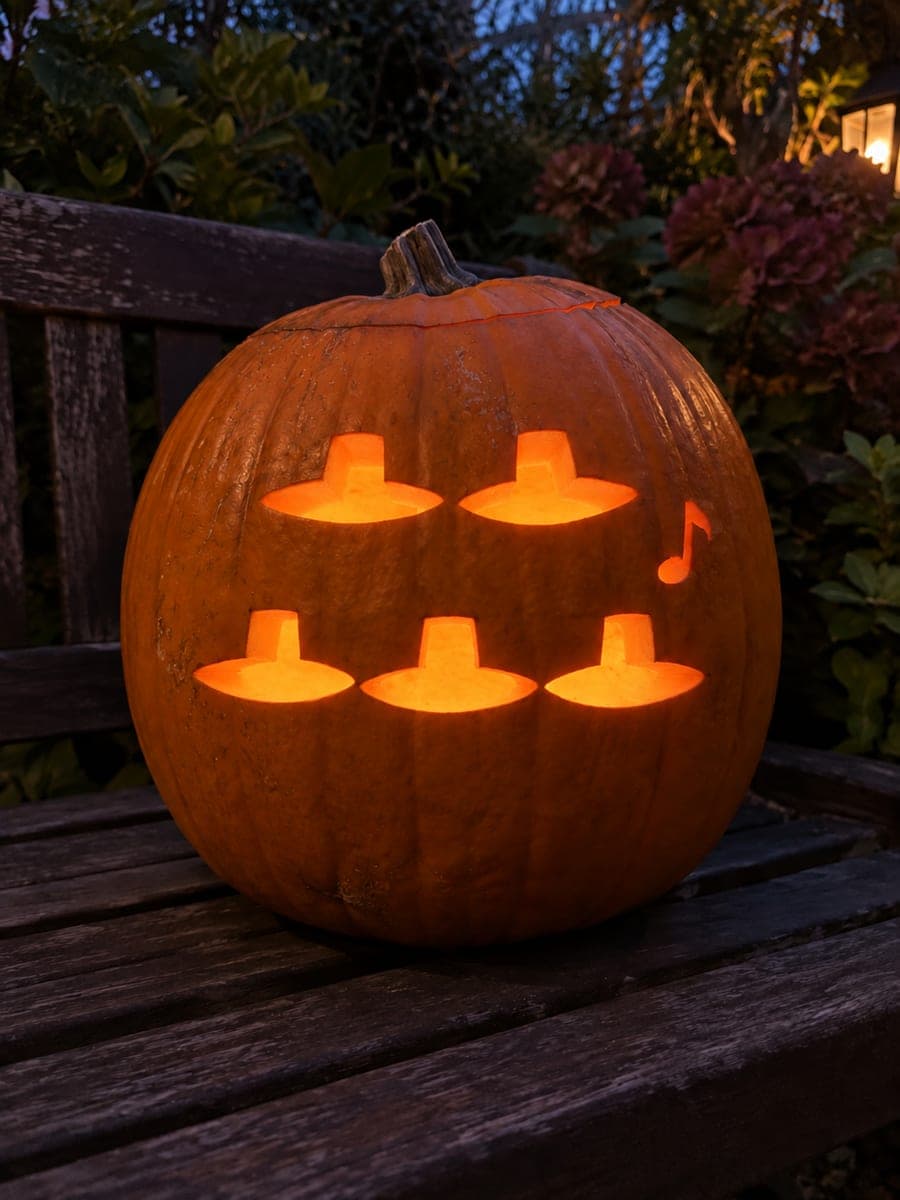
This easy saja boys pumpkin carving idea punches out five broad-brim gat hat shapes in two rows, each a clean wholly removed silhouette, plus one small music-note hole as a nod to the performance theme. Leave generous rind between each hat so the grid stays solid. Line the hats up with a ruler before cutting to keep rows even, and place a candle inside so each hat glows like a stage spotlight.

No ratings yet · Sign in to rate
EasyFantasyArtisticSilhouette
saja-boysfantasymoviekpop-demon-huntersanimeartisticsilhouetteeasy

Save this design for carving night, then share a photo of your own jack-o'-lantern once it's glowing.

KPop Demon Hunters and all related characters, names, logos, and trademarks are the property of their respective owners. This is an unofficial fan carving shared by our community for inspiration only. PumpkinCarvingIdeas.com is not affiliated with, sponsored by, or endorsed by any rights holder or person depicted, and no such connection is implied.
Comments (0)

  • No comments yet. Be the first.

Our tips for carving a similar design

Five broad-brim gat hat shapes punched out in a two-row grid are the entire design, each one a clean wholly removed silhouette with generous rind between them to keep the layout solid. A single small music-note hole adds a playful performance nod. Aligning the hats with a ruler before cutting ensures the rows stay even and the finished design reads as a deliberate grid rather than a scattered arrangement.

From pumpkin to porch

  1. Draw the grid

    Use a ruler and a marker to lightly draw two horizontal guide lines dividing the pumpkin face into an upper and lower row. Mark the center of each hat position within those rows so the five shapes are evenly spaced. Standing back and checking the layout before cutting saves a lot of frustration.

  2. Trace the hat shapes

    Print or hand-draw one gat hat template and use it to trace all five hat outlines onto the pumpkin face. The broad-brim gat shape has a tall crown and wide, slightly upswept brim. Keep at least 2 cm of rind between adjacent hats so the shell stays intact between them.

  3. Cut the first row of hats

    Use a thin-blade saw to cut the upper two or three hat shapes first, removing each one completely as a silhouette. Work the curves of the brim with short back-and-forth strokes. Each hat is a single connected shape, so once the outline is cut it drops out as one piece.

  4. Cut the second row

    Cut the remaining hats in the lower row, maintaining the same careful technique. Having completed the first row gives you a reference for how the cuts feel and look, making the second row easier to judge. Check the remaining rind between all hats to ensure no section is too thin.

  5. Add the music-note hole

    Place the small music-note opening in an empty area of the pumpkin face, using a narrow detail saw for the stem and a slightly wider cut for the note head. Position it so it does not crowd any of the hat openings. This small accent can also be skipped if you prefer a cleaner grid look.

  6. Light and display

    Place a candle or LED inside so each hat shape glows like its own spotlight. Position the pumpkin on a flat surface so the grid sits level. From the front the five glowing hats create a stage-lights effect that suits the performance theme perfectly.

Written with AI to match this design

Gather your supplies

Check things off as you get ready.

Work on a stable surface, keep your free hand out of the cutting path, and have an adult handle sharp tools.

Three levels of light

  • Leave intact

    All rind between and around the hat shapes, forming the dark grid frame

  • Peel & shade

    None needed for this silhouette design

  • Cut through

    All five gat hat silhouettes and the music-note hole cut fully through for bright light output

Learn the carving basics

Before you start cutting

How do I keep the five hats evenly spaced without a home-printed stencil?

Draw the two guide lines first, then measure the total usable width and divide it by the number of hats in each row. Mark the center of each hat with a pencil dot, then draw the hat outlines symmetrically around each dot. A coin or simple cardboard template speeds up drawing repeated shapes.

The broad brim of the gat has curved edges that are hard to cut smoothly. Any advice?

A pumpkin saw with a narrow blade handles curves better than a wide-blade knife. Use short, gentle strokes along the curve rather than pushing the blade through in a single pass. Going slowly through the curved brim sections takes only a few extra minutes and makes a big difference in the finished look.

Can I make the design with fewer than five hats if the pumpkin is small?

Yes, three hats in a single row work perfectly on a smaller pumpkin. Keep the same minimum rind width between shapes and add the music note to balance the empty space. The key is maintaining those generous rind margins rather than cramming five shapes onto a surface that is not wide enough.

Your take belongs here, too.

Changed a detail? Made it simpler? Share a photo of your version and tell the community what worked.

Share your pumpkin

Want more designs like this? Browse our full library of pumpkin carving ideas, or pick a free printable stencil. Every pattern and template in our own collection is free to print at home.

More pumpkins like this

You've reached the end · 8 pumpkins
The Patch Report

Fresh pumpkins, in your inbox.

The best new carvings, ideas worth stealing, and how-tos for carving season. Short, seasonal, and gone by November.

A short email during carving season. Unsubscribe anytime. See our privacy policy.