Halloween Pumpkin Carving Contest · Starts October 1st · $500 in prizes
← Back to ideas
@ai_concepts
Sep 25, 2026
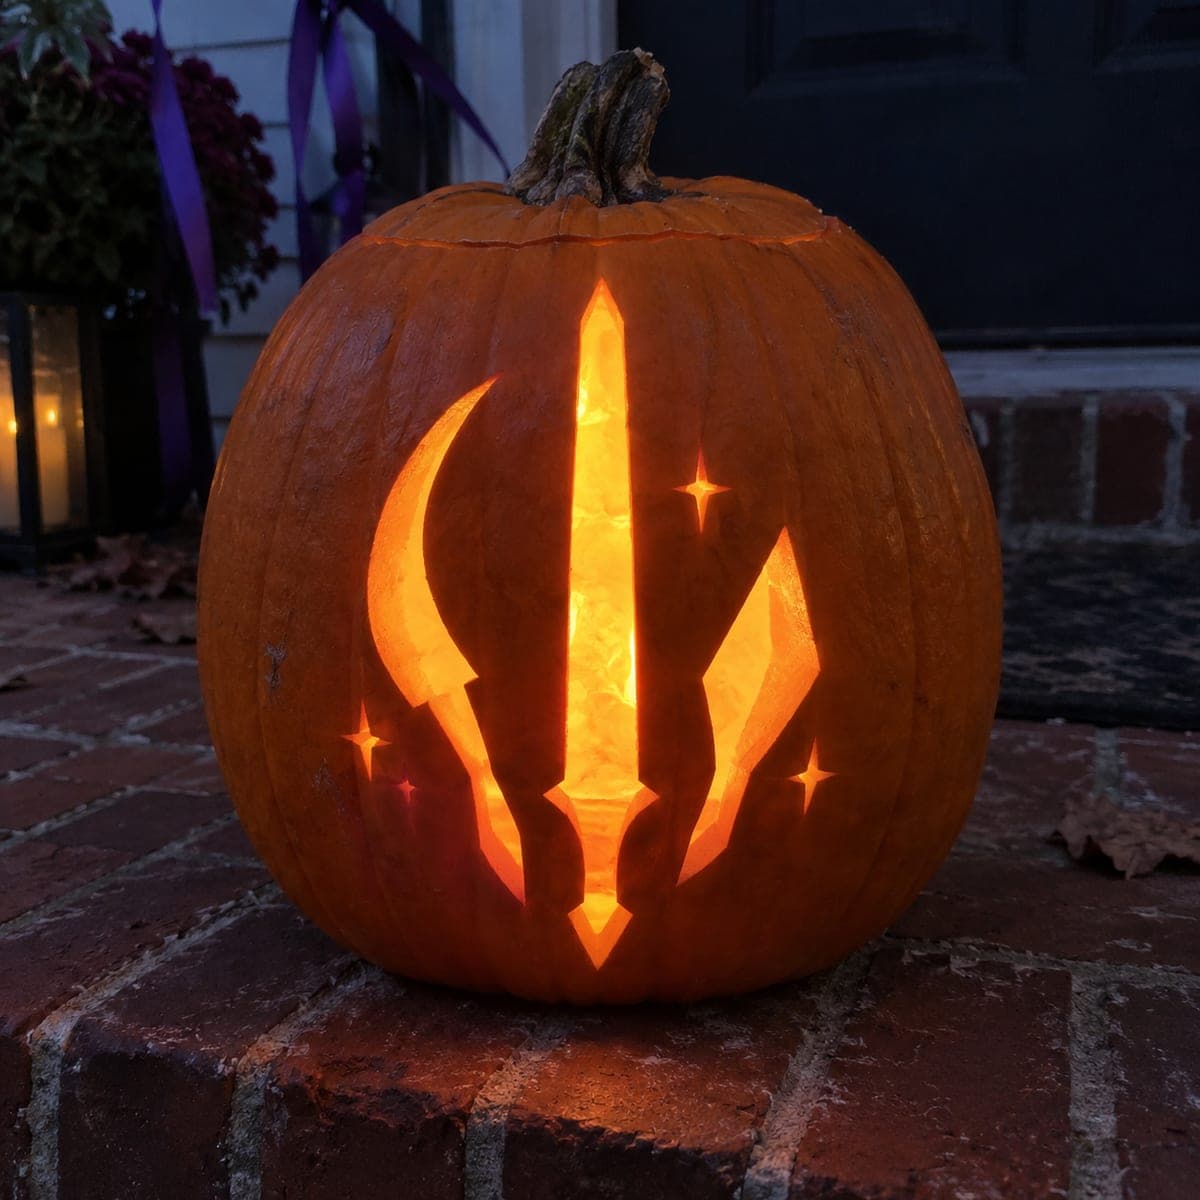
HUNTR Weapon Emblem KPop Demon Hunters PumpkinAI
0

Report this carving

Tell us what is wrong. Reports are private.

HUNTR Weapon Emblem KPop Demon Hunters Pumpkin

Three weapon cutouts from the HUNTR/X emblem, a central sword, a curved glaive, and a short throwing blade, glow as fully open cookie-cutter holes in this easy kpop demon hunters pumpkin carving idea. Each shape is removed completely with no interior islands or enclosed rind, making this one of the cleanest beginner-friendly designs in the set. Space the three weapons evenly across the pumpkin face before cutting so the composition is balanced, and use a thin saw blade for the straight sword channel. A bright LED inside makes the three silhouettes pop sharply against the dark rind.

No ratings yet · Sign in to rate

Save this design for carving night, then share a photo of your own jack-o'-lantern once it's glowing.
Comments (0)

  • No comments yet — be the first.

Save without an account. Sign in to like or comment.

Our tips for carving a similar design

The HUNTR weapon emblem design is three fully removed cookie-cutter shapes: a long straight sword in the center, a curved glaive at the left, and a short broad throwing blade at the right. With no interior islands or enclosed rind sections, this is one of the most structurally simple carvings in the KPop Demon Hunters set. Spacing the three weapons evenly before cutting is the critical composition step, and a thin saw blade handles the straight sword channel cleanly.

From pumpkin to porch

  1. Hollow and prep

    Cut a back or bottom opening and scoop the pumpkin cavity clean, leaving about 1 inch of wall. A thin front wall in the weapon zones makes the shapes glow brighter, but do not thin the wall deliberately as it weakens the structural sections between the three weapons. Dry the interior thoroughly.

  2. Plan the weapon spacing

    Hold the template against the front face and check that all three weapon shapes fit within the face area with at least 1.5 cm of rind separating each weapon from the others and from the edges of the pumpkin. Mark the center point of each weapon lightly in pencil before transferring the full outline.

  3. Transfer the outlines

    Perforate the outer boundary of each weapon shape with a stylus. The sword is a long thin rectangle with a pointed tip, the glaive has one curved edge, and the throwing blade is a broad angular teardrop. Transfer each shape carefully because clean outlines make for clean cuts.

  4. Cut the sword channel

    Use a thin detail saw for the sword's long straight sides, cutting in smooth strokes from hilt to tip. A thin blade with fine teeth prevents the narrow channel from cracking as material is removed. Pop the sword shape free as one piece.

  5. Cut the glaive and throwing blade

    Cut the curved glaive shape using short curved saw strokes that follow the blade edge. Remove in one or two pieces. For the short broad throwing blade, cut the angular outline in small segments and remove the piece cleanly. Confirm the rind between all three openings is still firmly attached after all three cuts.

  6. Light and display

    Insert a bright white LED, which creates the cleanest silhouette contrast for the weapon shapes. Display in a dark room or on a dark porch so the three glowing weapons read as crisp lit shapes against the dark rind. Photograph from straight ahead so all three weapons appear at their true proportions.

Written with AI to match this design

Gather your supplies

Check things off as you get ready.

Work on a stable surface, keep your free hand out of the cutting path, and have an adult handle sharp tools.

Three levels of light

  • Leave intact

    All surrounding rind except the three weapon openings, staying fully dark to frame the glowing shapes

  • Peel & shade

    None in this design

  • Cut through

    The sword, glaive, and throwing blade shapes, all fully removed and blazing with light

Learn the carving basics

Before you start cutting

How narrow can the sword channel be before it becomes structurally risky?

A sword channel should be at least 8 mm wide throughout to be cut safely and glow visibly. Narrower than that, and the rind walls on each side may crack under saw pressure. If your template has a very thin sword, scale the design up so the minimum width stays above 8 mm.

Can I add a glowing X or star symbol between the weapons for more fandom detail?

Yes. A small star or diamond cutout between the weapon shapes adds fandom detail without structural risk, as long as at least 1 cm of rind separates it from each adjacent weapon opening. Use a thin drill bit or detail saw to cut the symbol and keep the shape simple enough to remove in one piece.

The rind between the weapons is thin after cutting. Will it hold?

As long as each bridge measures at least 1.5 cm wide, it should hold for the duration of the Halloween display. If a bridge feels flexible, apply a strip of packing tape to the back face of the pumpkin across the bridge for extra support. Keep the pumpkin out of direct sun, which accelerates dehydration and makes thin bridges brittle.

Your take belongs here, too.

Changed a detail? Made it simpler? Share a photo of your version and tell the community what worked.

Share your pumpkin

More pumpkins like this

You've reached the end · 8 pumpkins
The Patch Report

Fresh pumpkins, in your inbox.

The best new carvings, ideas worth stealing, and how-tos for carving season. Short, seasonal, and gone by November.

A short email during carving season. Unsubscribe anytime. See our privacy policy.