Halloween Pumpkin Carving Contest · Starts October 1st · $500 in prizes
← Back to ideas
@ai_concepts
Aug 11, 2026
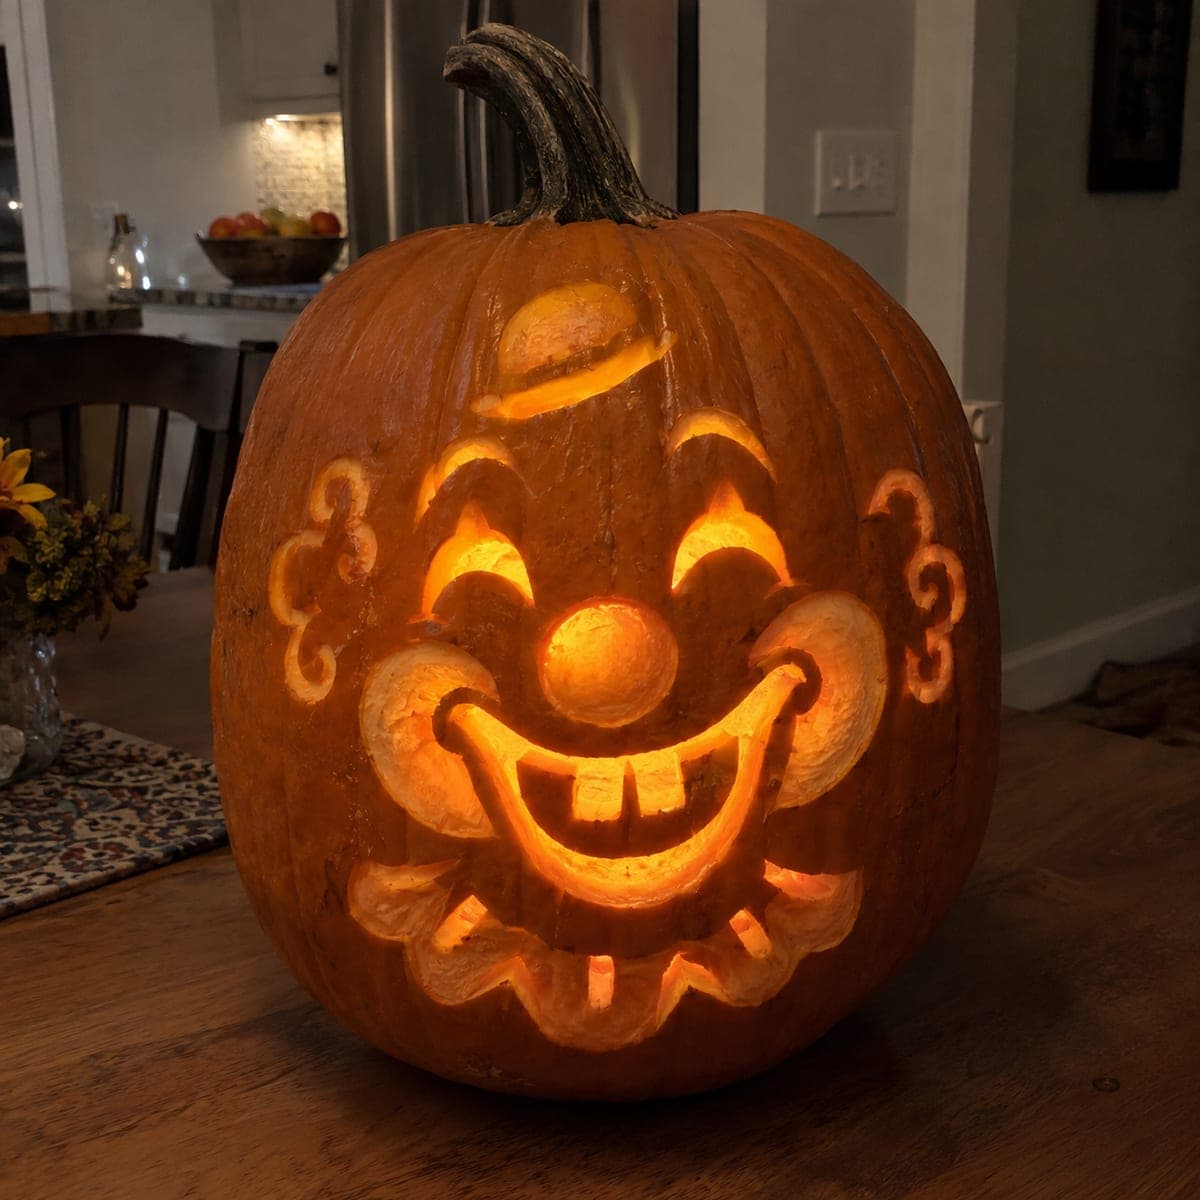
Smiling Vintage Circus Clown Jack-O-LanternAI
0

Smiling Vintage Circus Clown Jack-O-Lantern

A happy circus clown with a button nose, tiny hat, and ruffled collar beams from this carved pumpkin, glowing in cheerful layers of light and shadow. The face combines pierced cutouts for the brightest spots with shallow etching for the midtones, so carve the deep openings first and shave the surrounding skin after. A warm LED puck light keeps the thin ruffle details from scorching the way a candle might.

This is an AI-generated concept image: a realistic, carvable design idea rather than a photo of a finished carve. AI concepts are always labeled and sit out the leaderboard and the contest.

No ratings yet · Sign in to rate
Comments (0)

  • No comments yet — be the first.

Save without an account. Sign in to like or comment.

Our tips for carving a similar design

The charm of this clown comes from mixing pierced cutouts with shallow shaving, so the button nose and puffy cheeks catch a soft midtone glow while the mouth and eyes blaze through. The plan is to carve the deep openings first, then go back and skin-peel the raised details like the ruffle collar, cheeks, and nose. Since this is a concept image with no real pumpkin, treat it as a target look and keep every thin detail attached to solid skin.

Written by PumpkinCarvingIdeas.com, inspired by the image above. These are our suggestions, not instructions from the uploader. This approach to the AI concept has not been tested on a real pumpkin.

From pumpkin to porch

  1. Prep the pumpkin and light it

    Pick a tall, round pumpkin with a smooth front face. Cut a wide lid from the bottom instead of the top so the stem stays intact as decoration, then hollow the inside until the front wall is about one inch thick. A thinner wall makes shaving easier later. Drop in an LED puck light to check brightness before you carve, since a candle would scorch the delicate ruffles.

  2. Transfer the clown face

    Print or draw the clown design and tape it snugly to the front, clipping the edges so it hugs the curve. Poke holes along every line with a pushpin or transfer tool, spacing them close on the tight curls of the collar. Peel the paper and connect the dots lightly with a marker. Double check the mouth, eyes, tiny hat, and nose are all balanced before any cutting.

  3. Cut the bright openings first

    Use a fine saw to pierce fully through the mouth, the gap-tooth spaces, the crescent eyes, and the little eyebrow slits. These are your brightest spots. Cut the large mouth last among the openings so the surrounding pumpkin stays sturdy while you work the smaller shapes. Support the pumpkin from inside with your free hand and take slow, gentle strokes.

  4. Shave the midtone shapes

    Switch to a loop or ribbon tool and skin-peel the surfaces that should glow softly: the round button nose, the puffy cheeks, the hat, and the ruffled collar scallops. Remove only the outer skin so light seeps through as a dim orange, keeping these areas raised and attached. Vary the depth slightly to give the cheeks and nose a rounded, dimensional look. Leave narrow uncut ridges between shapes to act as bridges.

  5. Refine the details and curls

    Clean up the decorative side curls and the outline of the collar with a small detail knife. Trim the tooth gaps square and even so the smile reads clearly when lit. Scrape away any stray fibers from inside the cutouts so light passes cleanly. Step back, light it, and touch up any spot that looks muddy or uneven.

  6. Light it and photograph

    Set the LED puck inside and dim the room to judge the glow. If the shaved areas look too dark, thin them a little more from the inside. Wipe the cut edges and coat them with a thin layer of petroleum jelly to slow drying. Snap your photo at night with the surrounding lights off for the warmest effect.

Gather your supplies

Check things off as you get ready.

Work on a stable surface, keep your free hand out of the cutting path, and have an adult handle sharp tools.

Three levels of light

  • Leave intact

    The untouched outer skin around the face and the background stays dark for contrast.

  • Peel & shade

    The button nose, puffy cheeks, tiny hat, and ruffled collar are skin-peeled for a soft orange midglow.

  • Cut through

    The wide smiling mouth, tooth gaps, crescent eyes, and eyebrow slits are cut through for the brightest light.

Learn the carving basics

Before you start cutting

How do I keep the ruffle collar and side curls from breaking off?

Shave those shapes rather than cutting all the way through, so they stay part of the solid pumpkin wall. Leave thin ridges of skin between each scallop and curl to act as natural bridges. Work slowly with a loop tool and support the area with your other hand.

Why cut the big mouth last?

The large mouth opening removes a lot of structural material, so the wall gets floppy once it is gone. Doing the small eyes, teeth gaps, and eyebrows first keeps the surface firm and easier to control. Save the biggest cut for the end to reduce cracking.

How do I get the nose and cheeks to look rounded?

Shave them a little deeper in the center and taper toward the edges so the light glows brighter in the middle. This creates a soft domed look instead of a flat patch. Test it with the light on and adjust the depth from the inside if needed.

Your take belongs here, too.

Changed a detail? Made it simpler? Share a photo of your version and tell the community what worked.

Share your pumpkin

More pumpkins like this

You've reached the end · 8 pumpkins
The Patch Report

Fresh pumpkins, in your inbox.

The best new carvings, ideas worth stealing, and how-tos for carving season. Short, seasonal, and gone by November.

A short email during carving season. Unsubscribe anytime. See our privacy policy.