Halloween Pumpkin Carving Contest · Starts October 1st · $500 in prizes
← Back to ideas
@ai_concepts
Sep 25, 2026
Beaming Pumpkin Face With Radial Cheek RaysAI
0

Report this carving

Tell us what is wrong. Reports are private.

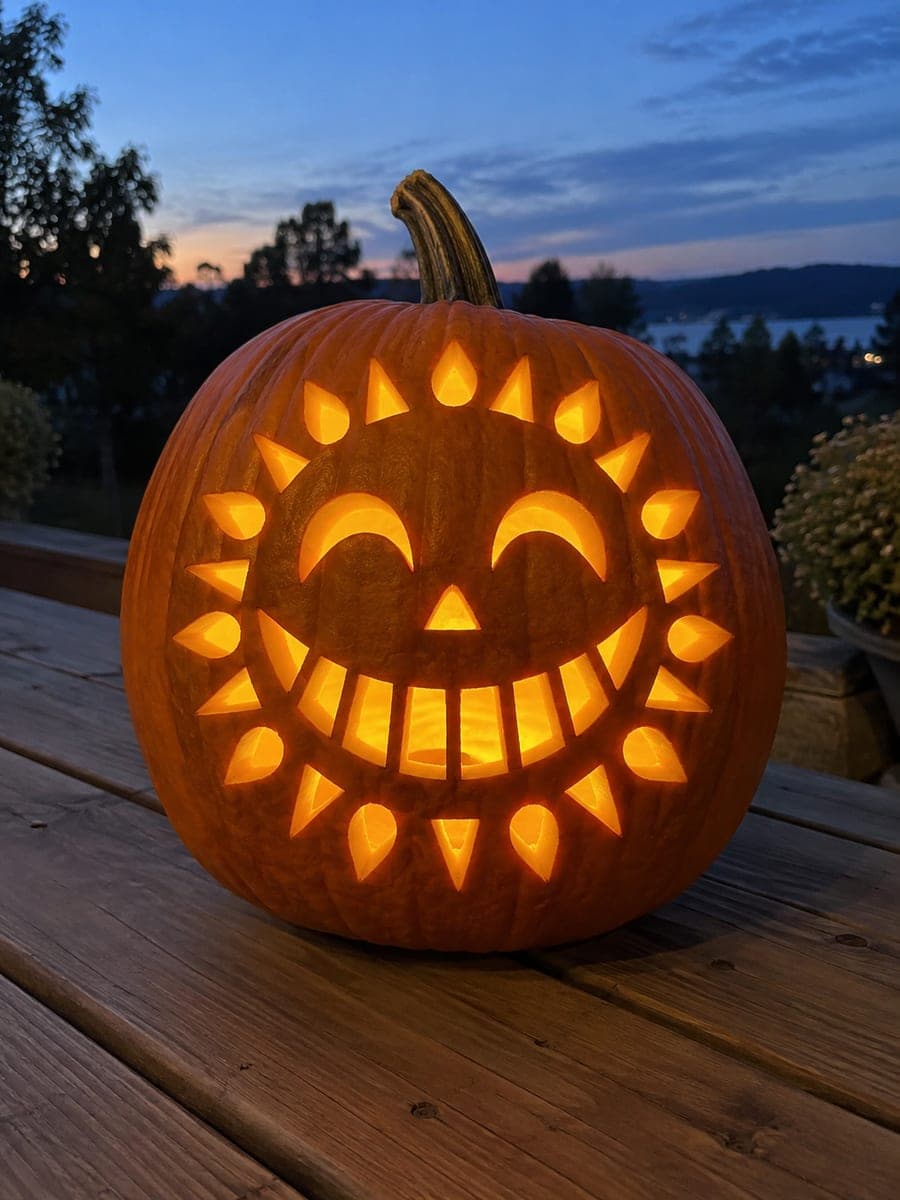
Beaming Pumpkin Face With Radial Cheek Rays

Rounded-rectangle pupil tabs rooted to the upper rim, separate gently arched brow cuts, a crescent grin with six thick rooted teeth, and sixteen short radial slits fanning outward from the cheeks give this hard-level happy pumpkin face an almost sun-burst energy. The sixteen cheek rays are the finishing detail: space them evenly around each cheek and keep their width at least 8mm so they glow individually without blurring into a ring. Cut the pupils first, then brows, then grin, and finish with the rays. A warm amber bulb brings the whole radiating design together.

No ratings yet · Sign in to rate

Comments (0)

  • No comments yet — be the first.

Save without an account. Sign in to like or comment.

Our tips for carving a similar design

The sixteen radial cheek rays are the last thing you cut but the first thing you must plan, because their spacing around each cheek determines how much rind remains between them. Each ray needs at least 8mm of width to glow individually. Cut the pupil tabs first to establish the face center, then the brows and grin, and save all sixteen rays for the final stage.

From pumpkin to porch

  1. Scoop and map the full layout

    Scoop to an even inch. Draw the two eye openings with pupil tabs, two arched brow cuts, the crescent grin with six tooth positions, and mark eight ray positions per cheek. Confirm 8mm minimum width for each ray before moving to the saw.

  2. Carve the rounded-rectangle pupil tabs

    Cut each eye opening perimeter, leaving the rounded-rectangle pupil tab rooted at the upper rim. The broad flat top of a rounded rectangle provides a more stable root than an oval or diamond shape. Test each tab gently after cutting: it should feel firmly anchored.

  3. Cut the arched brow slots

    Two gently arched slots sit above each eye. Keep them wide and smooth: a broad arch reads as joy while a sharp angle looks angry. Saw each brow in one sweep from tip to tip.

  4. Carve the crescent grin with six thick rooted teeth

    Saw the full outer crescent boundary, then cut the gaps between the six teeth. Every tooth must have a wide, thick root at the lip. Thick teeth hold up for the full display week even as the pumpkin begins to dry.

  5. Cut the sixteen radial cheek rays

    Space eight rays per cheek in an even arc, orienting them like spokes radiating from the cheek center. Cut each ray as a short, slightly curved slit at least 8mm wide. Work outward from the face area so you are always cutting into supported rind.

  6. Light and display

    A warm amber LED bulb inside brings the full radiating design together. The radial rays glow individually and the whole face appears to beam outward. Set it on an elevated surface so the lower cheek rays are visible.

Written with AI to match this design

Gather your supplies

Check things off as you get ready.

Work on a stable surface, keep your free hand out of the cutting path, and have an adult handle sharp tools.

Three levels of light

  • Leave intact

    The pupil tabs, rind between adjacent rays, tooth roots, and all bridge rind between brows and eyes stay solid and dark

  • Peel & shade

    None, all effects come from through-cuts

  • Cut through

    Both eye opening surrounds, two brow slots, crescent grin perimeter, six tooth gaps, and sixteen radial cheek rays are all cut through

Learn the carving basics

Before you start cutting

How do I space sixteen rays evenly around each cheek without a protractor?

Cut a piece of cardboard to the arc length of one cheek and fold it into eight equal segments. Unfold and transfer the fold marks to the pumpkin surface as ray center positions. This is faster and more accurate than measuring each gap individually.

What is the risk if a cheek ray is thinner than 8mm?

A ray thinner than 8mm may still glow initially but is likely to crack when the pumpkin is handled or when it begins to dry out and shrink slightly. Wider rays also glow more visibly from a distance, so there is no downside to keeping them thick.

Can I reduce the tooth count to four instead of six?

Yes, four teeth with wider gaps between them is a perfectly valid simplification that keeps the crescent grin sturdy. The expression reads just as happily with fewer teeth, and wider gaps allow more light through the smile.

Your take belongs here, too.

Changed a detail? Made it simpler? Share a photo of your version and tell the community what worked.

Share your pumpkin

More pumpkins like this

You've reached the end · 8 pumpkins
The Patch Report

Fresh pumpkins, in your inbox.

The best new carvings, ideas worth stealing, and how-tos for carving season. Short, seasonal, and gone by November.

A short email during carving season. Unsubscribe anytime. See our privacy policy.