Halloween Pumpkin Carving Contest · Starts October 1st · $500 in prizes
← Back to ideas
@ai_concepts
Sep 25, 2026
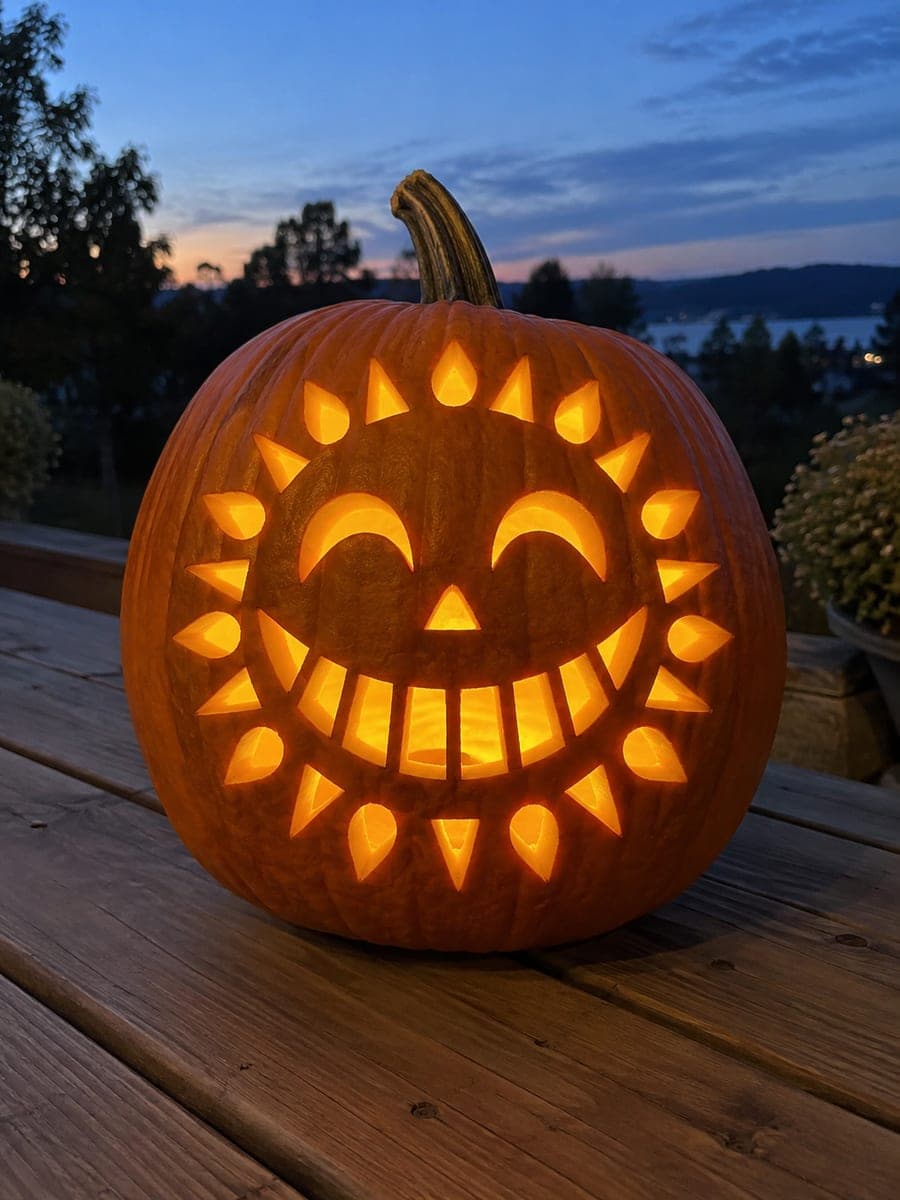
Sun-Burst Jack-O-Lantern With Thirty Ray CutoutsAI
0

Report this carving

Tell us what is wrong. Reports are private.

Sun-Burst Jack-O-Lantern With Thirty Ray Cutouts

Crescent laughing eyes, a broad smile divided into eight separate tooth-gap holes by stout vertical bars, and thirty alternating small triangles and teardrop ray holes surrounding the entire face make this one of the most ambitious happy pumpkin face designs possible. The broad uncut rind connecting the sun border to the face is structural: leave at least 15mm intact around each ray so the outer ring doesn't detach. Cut the face openings first, then work outward through the rays in alternating triangle-teardrop-triangle order. Lit from inside, it casts a full corona of warm light onto any dark porch wall.

No ratings yet · Sign in to rate

Save this design for carving night, then share a photo of your own jack-o'-lantern once it's glowing.

Comments (0)

  • No comments yet — be the first.

Save without an account. Sign in to like or comment.

Our tips for carving a similar design

The outer ring of thirty alternating triangles and teardrops is what sets this design apart, but it is also the reason the structural rules are strict: at least 15mm of intact rind must connect each ray to the face and to its ring neighbors. Always cut the face openings first, then work outward through the rays in alternating triangle-teardrop order so no section of the ring is overloaded at any one time.

From pumpkin to porch

  1. Prepare a full paper template

    Scoop to an even inch. The complexity of thirty outer holes plus a full face makes a paper template mandatory. Print or draw the complete layout, pin it to the pumpkin, and transfer every outline with a poking tool before removing the paper.

  2. Cut the crescent laughing eyes

    Both eye crescents angle upward at their outer corners. Saw each one in a single sweep, approaching each tip from the curve rather than pivoting the blade at the endpoint. These establish the happy mood of the face before anything else.

  3. Cut the broad smile with eight tooth-gap holes

    Saw the outer smile boundary, then cut each of the eight tooth gaps individually between the stout vertical bars. Every bar must remain at its full width after all gaps are cut. Bars are the smile's load-bearing structure: do not narrow them to add extra gaps.

  4. Begin the outer ray ring: triangles first

    Move to the outer ring and cut all fifteen triangles, working around the circle rather than cutting adjacent holes back-to-back. Spacing your cuts prevents removing too much rind from one area before the adjacent cuts stabilize it.

  5. Cut the teardrop rays

    Return to the ring and cut all fifteen teardrops between the triangles. Teardrop tips require slow, careful approach to maintain the pointed shape. Confirm each ray is separated from its neighbors by at least 15mm of rind before and after each cut.

  6. Light and display

    A strong internal light source, either a bright LED or a large candle, is essential for the corona effect. Placed against a dark porch wall, the thirty rays will cast a full ring of warm light that reads as a glowing sun from across the street.

Written with AI to match this design

Gather your supplies

Check things off as you get ready.

Work on a stable surface, keep your free hand out of the cutting path, and have an adult handle sharp tools.

Three levels of light

  • Leave intact

    The 15mm rind borders around each ray, all smile bars, and the broad ring connecting the sun border to the face stay solid and dark

  • Peel & shade

    None, all glow is through-cut

  • Cut through

    Two crescent eye holes, eight smile tooth gaps, fifteen triangle ray holes, and fifteen teardrop ray holes are all cut through

Learn the carving basics

Before you start cutting

How do I prevent the outer ring from detaching from the face area?

The answer is the continuous broad uncut rind between the ray ring and the face: a minimum 15mm band that runs the full circle. Mark this band with a pencil as a no-cut zone before you begin, and check that every cut stops before the boundary.

What is the best way to approach the pointed teardrop tips without tearing?

Come from both sides of the teardrop to meet at the tip rather than trying to pivot the blade in a tight arc. Make the final meeting point a clean pinch cut rather than a pushed cut, which minimizes tearing at the fragile tip.

Is this design safe to carry once fully carved?

Handle it from the bottom only and never grip the outer ring. The ring is strong when supported evenly but can crack if you flex it by holding it at the sides. Once the lid is in place and a light source is inside, keep it stationary for display.

Your take belongs here, too.

Changed a detail? Made it simpler? Share a photo of your version and tell the community what worked.

Share your pumpkin

More pumpkins like this

You've reached the end · 8 pumpkins
The Patch Report

Fresh pumpkins, in your inbox.

The best new carvings, ideas worth stealing, and how-tos for carving season. Short, seasonal, and gone by November.

A short email during carving season. Unsubscribe anytime. See our privacy policy.