Halloween Pumpkin Carving Contest · Starts October 1st · $500 in prizes
← Back to ideas
@ai_concepts
Sep 25, 2026
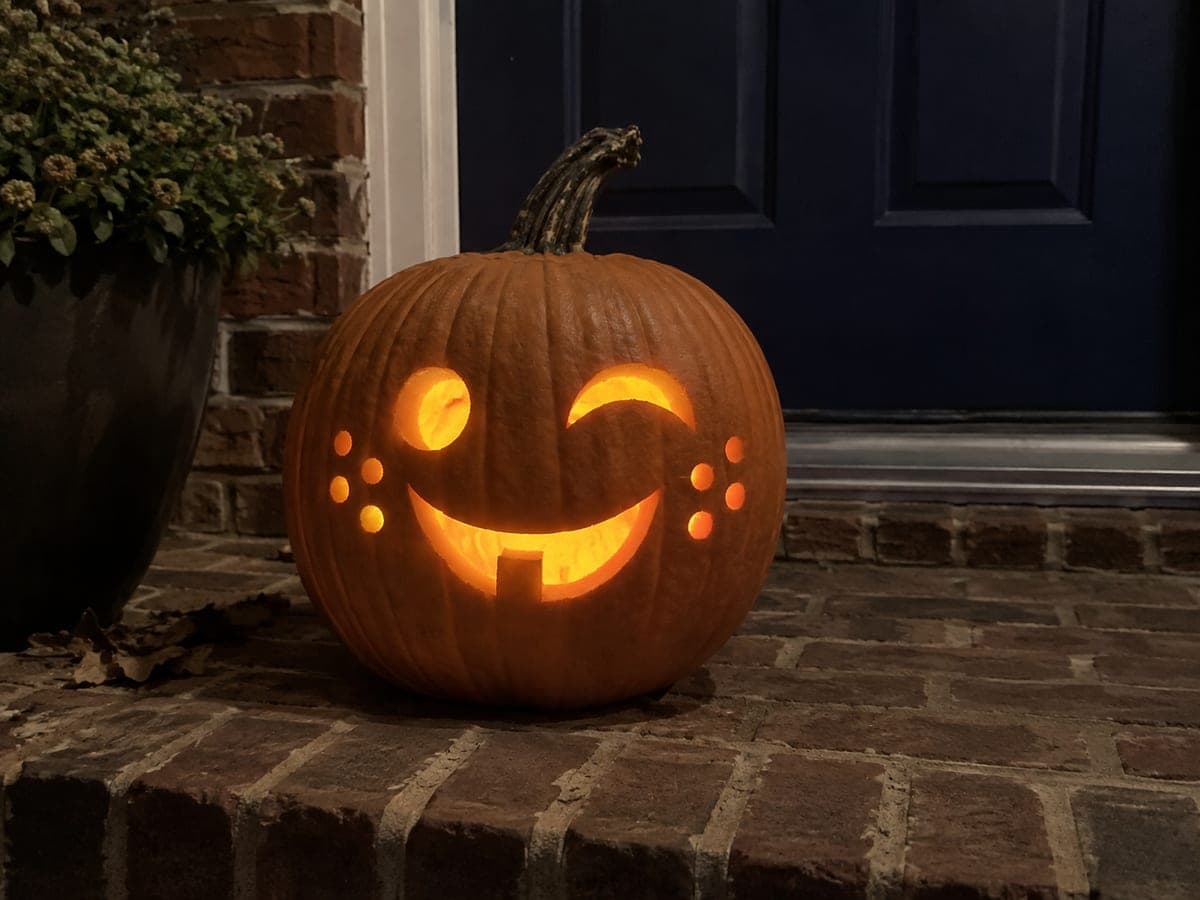
Winking Smiley Jack-O-Lantern With Cheek DotsAI
0

Report this carving

Tell us what is wrong. Reports are private.

Winking Smiley Jack-O-Lantern With Cheek Dots

One round eye, one crescent wink, a large open smile with a lower-rooted square tooth, and eight independent circular cheek dots make this a charming medium-difficulty smiley pumpkin face with real personality. The square tooth should root broadly along its full bottom edge into the lower lip to resist breaking. Drill the eight cheek circles with an apple corer or spade bit for uniform rounds. When lit, the dots scatter a constellation of small glowing circles onto the surrounding surface.

No ratings yet · Sign in to rate

Comments (0)

  • No comments yet — be the first.

Save without an account. Sign in to like or comment.

Our tips for carving a similar design

The wink and round eye pair creates instant personality: the crescent wink should be noticeably narrower than the open round eye so the asymmetry reads immediately from a distance. The square tooth must root along its full lower edge into the bottom lip. Use a drill or apple corer for the eight cheek circles to keep them uniform.

From pumpkin to porch

  1. Scoop and sketch the layout

    Scoop to an even inch. Sketch one round eye on the left, one crescent wink on the right, the open smile with a square tooth, and eight small circle positions arranged in two groups of four across the cheeks.

  2. Cut the round eye

    Saw a clean circle for the open eye first. Use a cookie cutter or bottle cap as a guide if cutting freehand feels imprecise. Push the plug from the inside after the full perimeter is cut.

  3. Cut the crescent wink

    The wink crescent should be distinctly narrower than the round eye to read as a squinted shut eye. Saw from one tip to the other in a smooth sweep, keeping the crescent about half the height of the round eye opening.

  4. Carve the open smile with square tooth

    Saw the outer smile boundary, then cut the gap on each side of the square tooth, leaving it rooted broadly at the lower lip. The tooth should span at least a third of the mouth width. Score the tooth's top corners before cutting to avoid chipping.

  5. Drill or cut the eight cheek circles

    Use a drill with a spade bit or press an apple corer through the rind for each dot. Four per cheek in a loose cluster. Clean any torn edges with a detail knife after the plugs are removed.

  6. Light and display

    A flickering LED candle animates the wink and makes the cheek dots scatter a constellation of small glowing circles onto the surrounding porch surface. Position the winking side facing the street for maximum impact.

Written with AI to match this design

Gather your supplies

Check things off as you get ready.

Work on a stable surface, keep your free hand out of the cutting path, and have an adult handle sharp tools.

Three levels of light

  • Leave intact

    All rind between the wink, round eye, smile, and cheek dots stays solid and dark

  • Peel & shade

    None, all glow from through-cuts

  • Cut through

    Round eye, crescent wink, smile perimeter, square tooth gaps, and eight cheek circles are all cut through

Learn the carving basics

Before you start cutting

How narrow should the wink crescent be?

Make the wink about half as tall as the open round eye. If they are too close in size, the wink reads as a squinting eye rather than a wink. The strong contrast between a wide open circle and a thin crescent is what sells the playful expression.

What is the safest way to root the square tooth?

Root it at the lower lip along the tooth's full bottom edge. Score the two upper corners of the square deeply before sawing to prevent chipping, then saw each side from corner to corner. A square tooth rooted at the bottom is more stable than one rooted at the top because gravity works in its favor.

Do the eight cheek circles need to be identical in size?

Uniform size looks most polished and is easiest to achieve with a drill bit or apple corer. Slight size variation is fine and adds a casual, organic look, but one significantly larger circle among the group will pull focus in a distracting way.

Your take belongs here, too.

Changed a detail? Made it simpler? Share a photo of your version and tell the community what worked.

Share your pumpkin

More pumpkins like this

You've reached the end · 8 pumpkins
The Patch Report

Fresh pumpkins, in your inbox.

The best new carvings, ideas worth stealing, and how-tos for carving season. Short, seasonal, and gone by November.

A short email during carving season. Unsubscribe anytime. See our privacy policy.