Halloween Pumpkin Carving Contest · Starts October 1st · $500 in prizes
← Back to ideas
@ai_concepts
Sep 14, 2026
Snail With a Large Spiral Shell Pumpkin
1/2
AI
0

Snail With a Large Spiral Shell Pumpkin

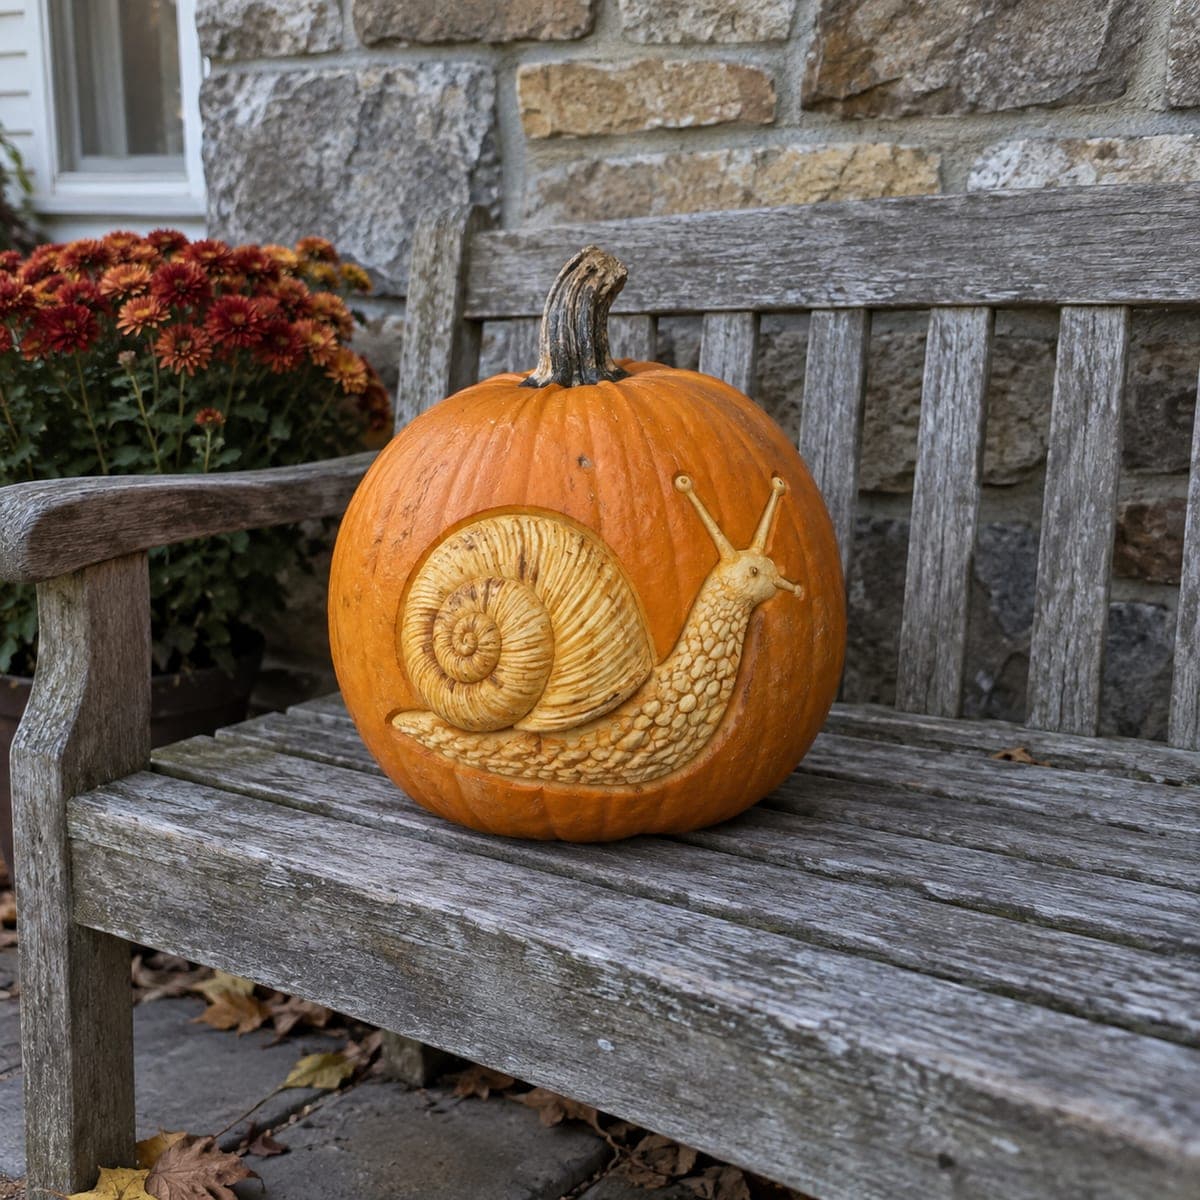
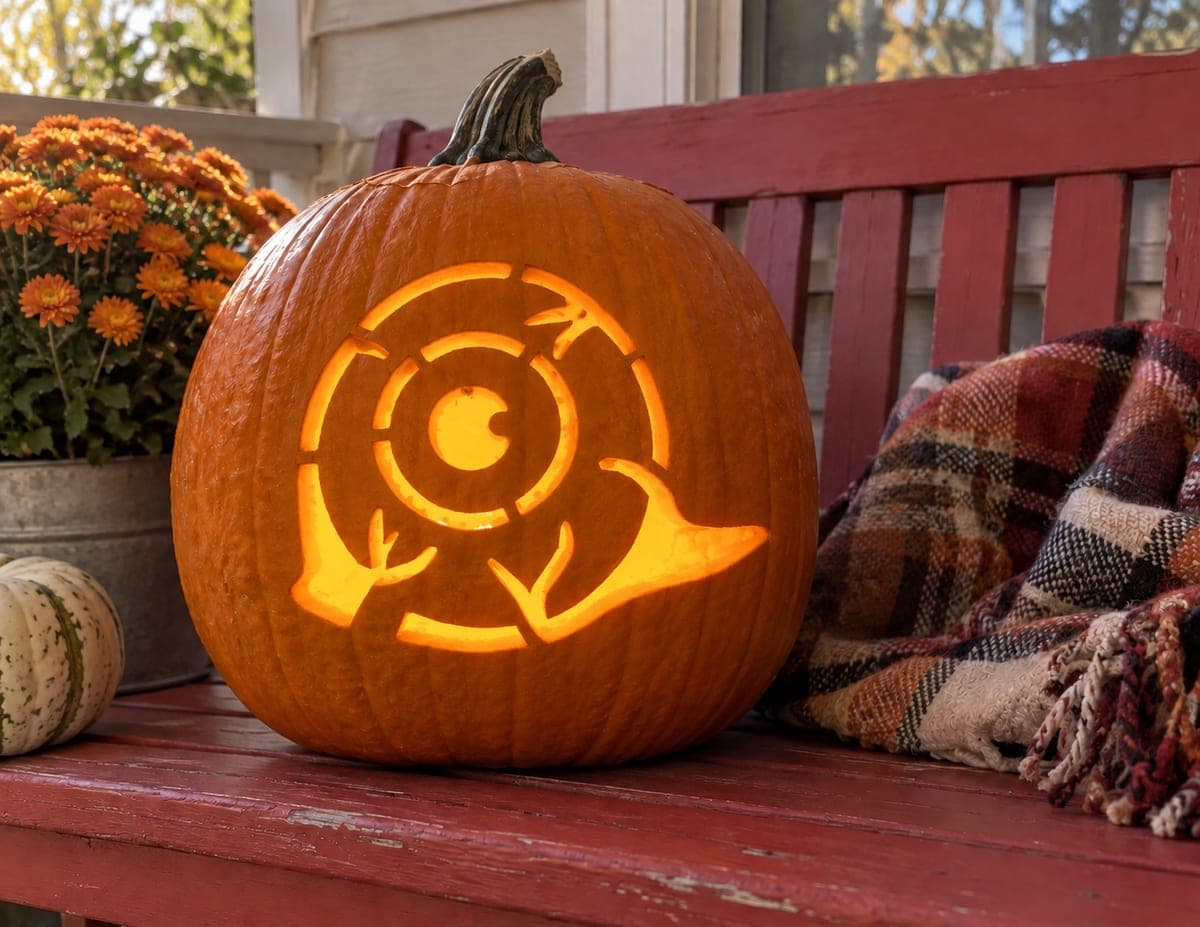
A snail is shown from a slightly elevated angle with a large circular shell made of concentric spiral bands and a long body stretching out below. The spiral bands within the shell are rendered as cut-through sections separated by narrow uncut rind lines in this pumpkin carving idea. Carve the outermost shell ring first, then work inward ring by ring toward the center so each successive cut is braced by the remaining outer rings.

This is an AI-generated concept image: a realistic, carvable design idea rather than a photo of a finished carve. AI concepts are always labeled and sit out the leaderboard and the contest.

No ratings yet · Sign in to rate
Comments (0)

  • No comments yet — be the first.

Save without an account. Sign in to like or comment.

Our tips for carving a similar design

The whole design leans on concentric rings that read as a spiral because narrow strips of uncut rind separate each cut band. The trick is to treat those thin rind lines as bridges that hold the whole shell together, and to carve the biggest rings first while the outer wall still braces everything. The snail body and antennae below are a single flowing cutout that anchors the shell.

Written by PumpkinCarvingIdeas.com, inspired by the image above. These are our suggestions, not instructions from the uploader. This approach to the AI concept has not been tested on a real pumpkin.

From pumpkin to porch

  1. Transfer the pattern and plan your bridges

    Print the snail stencil sized to fit the flat front of your pumpkin and tape it smooth with a few folds around the curve. Poke the outlines with a pin or transfer tool, paying close attention to the thin lines that separate each shell ring. Those uncut lines are structural bridges, so mark them clearly with a marker before you remove the paper. Step back and confirm the spiral reads correctly before any blade touches the surface.

  2. Open a lid and hollow the pumpkin

    Have an adult cut a lid in the back rather than the top so the front stays clean, angling the cut inward so the lid rests without falling through. Scoop out the seeds and pulp, then thin the front wall from the inside to about one inch thick. A thinner wall makes the many ring cuts easier and lets more light escape. Save your scooped pulp bin nearby to catch cut pieces as you work.

  3. Carve the outermost shell ring first

    Start with the largest outer band of the spiral and cut it through completely with a small keyhole saw or detail blade. Work slowly along both edges of the band, leaving the marked rind bridges intact between rings. Because you begin at the outside, the surrounding pumpkin wall keeps everything rigid while you cut. Pop the freed crescents out gently by pushing from the back.

  4. Work inward ring by ring

    Move to the next band in toward the center, again cutting the open sections and leaving the narrow rind lines untouched. Each ring you finish is still braced by the rings you have not cut yet, so the shell never gets floppy. Take your time on the tight inner curves and keep your blade close to vertical for crisp edges. Finish with the small center dot last, since it is the most fragile spot.

  5. Cut the snail body and antennae

    Outline the long body stretching below the shell and the two thin antennae reaching up. Cut the body as one open shape, but keep the antennae slightly thicker than they look on paper so they do not snap. Round the outer edges of the body cutout a touch for a softer, cuter look. Clear any clinging strings from the back of every opening.

  6. Light it and photograph

    Set a battery LED puck or a string of LEDs inside and close the back lid. Skip real candles, since the many bridges and thin antennae can scorch and weaken. Test in a dark room and rotate the light until the spiral and body glow evenly. Shoot your photo at dusk on a porch or bench so the warm light stands out against the fading sky.

Gather your supplies

Check things off as you get ready.

Work on a stable surface, keep your free hand out of the cutting path, and have an adult handle sharp tools.

Three levels of light

  • Leave intact

    The uncut rind lines between shell rings and the outer skin around the snail stay dark, defining the spiral.

  • Peel & shade

    Optionally shave the skin just inside the body outline for a soft dim halo that separates the snail from the shell.

  • Cut through

    The open bands of the spiral, the center dot, and the snail body are cut all the way through for the brightest glow.

Learn the carving basics

Before you start cutting

How thin can I make the lines between the spiral rings?

Keep each rind bridge at least a quarter inch wide, and a bit wider on the tight inner rings. Anything thinner tends to tear or collapse once the surrounding pumpkin softens. Wider bridges also read more clearly as a spiral from a few feet away.

Why carve the outer ring before the inner ones?

The uncarved outer wall acts as a brace that keeps the shell stable while you cut. If you started in the center, each new outer cut would remove support and the whole shell could sag or crack. Working outside in means every ring you finish is still held firm by the rings you have not touched yet.

This is an AI concept, so how do I keep the thin antennae from breaking?

Since no real pumpkin exists in the image, treat the antennae as the weak point and make them noticeably thicker than the picture suggests. Keep them attached to the body at the base rather than free floating, and avoid over thinning the wall behind them. If one feels fragile, add a tiny uncut bridge partway up for support.

Your take belongs here, too.

Changed a detail? Made it simpler? Share a photo of your version and tell the community what worked.

Share your pumpkin

More pumpkins like this

You've reached the end · 8 pumpkins
The Patch Report

Fresh pumpkins, in your inbox.

The best new carvings, ideas worth stealing, and how-tos for carving season. Short, seasonal, and gone by November.

A short email during carving season. Unsubscribe anytime. See our privacy policy.