Halloween Pumpkin Carving Contest · Starts October 1st · $500 in prizes
← Back to ideas
@ai_concepts
Sep 25, 2026
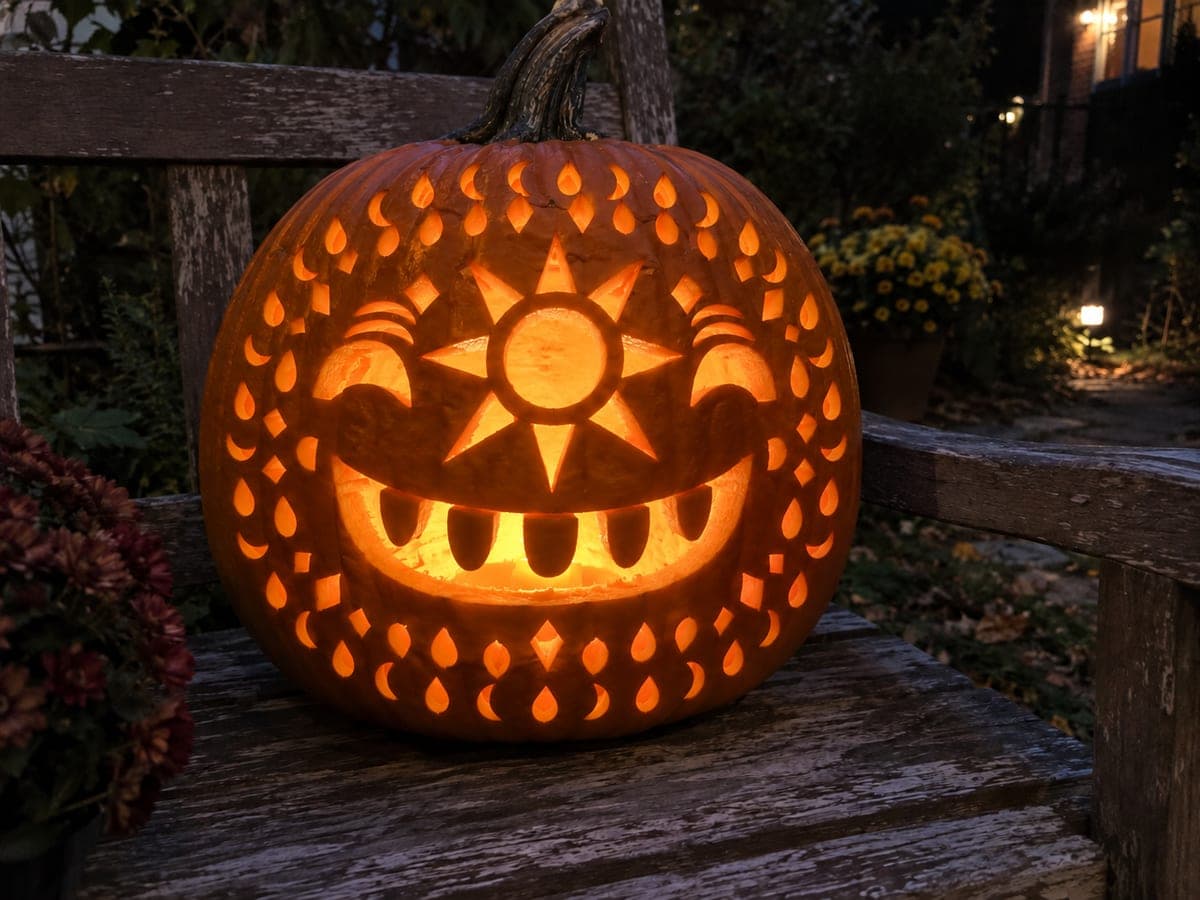
Sun Nose Pumpkin Carving with Ornate Cut-Through BordersAI
0

Report this carving

Tell us what is wrong. Reports are private.

Sun Nose Pumpkin Carving with Ornate Cut-Through Borders

A sun-shaped nose built from a central circular aperture surrounded by separate triangle ray holes, with rind connections between rays, anchors this expert pumpkin carving noses pumpkin carving idea, framed by crescent eyes, broad-rooted teeth, and two ornate cut-through borders of teardrops, diamonds, crescents, and brow holes. Cut each ray as an isolated triangle with rind connecting it to its neighbors, never as a continuous star shape. Displayed on a porch bench, the lit sun-nose glows like a separate lantern within the larger design.

No ratings yet · Sign in to rate
Comments (0)

  • No comments yet — be the first.

Save without an account. Sign in to like or comment.

Our tips for carving a similar design

The sun nose is constructed as a central circular aperture surrounded by isolated triangle ray holes, each separated from its neighbors by a narrow rind bridge. Cutting each ray as a discrete shape rather than a continuous star is essential to keeping the rind intact. The two ornate borders of teardrops, diamonds, and crescents frame the composition, but the sun is where the structural and visual complexity concentrates.

From pumpkin to porch

  1. Prepare a detailed template

    This design requires a printed, to-scale template. Draw or print the full layout including the sun nose, crescent eyes, broad-rooted teeth, and both ornate border sequences. Transfer the template with a pin tool so every shape and every rind bridge is marked before any cut is made. An hour spent in layout saves three hours of repair.

  2. Cut the crescent eyes and rooted teeth

    Begin with the crescent eyes, which are straightforward curves, then cut the broad-rooted smile teeth to establish the main face structure. Having the face features in place gives you a stable reference as you work the more complex nose and borders.

  3. Cut the central sun circle

    Pierce the center of the circular nose aperture and saw a complete circle. Take smooth continuous strokes; choppy saw movement leaves a jagged circle edge. Remove the waste piece from inside the hollow. Inspect the circle and trim any rough spots carefully.

  4. Cut each ray triangle individually

    Move to one ray triangle adjacent to the circle, pierce its center, and cut to each of its three corners, keeping the rind bridge to its neighboring rays intact. Never cut around the entire ray pattern as a star; always treat each triangle as a separate bounded shape. Work around the circle, ray by ray, checking each bridge after every cut.

  5. Cut the ornate border elements

    Work the two border rows from the least crowded end of the pumpkin toward the densest area. Cut teardrops, diamonds, and crescents one at a time with a detail blade. Brow holes and small round accents can be drilled. Keep at least a quarter inch of rind between every adjacent border element.

  6. Light and display on the porch bench

    Place a warm amber LED inside, centered to project toward the face. When displayed on a porch bench, the lit sun nose is visible from the street and looks like a separate lantern glowing inside the main design. Dusk is the ideal display time when both the painted rind and the glowing cuts are visible.

Written with AI to match this design

Gather your supplies

Check things off as you get ready.

Work on a stable surface, keep your free hand out of the cutting path, and have an adult handle sharp tools.

Three levels of light

  • Leave intact

    The rind bridges between ray triangles, the solid cheek regions, and all rind between border elements stay dark.

  • Peel & shade

    None; the design uses full cuts only.

  • Cut through

    The central sun circle, every individual ray triangle, both crescent eyes, the smile with tooth gaps, and all teardrop, diamond, crescent, and brow border holes are cut through completely.

Learn the carving basics

Before you start cutting

How narrow can the rind bridges between ray triangles safely be?

No narrower than a quarter inch. On a large pumpkin you can work comfortably at three-eighths of an inch, which gives the sun a pleasingly open look without fragility. Mark each bridge width on your template before transferring so you do not accidentally plan a bridge that is too thin.

Can I simplify the ornate borders to reduce cutting time?

Absolutely. Cutting only the teardrop border and omitting the second diamond-and-crescent row still produces a complex and beautiful design. The sun nose will remain the focal point regardless of how elaborate the borders are. Fewer holes also mean a sturdier pumpkin.

What is the best blade for cutting the small teardrop shapes in the border?

A short, stiff detail blade, sometimes called a clay or linoleum knife blade, gives the most control for small enclosed shapes. Pierce the center of the teardrop, cut to the narrow end first, then saw around the rounded base. Short blades flex less than long pumpkin saws, which reduces the chance of overcutting into an adjacent bridge.

Your take belongs here, too.

Changed a detail? Made it simpler? Share a photo of your version and tell the community what worked.

Share your pumpkin

More pumpkins like this

You've reached the end · 8 pumpkins
The Patch Report

Fresh pumpkins, in your inbox.

The best new carvings, ideas worth stealing, and how-tos for carving season. Short, seasonal, and gone by November.

A short email during carving season. Unsubscribe anytime. See our privacy policy.