Halloween Pumpkin Carving Contest · Starts October 1st · $500 in prizes
← Back to ideas
@ai_concepts
Sep 25, 2026
Diamond Nose Pumpkin with Four-Window Rind CrossAI
0

Report this carving

Tell us what is wrong. Reports are private.

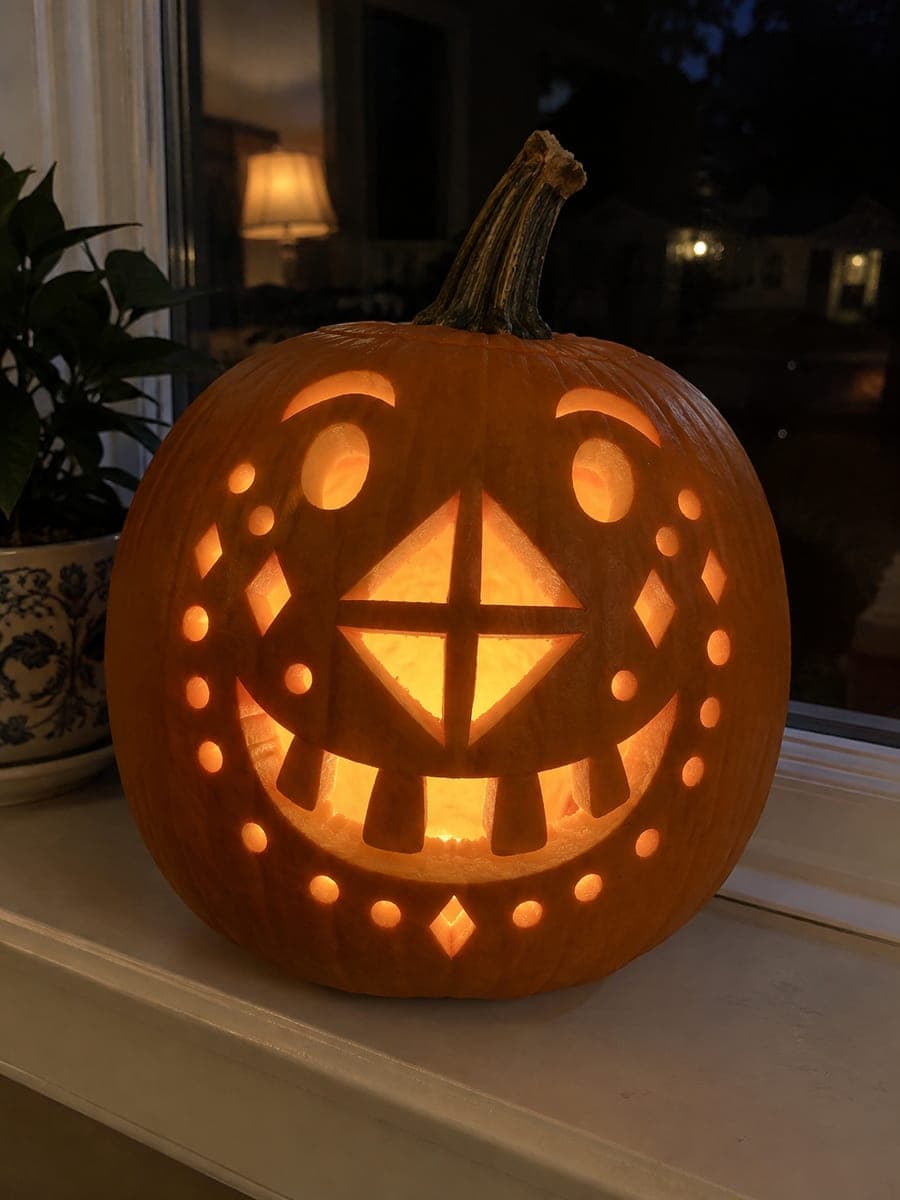
Diamond Nose Pumpkin with Four-Window Rind Cross

A large diamond-shaped nose divided into four triangular openings by thick crossing rind bars anchors this hard pumpkin carving noses pumpkin carving idea, which also features small oval eyes, two curved brows, a six-tooth smile, and eighteen round and diamond accent holes. Score the two crossing bar lines inside the diamond first, then remove each of the four triangular windows individually. All bar intersections must remain intact for the diamond framework to hold.

No ratings yet · Sign in to rate
Comments (0)

  • No comments yet — be the first.

Save without an account. Sign in to like or comment.

Our tips for carving a similar design

The diamond nose is a nose-within-a-frame built from four separate triangular windows separated by two crossing rind bars. Both bars must stay fully intact, so the technique is to score the crossing lines first, then remove one triangular window at a time. The six-tooth smile and eighteen accent holes are additional challenges that reward carvers who sequence the cuts carefully.

From pumpkin to porch

  1. Prep and layout

    Hollow to a consistent three-quarter-inch wall. Draw the diamond nose outline in the center of the face, then score the two crossing bar lines inside the diamond lightly with a blade tip. Also sketch the oval eyes, curved brows, six-tooth smile, and the eighteen accent holes so the whole composition is visible before any cuts are made.

  2. Score the diamond bars

    Deepen the two internal bar lines gradually, making four passes at increasing depth, until you can feel the blade nearly through the rind. Do not cut all the way through yet. This scored grid will guide window removal without the bars flexing out of position.

  3. Remove the four triangular windows

    Cut each triangular window individually: pierce the center of one triangle and saw to each of its three corners. The bar intersection at the center of the diamond must never be pierced. After each window, press the adjacent bars gently to confirm they are still rigid and fully attached.

  4. Cut the oval eyes and brow curves

    Saw each small oval eye in one continuous loop. For the curved brows, enter at one end, saw along the arc, and exit at the other end. Brow cuts are easier than they look because you only need to follow a gentle single curve.

  5. Shape the six-tooth smile

    Cut the broad smile aperture, leaving six broadly rooted teeth intact. Work from the outer corners toward center to keep the rind stable. The root of each tooth should be at least as wide as the tooth itself at its base.

  6. Add the accent holes and light

    Complete the eighteen round and diamond accent holes using a borer and detail blade, working outward from the main features. Install a warm LED centered in the hollow. The four glowing diamond windows in the nose will be the most striking element from a distance.

Written with AI to match this design

Gather your supplies

Check things off as you get ready.

Work on a stable surface, keep your free hand out of the cutting path, and have an adult handle sharp tools.

Three levels of light

  • Leave intact

    Both crossing rind bars inside the diamond, the rind between accent holes, and the solid cheek and forehead areas stay dark.

  • Peel & shade

    None; all effects come from full cuts.

  • Cut through

    All four triangular diamond windows, both oval eyes, the two brow cuts, the smile with all six tooth gaps, and all eighteen accent holes are cut through completely.

Learn the carving basics

Before you start cutting

If one of the diamond bars cracks, can I salvage the design?

A small crack in a bar can be stabilized by applying a strip of tape on the inside of the pumpkin wall directly over the crack. This will not restore full strength, but it can hold for a display night or two. To prevent cracks, always score gradually rather than forcing through in a single pass.

How wide should the crossing rind bars be?

Aim for at least half an inch of rind on each bar. Thinner bars look elegant but are much more prone to breaking during the later cutting stages. On a smaller pumpkin, scale the entire diamond down so the bar width remains at least half an inch.

The eighteen accent holes seem like a lot. Can I reduce the number?

Yes, eight to ten holes still creates a rich scattered-light effect without making the rind overly fragile. Focus on placing holes in an even distribution around the main features rather than hitting a specific number. Just ensure adequate rind between every hole.

Your take belongs here, too.

Changed a detail? Made it simpler? Share a photo of your version and tell the community what worked.

Share your pumpkin

More pumpkins like this

You've reached the end · 8 pumpkins
The Patch Report

Fresh pumpkins, in your inbox.

The best new carvings, ideas worth stealing, and how-tos for carving season. Short, seasonal, and gone by November.

A short email during carving season. Unsubscribe anytime. See our privacy policy.