Halloween Pumpkin Carving Contest Β· Starts October 1st Β· $500 in prizes
← Back to ideas
@ai_concepts
Sep 25, 2026
Oval Eyes and Crescent Smile Oblong PumpkinAI
0

Report this carving

Tell us what is wrong. Reports are private.

Oval Eyes and Crescent Smile Oblong Pumpkin

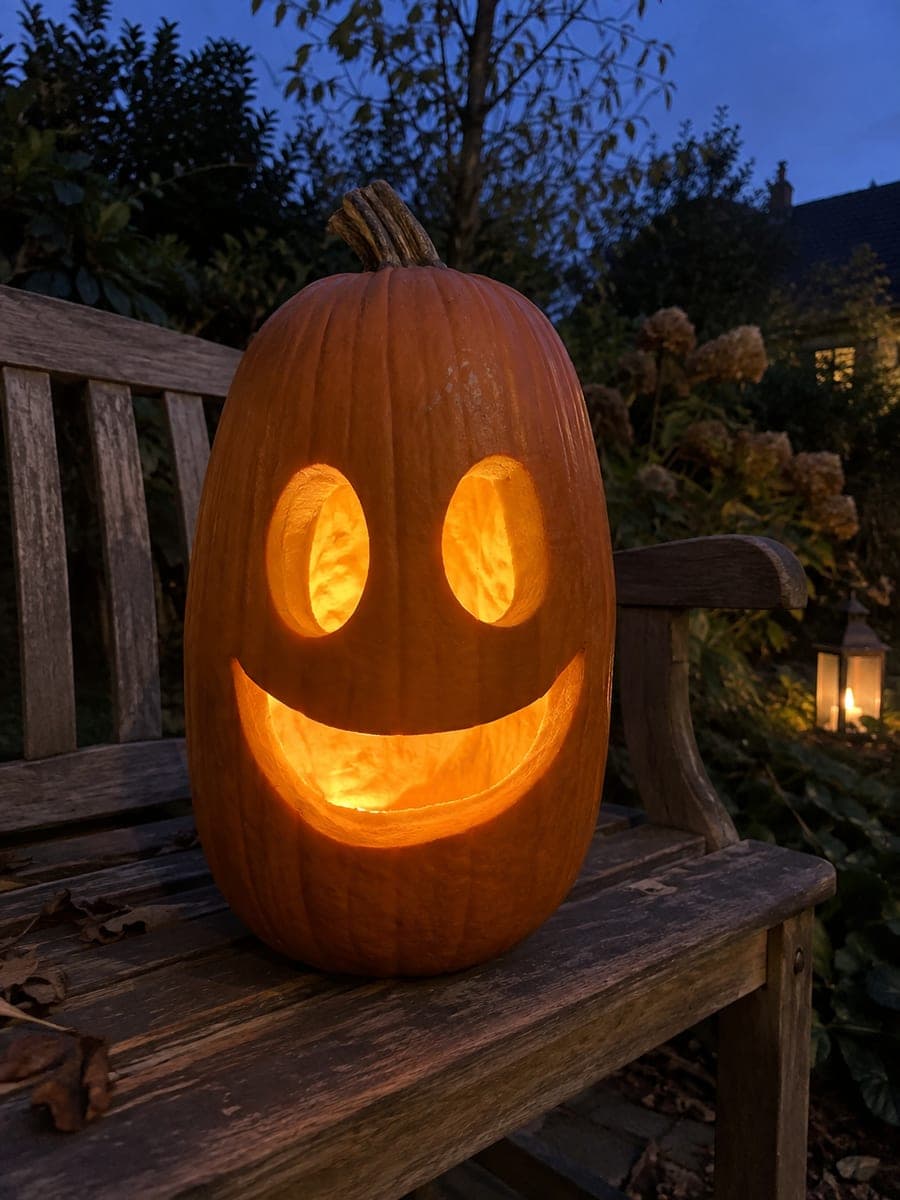
Two clean oval eye holes and a broad empty crescent smile are carved into this 40-centimeter oblong pumpkin for a face that emphasizes the shape's natural elongation. Ovals echo the curved sides of an oblong pumpkin better than triangles, so trace them to follow the longest axis of the face section. Cut the crescent smile with a single smooth sweep of a thin saw blade, pulling slightly downward on each end to sharpen the curve. On a garden bench at blue hour this oblong pumpkin carving idea glows with an easy, unhurried warmth.

No ratings yet Β· Sign in to rate

Comments (0)

  • No comments yet β€” be the first.

Save without an account. Sign in to like or comment.

Our tips for carving a similar design

Two oval eye holes and one broad crescent smile use the oblong pumpkin's elongated shape as a design feature, with the ovals echoing the curved sides of the shell. Cutting the crescent as a single continuous sweep delivers the cleanest curve. Three openings on an oblong pumpkin create a face that feels unhurried and confident.

From pumpkin to porch

  1. Prep the pumpkin

    Cut a back opening at the base for easy access rather than a top lid, which can be awkward on an oblong shape. Scoop to about 2.5 centimeters of wall thickness throughout. The oblong shape concentrates more flesh toward the center, so check thickness there as well as at the sides.

  2. Trace the oval eyes

    Draw two oval shapes in the upper third of the face, each about 6 centimeters long on the horizontal axis and 4 centimeters tall. Align them so their long axes follow the oblong pumpkin's natural horizontal stretch for a face that looks at home on the shape.

  3. Mark the crescent smile

    Draw a broad upward-curving crescent in the lower third of the face. The crescent should span roughly half the pumpkin width and be about 3 centimeters tall at its deepest point. Mark both the outer arc and inner arc of the crescent before cutting.

  4. Cut the oval eyes first

    Use a thin serrated saw to follow each oval outline. Keep the blade perpendicular to the curved surface as you work around the shape. Push each oval plug inward cleanly.

  5. Cut the crescent smile

    Cut the outer arc of the crescent first with one smooth sweep of the saw blade. Then return to cut the inner arc, which follows a tighter curve. The wedge of rind between the two arcs is the plug; score it free and push it inward.

  6. Light on a garden bench

    Place the pumpkin on a garden bench at blue hour with an LED tea light inside. The soft natural backlight from the fading sky adds depth to the orange glow. Position it so the oval eyes are visible from the approach path.

Written with AI to match this design

Gather your supplies

Check things off as you get ready.

Work on a stable surface, keep your free hand out of the cutting path, and have an adult handle sharp tools.

Three levels of light

  • Leave intact

    All rind above, below, and around the face openings stays solid and dark.

  • Peel & shade

    None. This design uses only full cutouts.

  • Cut through

    Both oval eye holes and the broad crescent smile are cut completely through for full glowing light.

Learn the carving basics

Before you start cutting

How do I trace a clean oval on a curved oblong surface?

Use a grease pencil and draw freehand in two arcs, top and bottom, connecting them at the ends. A slightly imperfect oval reads as charming rather than sloppy on a natural pumpkin surface. If you want more precision, cut an oval from card stock and trace around it.

The crescent smile has two cuts. How do I keep them from meeting in the wrong place?

Mark both ends of the crescent clearly before cutting either arc. Both arcs must start and stop at the same two points. Cut the outer arc first, then use those same endpoints as anchors for the inner arc.

Will an oblong pumpkin stay stable on a flat bench?

Oblong pumpkins sometimes roll if the base is rounded. A small square of non-slip mat or a folded cloth under the base keeps it steady. Alternatively, a shallow wooden ring cut from a paper towel tube holds the pumpkin upright on any surface.

Your take belongs here, too.

Changed a detail? Made it simpler? Share a photo of your version and tell the community what worked.

Share your pumpkin

More pumpkins like this

You've reached the end Β· 8 pumpkins
The Patch Report

Fresh pumpkins, in your inbox.

The best new carvings, ideas worth stealing, and how-tos for carving season. Short, seasonal, and gone by November.

A short email during carving season. Unsubscribe anytime. See our privacy policy.